At Divi Lover, we believe that knowing custom CSS is the key to creative freedom in web design. That is why Ania’s tutorials mostly deal with achieving various effects using custom CSS in Divi.
But what if you are a total beginner who, after watching even the best tutorial, is still left with more questions than answers? If that is you, we have great news! This article will answer all the beginner questions about custom CSS - and there is also a beginner guide video that you can watch to learn even faster!
The video beginner guide to custom CSS in Divi
This article is very long because we wanted to cover all the most important basics of using custom CSS in Divi. This guide was compiled using various materials, but the bulk of the information was prepared using beginner CSS lessons from Ania's Divi Stylist Academy, which teaches Divi web-design in depth.
If you prefer to watch a video rather than read, the video tutorial covers the same topics as this article, and more. And if you're only interested in a specific topic, we've included a table of contents for your convenience.
Ready to jump in? Let’s go!
What is CSS?
CSS actually stands for Cascading Style Sheets. It is a coding language that is used for styling and designing the layout of a website. So the way the website looks will be largely attributed to CSS - while HTML, another coding language, is primarily responsible for the content and structure.
When you’re using Divi to design your website, you are also using CSS, although not directly. While you’re designing in the Divi Builder, your design is actually saved as CCS - and other types of code.
Do you need to know CSS for Divi?
Of course, the fact that you’re reading this means you are already interested in learning CSS. This is awesome and we are not going to discourage you, no worries! You can skip this paragraph entirely and start learning right away.
But you might still be wavering - or maybe you just have so much on your plate that learning a coding language would be difficult to squeeze into your schedule. And if this is you, this step should help you decide whether to invest your time into learning CSS or not.
First of all, Divi has robust capabilities that should help you build a fantastic website without ever using custom code. So if you aren’t Divi-fluent yet, it might be worth it to check out Divi documentation from Elegant Themes to see what exactly Divi can and cannot do for you. It is possible that some of the effects you’d like to achieve are possible with Divi alone - and then, you won’t need CSS.
Secondly, while we generally discourage using too many plugins (conflicts and slow performance being the main issues when you rely on too many plugins), you might consider installing a plugin that will add some functionality to Divi for you.
Our Divi Toolbox, for example, adds a ton of features to your Theme Customizer, which normally would only be possible with custom CSS. So if you have little time or mental resources right now and would rather skip learning an entire coding language, this is an option worth considering.
But maybe you’ve already explored all the possibilities Divi offers and felt frustrated because they were too limited for you? And maybe you’ve tried some of the Divi-enhancing plugins and still found them lacking? Do you have creative, detailed design ideas and feel stumped and limited when you’re trying to implement them with Divi alone?
If that is you, congratulations! It means you’re ready for your CSS journey to begin!
Semantics and syntax of CSS
CSS is a language, and as such, has certain semantics (signs and meanings) and syntax (“sentence” structure). To learn the semantics of CSS, you would have to learn the names of CSS properties and their meanings, and there are some excellent resources for that which we will link below in the Resources section.
But just to give you a quick example: the CSS property background-color will mean - you guessed it - the color of an element’s background. Mostly, CSS property meanings are quite straightforward.
Selectors are a different matter, though. For example, here are some CSS class selectors you might see in Divi: et_pb_row, et_pb_module, or menu_item_type_post_type. Not as clear as the above example, but still legible.
If you’re scratching your head right now, don’t worry! We’ll explain what CSS properties and selectors are below. And rest assured: as your journey with CSS progresses, you will soon understand everything. CSS is a logical language, and as soon as you understand the rules, you will find it easy to read and analyze.
CSS syntax
Semantics deals with meanings, and syntax - with structure. Let’s take a look at the basic CSS ruleset structure.
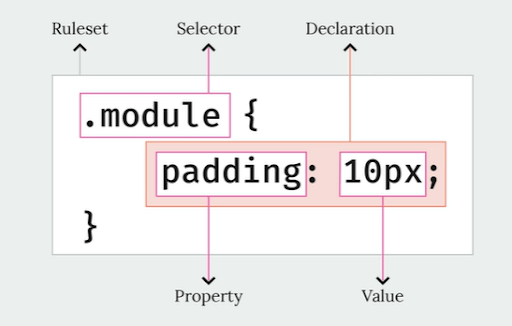
A ruleset is a complete unit of code instruction - a sentence, if you will. It contains information about the element you want to target, the properties you want to modify, and the values you want to apply.
First, we need to choose the selector - the element you want to target. In this example, the selector is an element with the class .module. After the selector is defined, we open a set of curly braces and put in the property, in this case, padding. After a colon, we will put in the correct value - so here, the padding will be 10 pixels.
And after one property-value pair, we should put in a semicolon. This signifies the end of the property-value pair, and after the semicolon, we can include another property-value pair - as many as we need.
When that is done, we need to close the curly brackets. And this is your basic CSS ruleset.
CSS formatting
So, if CSS were a language like English, the ruleset would be the equivalent of a sentence. And sentences are normally organized into paragraphs - and you can do that with your CSS, too.
There are no strict rules about how to organize the order of your rulesets (unless there are specificity problems, which we’ll touch on later) but it is still a great idea to have your code organized somehow.
One idea is to use comments to define the part of your website the portion of the code applies to. To make a comment, we start with /* put our comment here, and close with */. This is an example of what that would look like:
/* Header Styling */

ul li {
    padding: 10px;
    color: #ddeedd;
}

div.main {
    border: 1px #000 solid;
    margin-bottom:20px;
}
For better readability, you can also separate your properties with line breaks, like in the example above. Or you can keep each ruleset in one line - whatever works for you! The important thing is to stay organized and make your code as legible as you can. If it’s easy to read, you will also more easily catch any stray or missing characters that are likely to mess up your code.
CSS selectors
This is a complicated topic, so we’ll focus on the basics. Remember how we said CSS is used to style the website, while HTML is used to provide content? Well, a selector is how you connect the styling properties with the target content element.
Your selector can be simply an HTML tag, so for example, you could target all h1 elements with an h1 selector. You can also target IDs and classes, where a class will be preceded by a dot, for example .module, and an ID will we preceded by a hashtag, for example #featured.
Choosing the right selector can be tricky. For example, if your selector is h1, all your h1 headlines will be affected. That is why, to properly target elements, you’ll also be using IDs and classes, and you’ll often combine a few elements into one selector, to make it obvious what exactly the target is.
Look at the example below. Here, we are targeting all elements that have the ID #featured, the class .content, and the class .sticky. This is important when we want to be very precise about which element(s) we’re targeting.
#featured.content.sticky {
    color: lightsalmon;
}
This is an example of a CSS selector comprising various elements without spaces.
Classes and IDs
So, what exactly are classes and IDs? We already know that a class is preceded by a dot, and an ID is preceded by a hashtag (while HTML tag selectors will not be preceded by anything). Another difference between the two is this: the same class can be assigned to multiple elements on the page, while any given ID can belong to only one element on one page.
And similarly, one element can have many different classes, but only one ID.
IDs therefore, are rarer and more specific: if there is only one ID of a given name on the entire page, this ID will be fairly unique and specific, right? We’ll return to this point in the CSS specificity section.
For now, let’s say you have a class .module. Multiple elements on your page can have this class. And let’s say you have an element with an ID #featured. Only one element on your page can use this id. If you want to assign IDs to other elements on the same page, they need to have different names.
Now, how are they assigned? There’s good news: you get to decide what your classes and IDs will be called. In other words, you assign them. Now, in HTML, this is done like this:
<div id="main-content">
	<article id="featured" class="content sticky">
		<h2 class="post-title">Article title</h2>
		<p class="content">Sample content</p>
	</article>
</div>
Note that the article element has two classes separated by a space: class content and class sticky.
So inside the opening tag of your HTML element, you will assign the id and/or class. You can assign multiple classes to one element and use a space to separate different classes. The names are up to you, and it is also up to you to make them reasonable and easy to find.
Custom CSS in Divi: Classes and IDs
Now, with Divi, the case is a bit different. The classes are already assigned to elements, but you can name your own IDs or assign additional classes.
Now, how do you find out what an element’s class is in Divi? One way to do that is to open the settings of the module you’re interested in and go to the Advanced tab. Here, if you choose Custom CSS and scroll down to the Main Element section, you can check the element’s Divi-assigned class.
To do that, click the question mark icon. It will display the proper class for that element.
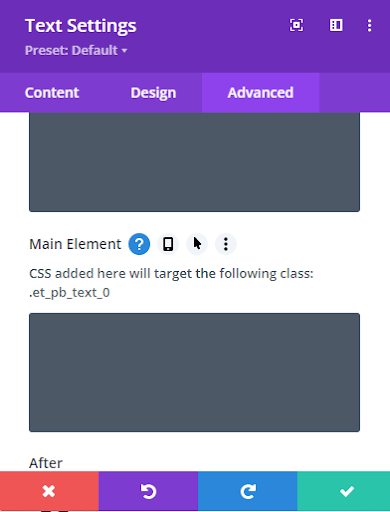
The class .et_pb_text_0 means that this is the first text module that appears on the page. The next one will be assigned the class .et_pb_text_1, and the next .et_pb_text_2, and so on. These classes are dynamic, which means that if you change the order of your text modules, the classes will also change to reflect that order. This is why using this class outside of the Advanced tab (where the class is pulled dynamically and will change if you rearrange your text modules) can be problematic.
And what follows here: when you’re using the Custom CSS section in the Advanced tab of a module’s settings, you do not need to include your selector - this is already done. Instead, in this tab, you only need to put in the property and value. You don’t need the curly braces, either.
This means that if you rearrange the order of your modules in any way, the CSS will not break, as the selectors will change automatically to reflect the new order.
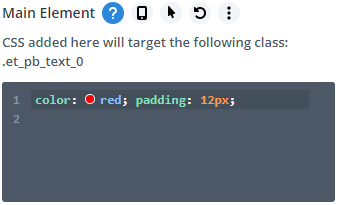
This is just a simple example to show you the correct way to input the CSS, since these properties can be easily changed with Divi.
The module settings’ Advanced tab is also where you can assign a custom ID or another class to an element. Simply go to CSS ID & Classes and put in your custom class or ID. Be careful with the spaces! If you use a multiple-word name, avoid spaces, because then the name will be treated as two separate classes. Instead, you can use a hyphen, for example: my-heading.
CSS specificity hierarchy for beginners
When you’re using CSS, some elements will take precedence over others, and this may lead to some confusion and issues. So, here are the basic rules governing the priority of CSS elements.
The specificity order of importance
We’ll examine what elements take precedence, for example, if you target two different selectors with the same property and different value.
First, inline styling will have the highest priority. It’s not likely that you will use inline styling with Divi, but just to cover all our bases, here is what we mean.
If you’re editing your website’s HTML, you can add the style attribute in line (hence the name inline styling), for example: <h1 style=”color:blue;”>Your H1 content </h1>. This kind of code will always take precedence. The second tier of CSS hierarchy is the ID, and we will explain this in more detail below. The third tier is for classes and pseudo-classes, and the fourth, so the least important, is for elements and pseudo-elements, so for example h2 element or a ::before pseudo-class.
CSS code order
The order of the elements will matter in only one case: if you have two almost identical rulesets with different values. For example, let’s say you have set the color for your h2 headings twice, with one value being green, and the other being purple.
h2 {color: blue;}
h2 {color: purple;}
When two identical rulesets differing only in value appear, the one lower down in the code will take effect.
What will happen is, the second ruleset will apply. CSS will assign the higher priority to the ruleset that is lower down in the code.
Obviously, we do not want to include such contradicting instructions in our code, but sometimes errors will happen, so if you’re seeing issues with your code behaving strangely, it’s worth checking for duplicates or contradicting rulesets.
Similarly, if you targeted the same class with two contradicting rulesets, the one lower down will apply.
CSS ID vs class specificity
Remember how we talked about IDs being more specific than classes? That is because there can be only one ID on a page, so a particular ID will refer to only one element, while a class can refer to multiple elements.
This means that if you have an element that has a certain class and a certain ID, and you assign different properties to the class and the ID, the value specified for the ID will apply.
In the example below, we have two h2 headings, and each has the class .heading. We have also assigned an ID to each heading. Now, if we target the class with the property: color and value: blue, both headings with this class will change color.
<h2 class="heading" id="first-heading">Sample heading (blue)</h2>
<h2 class="heading" id="second-heading">Sample heading (blue)</h2>

<style>
	h2.heading {color: blue;}
</style>
However, if we add another ruleset, this time targeting one of the IDs, and assign a different value to the color property, this will trump the ruleset targeting only class. That is because an ID carries more weight than class, and thus, will take priority.
<h2 class="heading" id="first-heading">Sample heading (purple)</h2>
<h2 class="heading" id="second-heading">Sample heading (blue)</h2>

<style>
	h2.heading {color: blue;}
	h2#first-heading {color: purple;}
</style>
To reiterate: both headings have the class .heading, and so, both are targeted with the styling changing text color to blue. However, when we introduce another ruleset to change the text color to purple, and we target that element’s ID, this ID-targeting ruleset will trump the class-targeting one, even though the element still has the class .heading.
If this is still unclear, give the video tutorial for this guide a watch. This is much easier to understand when you can watch a demonstration.
CSS parent and child elements
There are a lot of familial relations in coding languages and web design (child themes, anyone?). There are parent and child elements, and you might also hear about inheritance rules - because parent elements can pass their traits on to children.
So, what are parents and children in CSS?
A parent element is one that contains other elements - the children. Let’s say we have a div element with a class .my-text and ID #special. This element can contain other elements, in this case an h2 element and a p element.
The div element is the parent, and the h2 and the p are its children.
<div class="my-text" id="special">
	<h2>Sample heading</h2>
	<p>Lorem ipsum dolor sit amet primis sagittis. Nostra platea in sagittis at etiam.</p>
</div>
Notice that while the parent element has a class and ID assigned, the children don’t. This might be a problem if, for example, we wanted to target this particular h2. If we wrote a ruleset with the selector h2, all h2 elements on your page would be affected, right? And we don’t want that.
The solution is not to assign a class or a separate ID to every single element, thankfully. We can target a specific child element by using the class or id of its parent element.
So to target this h2, our selector would be #special h2. We need to start with the parent element attribute, and we will choose the ID to be more specific (unless you wanted to target all h2s contained within parent elements with the class .my-text, for example - then we would target the class).
The parent element’s ID will be followed by one space to indicate the parent-child relationship. And then we will specify the element we want to target: h2.
#special h2 {
    border: 3px #ef7f7f solid;
}
In the above example, the selector is the parent id #special, followed by the child element h2, and inside the curly brackets, we included properties and values for a border around the h2 heading.
The space is very important for indicating parent-children relationships in CSS. If we didn’t add the space, we would end up with the selector #specialh2, which would target an element with the ID specialh2. That would be invalid for our goals.
Just to review quickly: you might use a selector without spaces, for example h2#special to target an element which is an h2 and has the ID #special. It would not work for the example above (where the h2 doesn’t have an ID, only its parent does), but it would work if you wanted to target an h2 element with that ID.
CSS in Divi for beginners
And now that we know the most important CSS basics, let’s look at our options within Divi.
First of all, we will recommend different approaches depending on how much CSS you’re going to use, basically.
You might only want to do a few CSS customizations. So, for example, you were able to achieve the look you wanted with Divi alone, and you only need a few custom tweaks: maybe add a few global rulesets to apply to your entire website, and maybe one or two more for a specific page. If that is you, we would recommend you use the designated CSS spaces within Divi.
Where to add CSS in Divi?
For global rulesets that you want to apply on the entire website, the best place to add your code is Divi Theme Options -> General -> Custom CSS. Alternatively, you can access the same functionality through Theme Customizer -> Additional CSS.
They will both display your global custom CSS, so if you change something in the Theme Customizer, for example, the change will appear in the Theme Options.
Global CSS in Divi: when to use it?
One easy way to use global CSS in Divi is to target a certain class. For example, we want to add a very special text effect to some of our headings. We might call the class my-text and write the code for this effect in Divi Theme Options:
.my-text h2 {
    border-bottom: 2px #fef7f7 solid;
}
Next, when we want to apply this effect to a heading, we simply open the Text module’s settings, go to the Advanced tab -> CSS ID & Classes and add the class you’ve assigned - in this case, my-text - to the module. This will apply the CSS effects instantly to all headings level 2 inside the module with a class my-text.
This is a simple tweak that doesn’t require many lines of code, so the CSS box in the Divi Theme Options will be perfect.
CSS for customizing one page in Divi
We have a few options here. We can use Page Settings (click the gear icon in the purple menu in the Divi Builder) to put in custom CSS in the designated box. The code included there will affect the entire page, so you can use it to target elements visible on that particular page.
You can achieve the same thing by adding a Code module to your page. Simply add a new module anywhere on your page and paste your code in there.
If, however, you want to customize something smaller, like a section, a row, or a single module - each of these elements can be targeted with custom CSS. Go to your section’s, row’s, or module’s settings -> Advanced -> Custom CSS and put in your declarations (properties and values).
Remember: in the Divi Builder element’s Custom CSS box, we can’t put in a selector or the curly braces - only declarations!
Exporting pages or elements with custom CSS
Let’s say you want to export a page layout into the Divi Cloud - or save it as a JSON file to share. There is one important detail to be aware of, namely: if you add your custom CSS to your page settings, it will NOT be exported with the layout.
To make sure your custom CSS is safely included in the layout, you need to add it inside a Code module.
Also, if you’re saving or exporting a section or a row, you can simply place the Code module inside the section or row to make sure it’s exported as well.
Where to place advanced custom CSS in Divi?
The options we described above are all suitable for situations when little code is needed - or for when you’re only building one page or a layout.
But what to do when you want to try something more advanced, modifying an entire website with, say, hundreds of lines of code? That little box in the Divi Theme Options might not be enough for that - and it wouldn’t be convenient to use.
In this case, our preferred method is creating a child theme to store all our code in its style.css file. This has numerous benefits: for one, all the code is kept in one place, and you never have to wonder where that bit of CSS went - it’s in the file, and the file can be searched. Two, you can edit the code conveniently in a code editor. Three, you can easily update the file through FTP - or you can access it directly from your WordPress dashboard -> Appearance -> Theme File Editor. Four, placing your code inside a child theme (as opposed to placing it directly inside the Divi Theme files) protects it from being overwritten when the theme is updated.
To learn more about child themes and find out how to create one (or download one for free!), check out our Divi Child Theme Beginner Guide.
And if you’ve been wondering how to edit your website’s PHP code, this can also be done through a child theme - or through a functionality plugin, which we explain in this article.
Divi Lover Recommends: Best Free CSS Resources
Have you read our entire guide? Congratulations! It was really quite long and detailed. If you’d like to supplement your knowledge with a tutorial on using the Chrome Inspector to analyze and test out your code, head over to the accompanying video beginner guide for using CSS in Divi. It’s also a great idea to give it a watch to see all the rules we described here in action!
And if you’re hungry for more, here are some excellent free resources to continue your journey with CSS!
W3 Schools - Practice your CSS
www.w3schools.com
If you’d rather forego the theory and focus on practical skills, W3 Schools will be an excellent resource! With a vast index of CSS topics to explore, the platform covers all important topics with minimal written explanations and numerous practical examples and exercises. You can also practice your skills live in their online code editor.
MDN Web Docs - Learn more CSS
developer.mozilla.org
An open-source, free, professional learning platform for web-designers, MDN Web Docs is a kind of web-design Wikipedia. Head there to find clear definitions and learning guides for CSS, HTML, JavaScript - and a great guide for making web design accessible to all.
CSS Tricks - Advanced CSS effects
css-tricks.com
CSS Tricks is a treasure trove of CSS guides, tutorials, and all things web-design. The website is full of excellent, inspiring content, so definitely have a look around.
Divi Lover’s 5-Day CSS and Divi Challenge
css.divilover.com
Unlike the above resources, which are available 24/7, this challenge is time-limited. We run it once or twice a year, and it’s an excellent live course where you get to learn the CSS basics while practicing your skills with fellow CSS learners. Ania also runs daily live meetings, where you can ask all your CSS questions!
To sign up for the waitlist, click the link above.
Divi Lover's CSS tutorials
And of course, we couldn’t forget to mention Divi Lover’s tutorials! Always available as a clear video walkthrough as well as a written version with code snippets available to copy and paste, our tutorials tackle various effects that you can achieve with custom CSS on a Divi website.
Here are a few examples of our Divi custom CSS tutorials:
How to Add Underline Hover Effect to Divi Menu with CSS
How to Add a Fixed Bubble Popup Link to Divi
How to Use CSS Grid within the Divi Builder
FAQ: Answering your questions about CSS in Divi!
If you don't find an answer to your beginner questions about CSS in Divi in this article, ask them in the comments, and we'll do our best to update the FAQ section.
How do I find my custom code in Divi?
This depends on how you’re inserting your custom code in the first place. So if you’re using the Divi Theme Options Custom CSS field, you can search it using Ctrl+F (Cmd+F on Mac).
If you want to find a Code module, you can quickly locate it on a page using the Layers search option. Click on the little gray Layers icon in the Divi Builder purple menu. In the Search Layers setting, choose +Filter and then Codes. You will get a list of all the Code modules on the page.
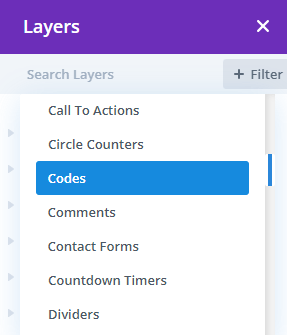
We aren’t aware of any way to filter for modules which have CSS put in their Advanced tabs, unfortunately - so if you know one, please share in the comments!
And if you’re using a lot of code, even these simple strategies can prove time-consuming. And then, the best way is to use a child theme (which we explain in this article), where all your custom CSS will be contained within a single file, easy to search and edit.
Can I get away with using code snippets without any CSS knowledge?
Of course, you can! But be aware that knowing even just the basics of CSS (how to read it, for example) can save you a lot of trouble if something goes wrong. Not to mention that when you know what you’re doing, you will also be saving a lot of time. So knowing the basics definitely helps, even if you’re only going to use tutorials and copy and paste snippets.
Do you have any questions?
We hope this complete CSS for Divi beginner guide will help you start your CSS journey on the right foot! If you have any CSS and Divi questions, fire away! We’re here to help you build beautiful websites, and we believe asking questions is a crucial part of learning.


How do you reference property or variable values in Divi’s CSS Class or CSS ID fields?
For example: One popular plugin (Divi Filter) requires specifying a category name after “dfc-” in the CSS Class field. How do we do that?
Excellcent. Very well-written and well-explained. Looking forward to reading all of your material.
Really nice explanation. I wonder if I should translate this text into German and make it accessible somewhere.
I could follow all explantions here, but one thing does not work for me in Divi. If I add my own code into the Divi custom CSS in the main Divi menu and assign my custom class to a module, it just does not work. Other CSS code items from the web work. How do I debug this?
Excellent explantion! thanks
Ania,
Excelent post.
cheers from Madrid.