What is a WordPress Functionality Plugin?
A functionality plugin is a plugin like any other plugin you can find in the WordPress repository. The one difference is that it wouldn’t be available for public distribution, because it is specific to your site. The plugin wouldn't have any settings page in the dashboard - it would just hold your own custom code.
When working on your website, you’ll often find tutorials asking you to add certain code to your theme’s functions.php file, and the functionality plugin is where you can place your PHP code snippets that would normally go into the functions.php file.
Why use a site-specific plugin?
The first reason is simple: if you change themes, you lose all of the functionality with it. A functionality plugin will allow you to change your website's theme without losing all of your tweaks and customizations.
And for Divi Theme users there is a second reason: Premium Child Themes. You need to use a child theme if you want to add PHP code to the functions.php file - you should never edit that file directly inside the Divi theme folder - your changes would be removed with the Divi update. So if you are using a simple child theme then you can keep your code in your functions.php file, but some premium Child Themes (including our own Child Themes for Divi) - come with their own automatic updates process. That means that you shouldn't edit the child theme files. You should keep your custom CSS in the Divi Theme Options and you can create a simple plugin to include any additional functionalities that require PHP.
A third reason might not be very important, but if you're making websites for clients - building a custom plugin with their company name will surely make you look like a pro! I've had many clients complementing my work and getting excited by having their own plugin, so there's that...
How to make a WordPress plugin?
If you haven't created a WordPress plugin before, don't worry. If you've made changes to your functions.php, then you can handle building a plugin and it is a great way to gain some experience.
Step 1 - create the plugin folder
Create a new directory inside the /wp-content/plugins folder on your server. You can name the directory whatever you like, but avoid using special characters and numbers (dashes and underscores are fine). I'd suggest going with something like mywebsite-functionality.
Note: If you'd like to work locally, you can create the plugin files on your computer and once you're done, ZIP the folder into a file and upload it like any other plugin.
Step 2 - create the plugin file
Next, create a new file inside the directory, a PHP file with a similar name as the folder - something like mywebsite-functionality.php will do the trick.
Step 3 - include the plugin header
Your plugin file needs specific header code so that WordPress will recognize it as a plugin. Here’s an example to get you started.
<?php

/*
 * Plugin Name:		My Functionality Plugin Name
 * Description:		This is a short description of what the plugin does. It's displayed in the WordPress admin area.
 * Version:			1.0
 * Author:			Your Name or Your Company
 * Author URI:		https://example.com/
 * License:			GPL-2.0+
 * License URI:		http://www.gnu.org/licenses/gpl-2.0.txt
 */
You don't need to include all these elements, the plugin name is the only required part for this to work.
That's it - now you can activate your plugin
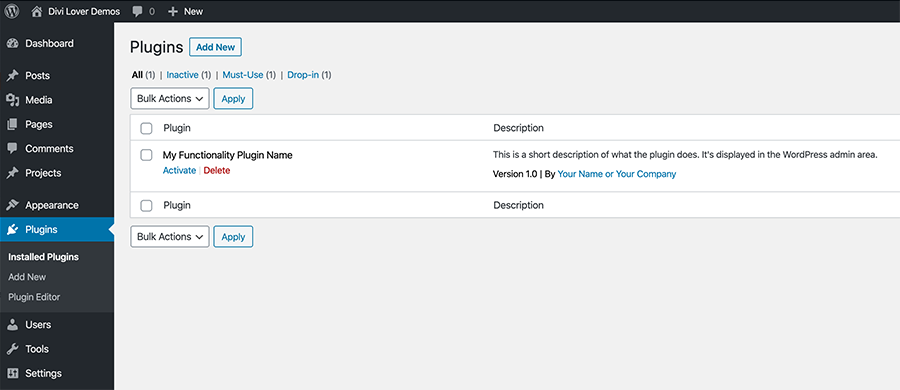
Once you save the file you're new plugin will appear in the WordPress dashboard and you should be able to activate it:
Right now the plugin doesn't do anything, but once you start including your code snippets - your code will work the same as it would be placed inside the functions.php file.
Adding HTML, CSS and JS to the plugin
Let's add some simple functions to see if our plugin works:
// CTA Fixed Button
 function dl_fixed_button () {
	 ?>
	 <a href="#" class="dl_fixed_button">Click Me!</a>
	 <?php
 }
 add_action ("wp_footer", "dl_fixed_button");
This code adds a link with a CSS class of dl_fixed_button to the footer of your website. Now, let's add some CSS to style the link:
.dl_fixed_button {
	display:inline-block;
	background:#fc63f7;
	color:#fff;
	padding:10px 15px;
	font-size:12px;
	font-weight:bold;
	position:fixed;
	z-index:99;
	bottom:10px;
	left:10px;
	text-decoration: none;
}
I'm creating a new "assets" folder inside my main plugin directory and I'm saving this CSS code in a new file called style.css, so the path to my file is mywebsite-functionaliy/assets/style.css
Now, to load this CSS we need an enqueue function in our main PHP file:
// Load the CSS
function dl_enqueue_assets() {
	wp_enqueue_style( 'functionality-styles', plugin_dir_url( __FILE__ ) . 'assets/style.css' );
}
add_action ("wp_enqueue_scripts", "dl_enqueue_assets");
If you'd like to include a JavaScript code you can use the same function to load a file called scripts.js:
// Load the CSS and JS
function dl_enqueue_assets() {
	wp_enqueue_style( 'functionality-styles', plugin_dir_url( __FILE__ ) . 'assets/style.css' );
	wp_enqueue_script( 'functionality-scripts', plugin_dir_url( __FILE__ ) . 'assets/scripts.js', array('jquery') );
}
add_action ("wp_enqueue_scripts", "dl_enqueue_assets");
We can also structure our functionalities better and move the code snippet which adds a button to a separate file called cta-fixed-button.php and load this file using the "include" function in our main plugin file, like this:
include('cta-fixed-button.php');And the cta-fixed-button.php file would look like this:
<?php

// CTA Fixed Button
 function dl_fixed_button () {
	 ?>
	 <a href="#" class="dl_fixed_button">Click Me!</a>
	 <?php
 }
 add_action ("wp_footer", "dl_fixed_button");
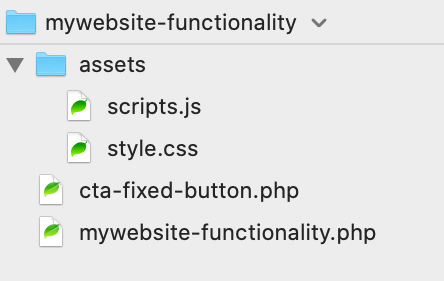
Here's how the sample plugin structure looks now:
Grab the Free Sample Plugin!
I compressed these sample files in a ZIP file, which Divi Lover subscribers can download below. Simply install and tweak the code to your needs or unzip the file and use it as a starting point for creating your own Functionality Plugin!
Free Resources for Divi Lovers
Access this layout and dozens of other freebies - available exclusively for newsletter subscribers.
New here?
Join the newsletter to unlock the Freebie Library and get weekly Divi tips, tutorials, and design goodies.
Already subscribed?
Go straight to the Freebie Library and download this layout - plus lots more!


Thanks Ania, for yet another awesome tutorial!
This is very useful as I’m always adding snippets to my functions.php for WooCommerce.
I’m not sure if it will work but I’m going to give it a try.
Great tutorial Ania, thanks for sharing and also showing how it all ties together. Would be awesome, if at some point you could show how to create a settings page as well if possible
Thank you Ania. It was very helpful as my php knowledge is poor!
I hope you will make many more tutorials – please!
Thanks Ania! I’ve been using the Code Snippets plugin, but I like the idea of adding my own plugin for custom functionality. It would be cool if you expand on this tutorial with how to create plugin setting options.
The great and successful blog post from divilover and we use it
Great tutorial Ania! Very straightforward and easy to follow! Keep up the good work!