How to create a Divi popup without plugins? Learn how to display any Divi section inside a Full Page Overlay!
This is the ultimate guide to creating a Divi popup without plugins. I will show you how to turn any section into a hidded popup that will be displayed after a button click. You will not need any plugins to do this - only a few lines of CSS and some jQuery, so we'll keep your website uncluttered and performing great!
You can choose from 3 ways to achieve this effect - each a different difficulty level. The easiest way is to download the free layout, the second option is to use the free snippets and watch the first 7 minutes of the Divi popup video tutorial, and the most advanced one is to follow the longer step-by-step video guide starting at minute 8 - direct link here. It will teach you how to write this code yourself and help you better understand this effect so you can customize it perfectly.
If you'd like to follow the complete CSS tutorial but want to brush up on you basic CSS skills first, feel free to use our Ultimate Guide for Working with CSS in Divi.
All right, let’s get started!
Free Resources for Divi Lovers
Access this layout and dozens of other freebies - available exclusively for newsletter subscribers.
New here?
Join the newsletter to unlock the Freebie Library and get weekly Divi tips, tutorials, and design goodies.
Already subscribed?
Go straight to the Freebie Library and download this layout - plus lots more!
Step 1
Create a button trigger
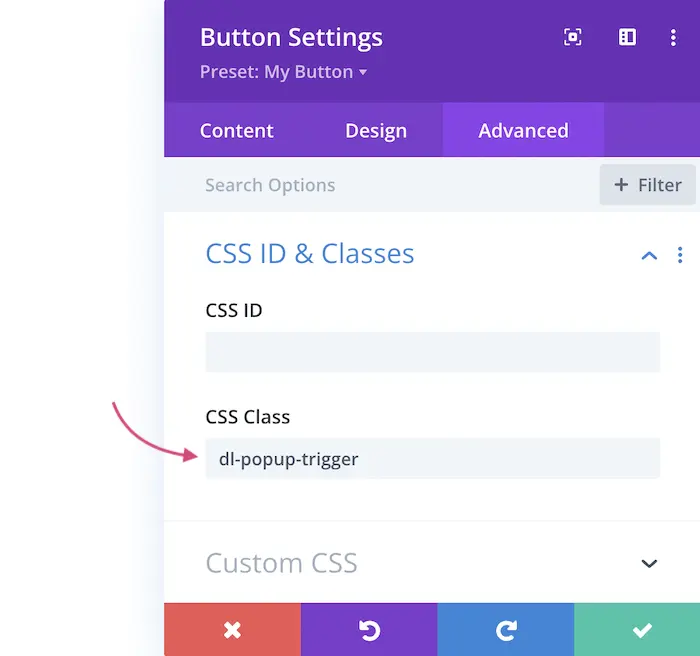
We can use the Divi Button module as a trigger. To make it work, add a custom CSS class of dl-popup-trigger to the Button Settings -> Advanced tab.
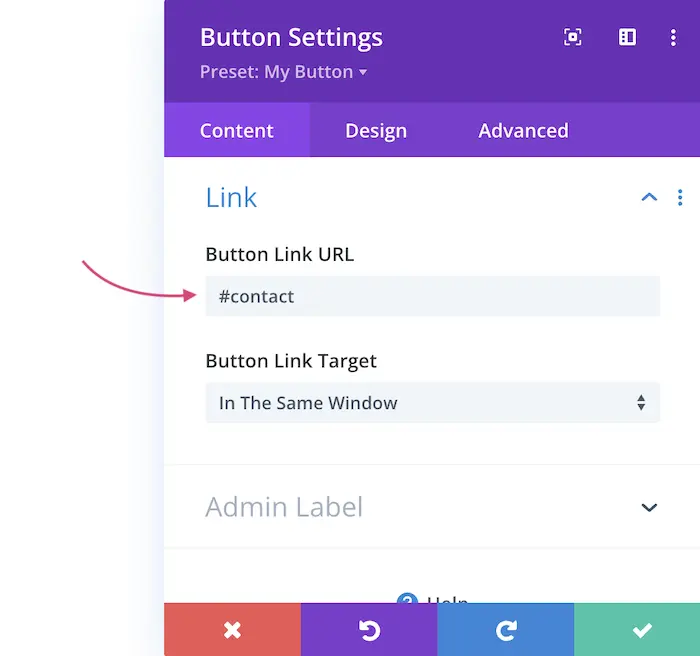
Make sure that the Button Link URL in the Content tab is an anchor link and uses the ID of the popup section with the hashtag symbol. In our example it's #contact.
Step 2
Create a popup section
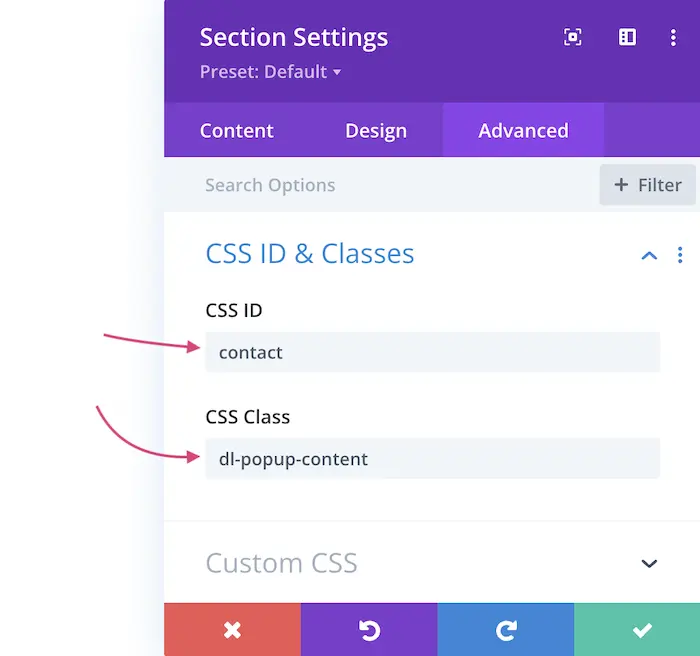
Add a new section which will be hidden initially. Make sure to set the correct CSS ID in the Advanced tab. It needs to match the Button URL from Step 1. In our example the ID is contact (without the hash symbol this time). The section also needs the CSS class of dl-popup-content.
Set the min-height to 100% in the Design tab to make sure the section background stretches to full-screen when the popup is visible.
Step 3
Add the CSS Snippet
Place the CSS code in yout Theme Options or child theme stylesheet:
/* Show/hide the popup overlay wrapper when "is-visible" class changes, apply the CSS to frontend only */
body:not(.et-fb) .dl-popup-wrapper {
  position:fixed;
  z-index:990;
  top:0;
  right:0;
  bottom:0;
  left:0;
  transition: all .5s cubic-bezier(.14,.06,.41,1.39);
  opacity:0;
  visibility:hidden;
}
body:not(.et-fb) .dl-popup-wrapper.popup-is-visible {
  opacity:1;
  visibility:visible;
}


/* Allow the content inside the popup wrapper to scroll */
.dl-popup-inside {
  height:100%;
  overflow-y: scroll;
}


/* Prevent Body from Scrolling when Popup is visible */
body.dl-noscroll {
  overflow: hidden;
}

/* Center Align Popup Content inside the Section */
.dl-popup-content {
  display:flex;
  flex-direction:column;
  justify-content: center;
}
.dl-popup-content .et_pb_row {
  margin-top:0;
  margin-bottom:0;
}


/* Adjust the position of the popup overlay for admin bar */
@media (min-width:600px) and (max-width:782px) {
  body:not(.et-fb).admin-bar .dl-popup-wrapper {
    top:46px;
  }
}
@media (min-width:783px) {
  body:not(.et-fb).admin-bar .dl-popup-wrapper {
    top:32px;
  }
}

/* Mave the popup on top of other elements */
.et_builder_inner_content.popup-is-visible {
  z-index:99999;
}

/* Add a hand cursor to the close trigger element */
.dl-popup-close {
  cursor:pointer;
}

/* Add Row animation when popup is triggered */
.dl-popup-wrapper.popup-is-visible .et_pb_row:not(.dl-popup-close) {animation:scale-in .5s cubic-bezier(.14,.06,.41,1.39) both; animation-delay: .5s; }
@keyframes scale-in{0%{transform:scale(0.3);opacity:0}100%{transform:scale(1);opacity:1}}
Step 4
Add the jQuery code
The jQuery script can be placed inside a Code module directly on your page, or (if it's a functionality you'd like to use globally in various places on your website) inside the Theme Options Integration tab.
<script>
jQuery(document).ready(function($) {


	$('.dl-popup-content').each(function(){
		$(this).wrap('<div class="dl-popup-wrapper"><div class="dl-popup-inside">');
	});


	$('.dl-popup-trigger, .dl-menu-popup > a').off().click(function(e){
		e.preventDefault();
		SectionID = $(this).attr('href');
		$(SectionID).closest('.dl-popup-wrapper').addClass('popup-is-visible');
		$(SectionID).closest('.et_builder_inner_content').addClass('popup-is-visible');
		$('body').addClass('dl-noscroll');

	});

	$('.dl-popup-close').click(function(e){
		e.preventDefault();
		$('.popup-is-visible').removeClass('popup-is-visible');
		$('body').removeClass('dl-noscroll');

		var PopupVideoIframe = $(this).closest('.dl-popup-content').find('.et_pb_video_box iframe');
		var PopupVideoSrc = PopupVideoIframe.attr("src");
		PopupVideoIframe.attr("src", PopupVideoSrc);

		var PopupVideoHTML = $(this).closest('.dl-popup-content').find('.et_pb_video_box video');
		PopupVideoHTML.trigger('pause');
	});


});
</script>
Optional
Trigger the Popup from the Menu
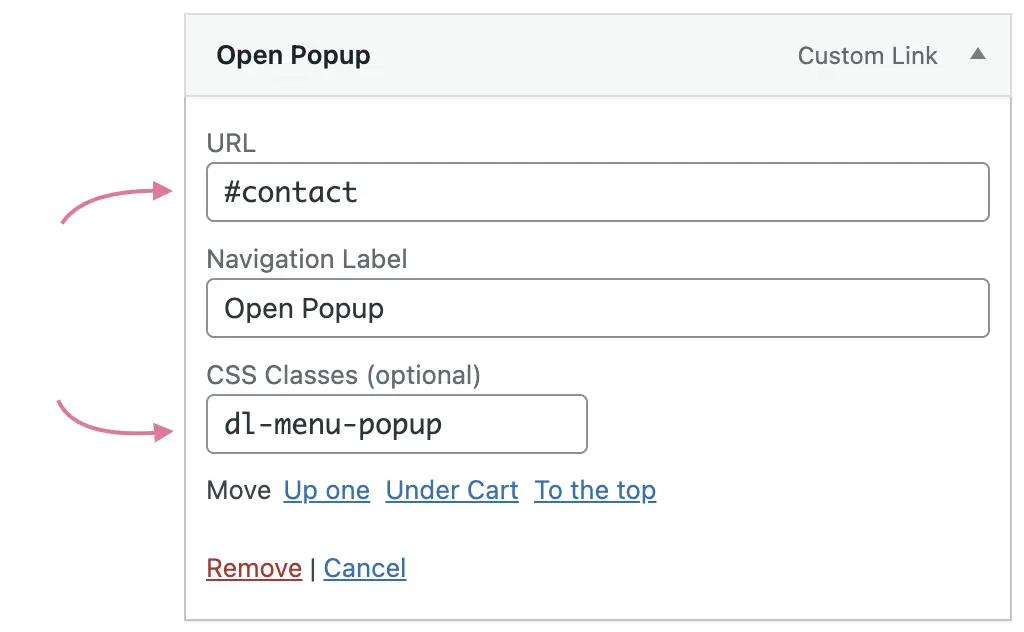
To trigger the popup from the main navigation, you will need to add a new Menu item using the "Custom Link" block. The URL needs to match the popup section ID, and the menu item needs a custom CSS class of dl-menu-popup.
Optional
Trigger the Popup Automatically on Page load
To trigger the popup automatically on page load, you will need a second jQuery function. Copy the code below and replace the #contact with your Popup section ID. You can also replace the 3000 value to define custom delay. 3000 miliseconds is 3s.
setTimeout(function(){
	SectionID = $('#contact');
	SectionID.closest('.dl-popup-wrapper').addClass('popup-is-visible');
	SectionID.closest('.et_builder_inner_content').addClass('popup-is-visible');
	$('body').addClass('dl-noscroll');
}, 3000);
And that's how you add a Divi popup without plugins!
I hope you found this tutorial helpful, and I hope everything was clear and accessible. If you use these tips, please let me know in the comments! Also, which option did you use - the layout, the snippets, or the long advanced guide? Please, let me know. Your feedback is crucial and it helps me see which tutorials work best for you.
If you have any questions, you can ask them in the comments below - or in my Divi Lovers Facebook group. It's a fantastic community of Divi users and web designers where we share useful tips and tricks.


You just amazing
Your tutorials always help me save my penny.
It works as it should be and fit my needs. Thanks Ania and teams.
I think for those who need the close button, place X icon module with the class dl-popup-close and position it wherever you want using divi native positioning.
hi, i can’t see the x button to close the popup. and is there any possible way to close the popup by pressing esc on keyboard?
Hello,
The popup opens but there is no option to close it. How can I add a button to close it? Thanks so much.
how to use it on blurb module?
I would also like to know.
Hi Ania!
Thanks so much for this tutorial. I have used it many times successfully but this time the popup is loading at the top of the page, and full-width. Any idea why this might be?
Great tutorial!
I don’t want to trigger the poup via a button, but via a text. How can I do that?
You can add a standard link with the same class, eg.
Hello. Is there a way to apply .dl-popup-close to the area behind the content so that it doesn’t effect links within the inner content? (When applying .dl-popup-close to #close section, the popup closes using the outside area, however, links within the popup are ignored.) Thank you!
You should be able to use this answer as a starting point. You’d need to adapt the code to the structure of your popup.
Great tutorial. I have used your tigger popup as a disclaimer that loads on entry to the home page. Do you know of any code I can add (and please tell me where to add it), to make the disclaimer only appear once when the site is visited, not everytime they click back to the homepage.
It’s not that simple, I’m afraid. It would require setting up cookies. You could look into jQuery Cookie script. Here’s a good tutorial to get started.
hi Ania , i want to use it for woo filters , is it possible if it has links and an accordion even though it is not visible, so as you have written it should not cover the next section and do not press the accordion keys ?
ok – i fount it and works ok
pop up section display = inline
Tremendous tutorial! Thank you, Ania. I just discovered your web site and I’m looking forward to exploring more of it. I do have a question/request:
Is it possible to define a Session such that the popup only appears once in any given session duration. Such that, if the duration of a Visitor Session was 7 days, then the popup that is automatically triggered based on Time Delay will only popup for that visitor once per week? What would I need to add to the code to achieve that effect?
Hi Nemo! I think you’d need to look into jQuery Cookie script. Here’s a good tutorial to get started.
When closing video popup, the audio from the video is still playing on the background and need to stop or pause.
Hi Ania,
where I have to add the Code, if I wan’t to load the Popup automatic?
Thank you in advance for any help.
Benny
When I include the Code in Divi Options, the Popup want’s to load on every site.
Now it works! I’ve added the Code in a Seperate Section in a Code Module:
jQuery(document).ready(function($) {
setTimeout(function(){
SectionID = $(‘#contact’);
SectionID.closest(‘.dl-popup-wrapper’).addClass(‘popup-is-visible’);
SectionID.closest(‘.et_builder_inner_content’).addClass(‘popup-is-visible’);
$(‘body’).addClass(‘dl-noscroll’);
}, 3000);
});
Thank you, Ania! One of the best, easiest to follow, and most helpful and thorough Divi tutorials I’ve come across in years! 🙂
Is there a way to add the class to a text link… instead of to a button or the Image module?
Also I tried to download the layout above, but did not receive an email. Thanks
I was able to sign up with a different email address, and downloaded the .json
But haven’t been able to get the .json to import into a new page. It just goes to 100%, stays there, and does’t finish.
Using Divi 4.19.1 / macOS X
Hi Rene,
Yes, I just added “dl-popup-trigger” as a class to a text link inside a text module with all of the other great coding Ania provided, and it works great!
Hi, can you show me a screen. I cant get it. :/
Hi Ania,
I love your channel. There are many useful tips – thanks! I’m wondering about this code, is there a reason why I can’t do un image trigger popup? For me, it is only works from a button. Is there any additional code to open a popup when clicking on un image?
Yana
The reason is that the code is looking for an HREF attribute of the “dl-popup-trigger” element. With Image module, the class is added to a parent, and the href is inside and A element, not direclty on the “dl-popup-trigger” as with the Button module. The “dl-menu-popup” class should work for Image module.
Thanks. I will try again.
Hi, I like your videos and I would like to ask if it is possible to send me the code with dl-menu-popup because I have the same problem as @YANASIRAKOVA. Thank you very much
can this pop up be used on more than one page?
Yes, you can use for mulitple popups.
do I need to change the link ID for each page or can it be the same link. e.g. can they all be #gettheguide for all the pages or would I have to do #gettheguide #gettheguide1 etc
If the popup is once on each page, it can use the same ID across all pages, but if you add more than one popup on a single page – they would need to use different IDs.
Awesome, thanks for the script. Unfortunately I don’t have a “close” function. Also no click outside the window closes the popup. Do you have a tip? Thanks
Oh, I checked…thank you – the answere is in the video 😀
Hi Ania,
I really enjoy your YouTube! channel as well.
I am having trouble getting this code to work on a mobile (iOS) device. Also, the trigger CSS Class for the optional Menu configuration needs to be updated to match:
Article: dl-popup-menu
Code: dl-menu-popup
Thank you in advance for any help.
Eric
Hi Eric,
We corrected the classes in the post, thank you. As you can see, our demo version works correctly on mobile, so this has to be something specific to your setup. I’m afraid it’s not possible to guess what might be wrong without seeing the URL. Did you try using (and editing) the JSON layout we’ve included in the article?