Milly Child Theme Documentation
Step-by-Step Installation and Customization InstructionsTABLE OF CONTENTS
Getting started
Downloading Child Theme
Installing Child Theme
API Key Activation
Importing Demo Content
Theme Builder Templates
Milly Theme Options
Global Color Change
Popup Overlays
Preloader
Typography
Sliders and Carousels
Divi Library
Global Presets
Custom Menu Icons
CSS Classes
Support
Changelog
Getting started
In order to install this child theme, you must first purchase a membership to Elegant Themes and download the Divi Theme package. The Divi Theme is NOT included with this child theme.
We keep Milly fully compatible with the latest Divi and WordPress version. Please ensure that you’ve downloaded and installed the latest version of Divi.
Please note:
Ensure you have the Divi Theme installed and activated prior to installing the Milly Child Theme. To avoid any issues during installation, it is highly recommended that you use this child theme on a fresh installation of WordPress.
Downloading child theme
Step 1: Download child theme file
After purchase, download the Milly.zip (Milly-reg.zip for Regular license, or Milly-ext.zip for Extended license) file from your account page on our website or from the Elegant Themes Marketplace, depending on where you made the purchase.
Optional: Download additional files
You can also download the additional Unzip_This_First_Milly.zip file, which contains the following files:
- Milly.zip - the installable Milly child theme file,
- ReadMe.pdf - a PDF document with links to support and this documentation page,
- Import Files folder containing files useful for manual demo import. Only needed if you're experiencing issues with the automatic, one-click demo import functionality.
Installing child theme
Step 1: Install Divi Theme (if not installed yet)
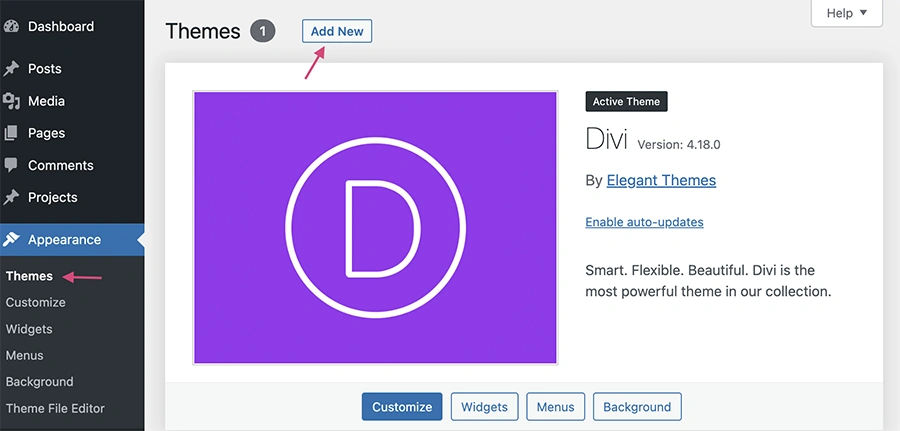
Once you’ve downloaded the Divi Theme package, log in to your WordPress website and go to Appearance ➞ Themes. Find and upload the Divi parent theme. Next, click on the Add New Theme.
Step 2: Upload and install Milly
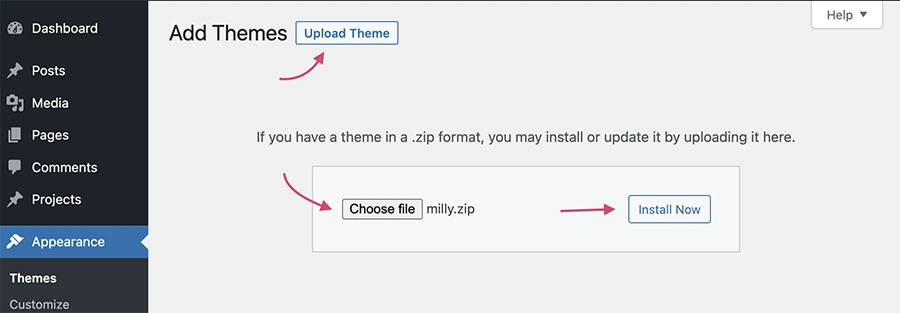
Click on Upload Theme and then Choose file. Locate the Milly.zip file on your computer, then click the Install Now button.
Step 3: Activate the child theme
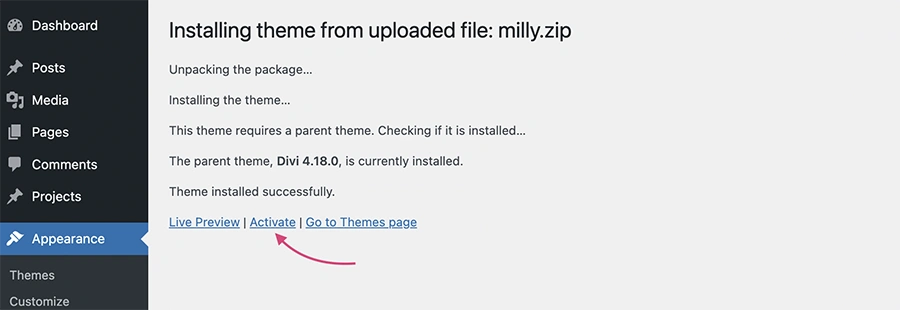
After completing the upload, you will need to activate the theme by clicking the Activate button.
API Key Activation
Please Note:
If you purchased the child theme via the Elegant Themes Marketplace, skip these steps. If your Elegant Themes API key is activated correctly in Divi Theme Options, you will receive automatic child theme updates and no additional API activation is needed.
Step 1: Activate child theme API key
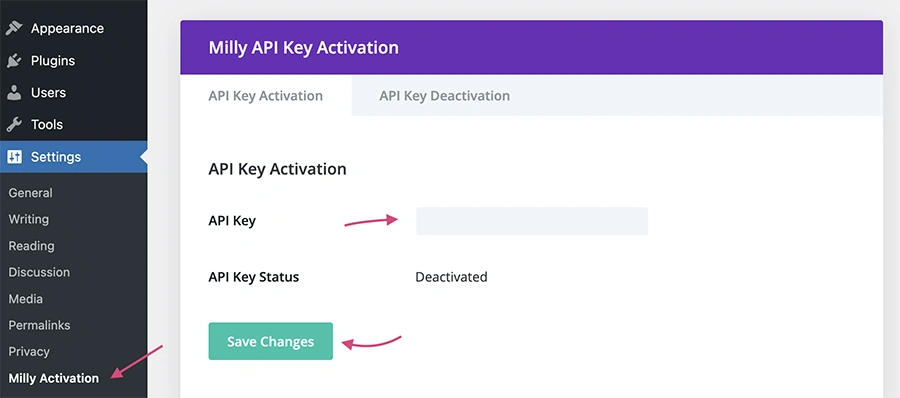
API key activation is required to receive automatic child theme updates. To activate your license, navigate to Settings ➞ Milly Activation, or click the link visible in the dashboard notice.

Step 2: Enter your API key
To see your API keys, please log in to your account. Enter your Master API key or Product API key and click Save Changes. Once the API key status is Activated, you'll be able to receive automatic child theme updates in your WordPress dashboard.
Importing demo content
Important: Divi Compatibility!
There is a known issue with child theme Presets not importing correctly in Divi version 4.19.2 and lower. To ensure the import process goes correctly, please use the latest Divi Theme version (4.19.3+) when importing Milly demo data.
If you need to import Milly demo on Divi 4.19.2 or earlier, please use Milly 1.1 zip file, which you can find in the "Alternative child theme installer" folder.
Step 1: Back up your site
Imports work best on a fresh installation of WordPress with the Divi Theme installed. It is always recommended that you verify that you have a good backup prior to importing new content.
Step 2Choose Demo Import Options
To import the child theme demo data, please navigate to the Milly ➞ Demo Import dashboard panel. You'll see the list of all elements ready to import, including: Posts, (and that includes Blog Posts, Pages, Projects, Products, Divi Theme Builder templates and Divi Library Layouts), Media files, Menus, Home and Posts Page settings, Divi Theme Options and WP Options (which include custom permalink structure). You'll be able to choose whether you want to install and activate the WooCommerce plugin.
For non-experienced users, we recommend keeping all elements selected.
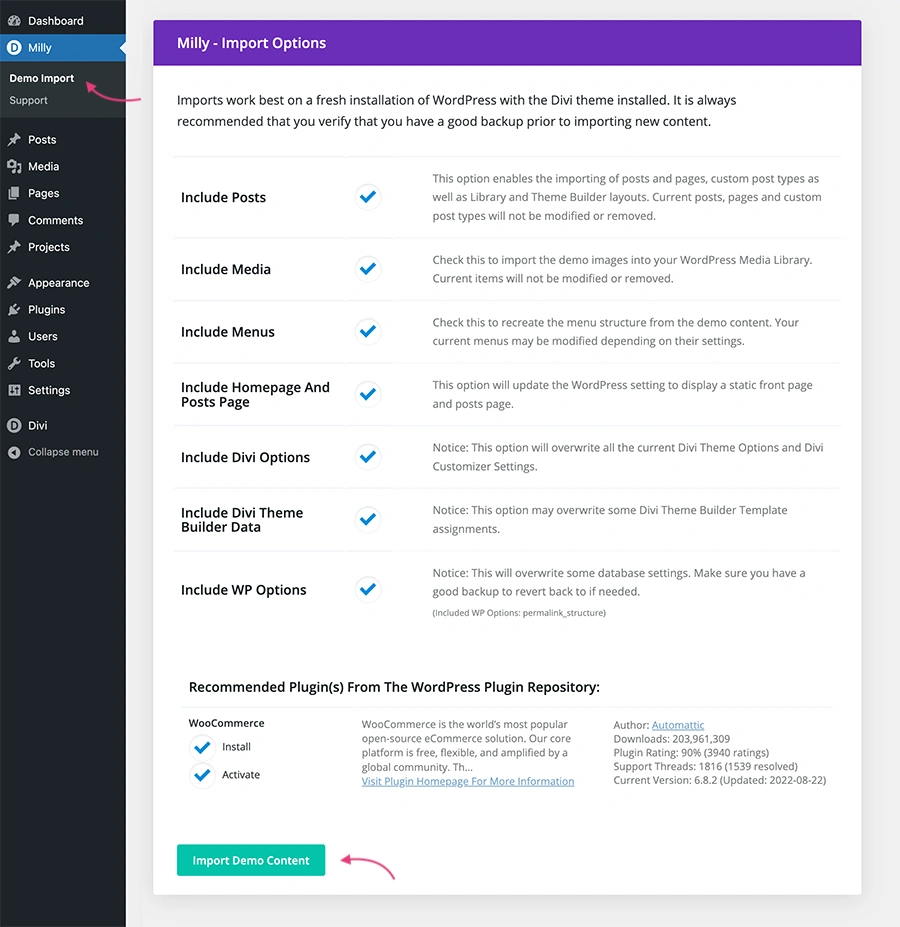
Step 3: Import Milly Demo
Click the Import Demo Content button. Please note: the import process may take even several minutes, depending on your internet connection speed. You'll see a progress bar with detailed information about the current import status. Please wait patiently for the import process to finish.
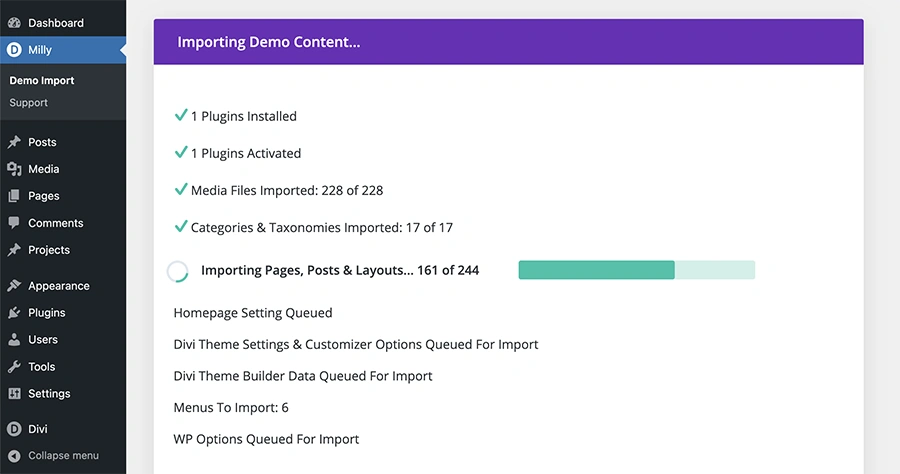
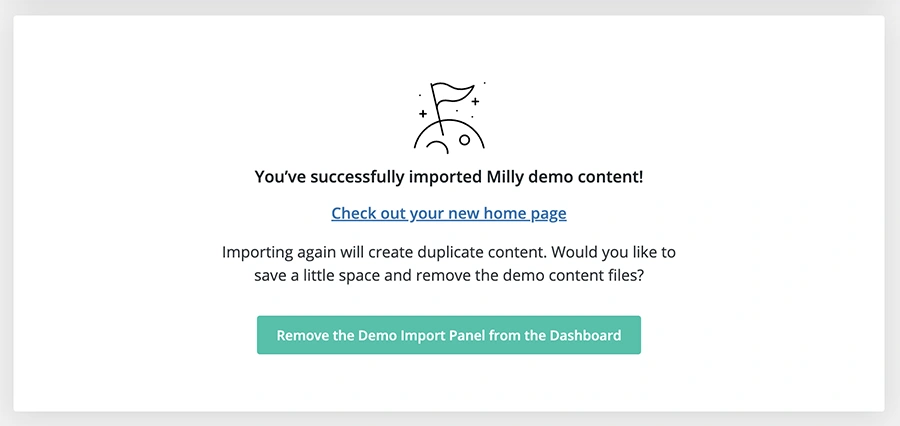
Optional: Remove Importer Files
Once the import process is completed, you'll be able to delete the importer files and remove the import functionality from the Dashboard by clicking the Remove the Demo Import Panel from the Dashboard button.
Theme Builder Templates
Step 1: Check Theme Builder Templates
The Milly Child Theme includes 13 Theme Builder templates. Depending on your setup, some of the template assignments used on the Demo page may not transfer automatically. Navigate to Divi ➞ Theme Builder to check the template structure. You can choose which header and footer template you want to use as global (Default Website Template), and what pages should use different header and footer templates.
Step 2: Manage Template Assignments
Templates marked with the red font are Unnasigned, which means they are not used on any page. You can manage template assignments using the Template Settings panel.

Milly Theme Options
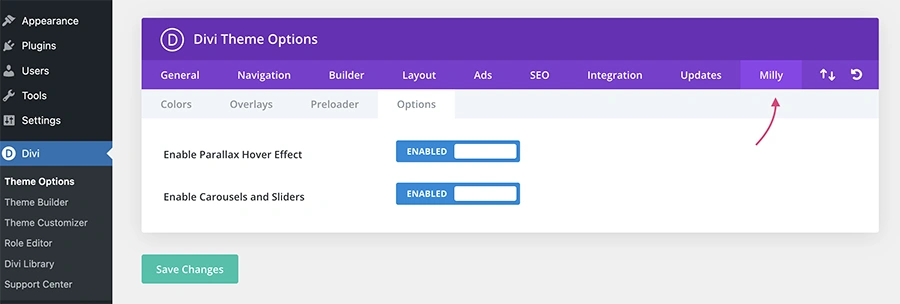
The Milly Child Theme features extensive customization options, which you can access in the Divi ➞ Theme Options ➞ Milly tab. You'll be able to manage settings inside the following sub-tabs:
Tab 1Colors
Here you can change the color palette. Changing a color here will apply to all elements across every page of your website.
Tab 2Overlays
Here you can choose the appearance and manage the behavior of custom popups - overlays included inside the child theme.
Tab 3Preloader
In the Preloader tab, you can choose the animated icon visible on page load, and also change its colors.
Tab 4Options
You can use the Options tab to disable the scripts needed for the Parallax hover effect and custom Sliders and Carousels.
Global Color Change
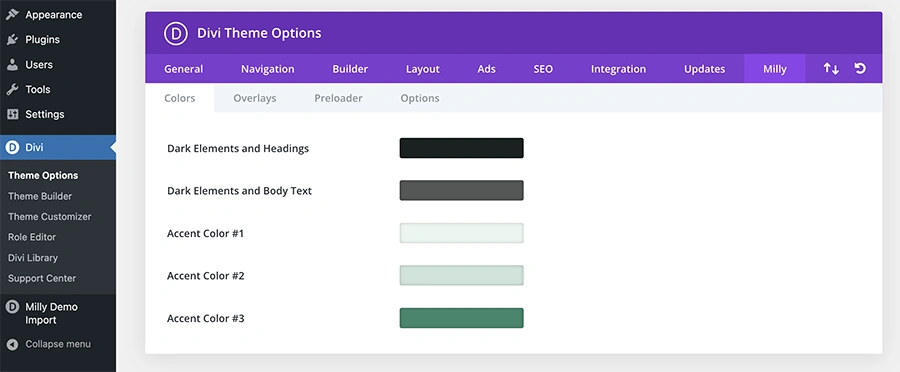
You can globally change the colors of all elements across every page on the website by navigating to Divi ➞ Theme Options ➞ Milly ➞ Colors.
You can set five different colors:
Dark Elements and Headings - this color is used mainly for heading text, CTA background and dark decorative elements.
Dark Elements and Body Text - this color is used mainly for body text and dark overlays.
Accent Color #1 - this is the main accent color used across the site. We recommend using a light color value.
Accent Color #2 - this is a secondary complimentary accent color used across the site. We recommend using a color slightly darker than Accent #1.
Accent Color #3 - this color is used for accents and CTA elements.
After updating the global colors using the Milly Theme Options, you can further edit the color of any individual element using the Divi Builder.
Popup Overlays
Step 1: Manage Overlay Options
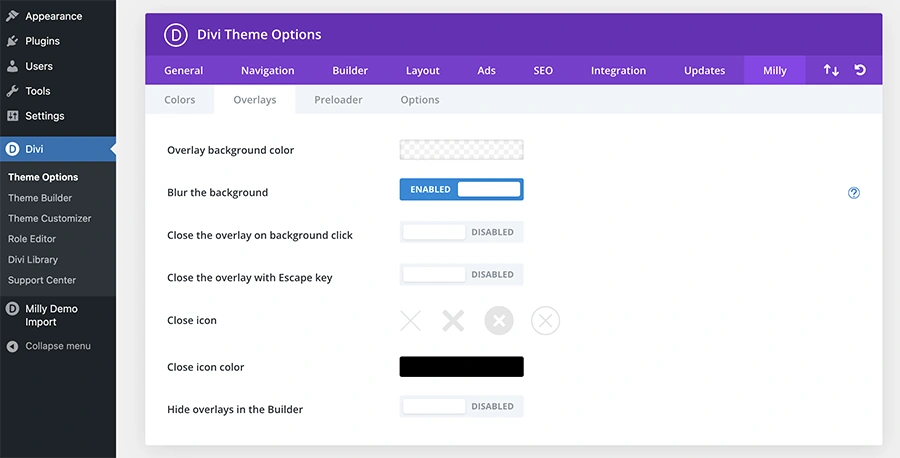
To customize the appearance and manage the behavior of custom Popup Overlays, navigate to Divi ➞ Theme Options ➞ Milly ➞ Overlays.
Available settings:
Overlay background color - choose the color behind the popup section. Please note that you can change the background of each individual popup using the Sections settings in the Divi Builder.
Blur the background - check this option to blur the background behind the overlay. This option has limited browser support.
Close the overlay on background click - check this option to close the overlay when a user clicks the background behind the content.
Close the overlay with the Escape key - check this option to close the overlay when a user presses the Escape key on the keyboard.
Close Icon - choose the default close icon. You can replace the default icon inside an individual popup if you use an element (e.g. Icon or a Button module) with the CSS class of milly-close inside the popup section.
Close icon color - choose the color of the default icon.
Hide overlays in the Builder - check this option to hide all overlays when editing the page in the Visual Builder. Please note that you can hide an individual overlay by using a custom CSS class of builder-hidden, and hidden overlays are still accessible from the Wireframe view.
Step 2: Add New Overlay
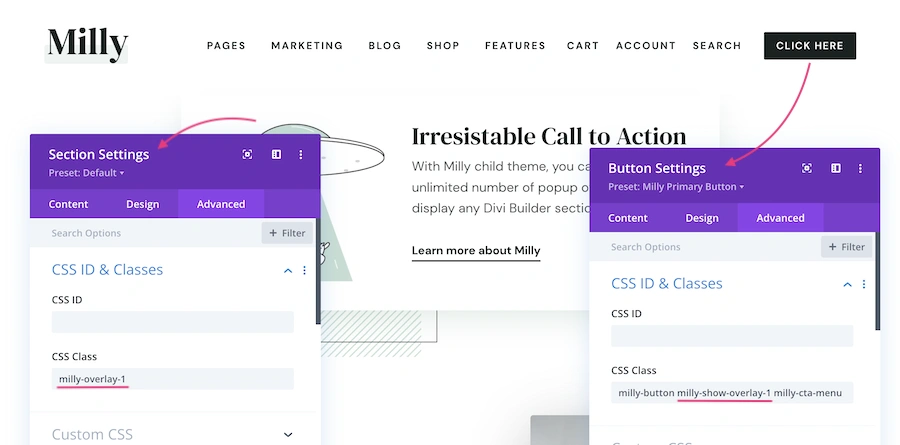
Two elements are needed to add a new overlay to your website: a trigger element and a popup section. Both need to use matching CSS classes. The trigger element (e.g. a Button module) needs a CSS class of milly-show-overlay-123 (123 should be replaced by a unique number). The overlay section (the content visible inside the popup) needs a CSS class of milly-overlay-123 (123 should match the number of the trigger element's CSS class).
Preloader
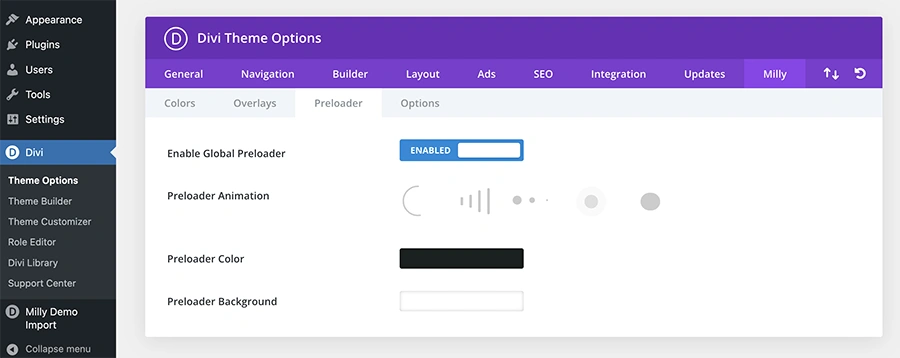
You can manage the global preloader functionality by navigating to Divi ➞ Theme Options ➞ Milly ➞ Preloader.
Available settings:
Enable Global Preloader - check this setting to show a preloader while the page content is loading.
Preloader Animation - choose the animated element.
Preloader Color - choose the color of the preloader icon.
Preloader Background - choose the color of the preloader background.
Typography
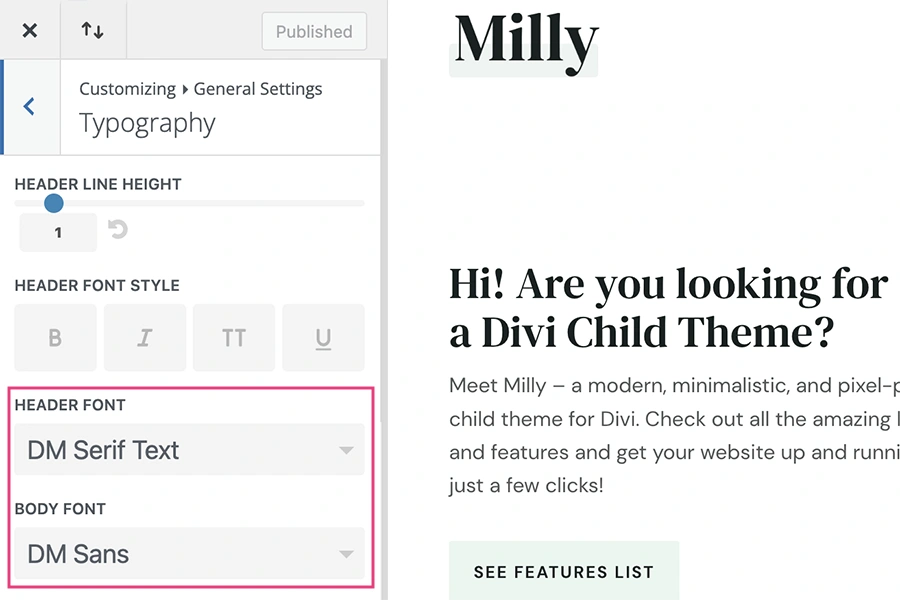
You can edit the default font used in the demo by navigating to Divi ➞ Theme Customizer ➞ General Settings ➞ Typography.
Sliders and Carousels
Milly uses custom JavaScript-based, draggable slider functionality with the following pre-styled carousel types:
option #1 Logo Slider

The logo slider uses automatic transition and all slider controls (arrows and dot navigation) are hidden. To display a list of Image Modules as slider, add a CSS class of milly-logo-slider to Column or Row settings. All Image modules need to be placed in the same Column.
option #2 Testimonial Slider

The testimonial slider uses Arrow navigation with a gradient background. Use a single-column Row and add a CSS class of milly-testimonial-slider to the Row settings.
option #3 Mini Slider
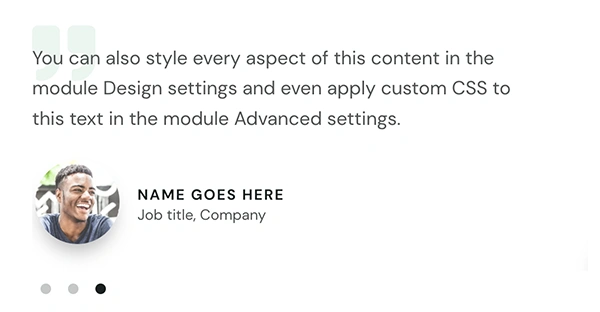
The mini slider uses Dot navigation. You can use any module inside a mini slider. Simply add a CSS class of milly-mini-slider to the Column settings. Ensure each module's width is set to 100%.
Option #4 Shop Slider
Use a CSS class of milly-shop-slider inside a Woo Products module settings, to turn a WooCoommerce product list into a carousel slider with Arrow navigation.
Option #5 Row Slider
By assigning a CSS class of milly-row-slider to a Divi Section, you will turn each Row inside that section into a single slide, which gives you full control over the slider appearance. The slider displays a single Row at a time and can be controlled with Arrow navigation.
Option #6 Row Inline Slider
By assigning a CSS class of milly-row-inline-slider to a Divi Section, you will turn each Row inside that section into a single slide. Set the width of each Row in the Builder settings to create a carousel-type slider. Each card in a carousel is a row, so you have full control over the content inside. The slider will be controlled with Arrow navigation.
Divi Library
Option #1 Page layouts and Theme Builder templates
We included an extensive layout library inside the Milly Child Theme. We assigned a featured image to each page layout, making it extremely easy to preview a layout when importing inside the Builder.
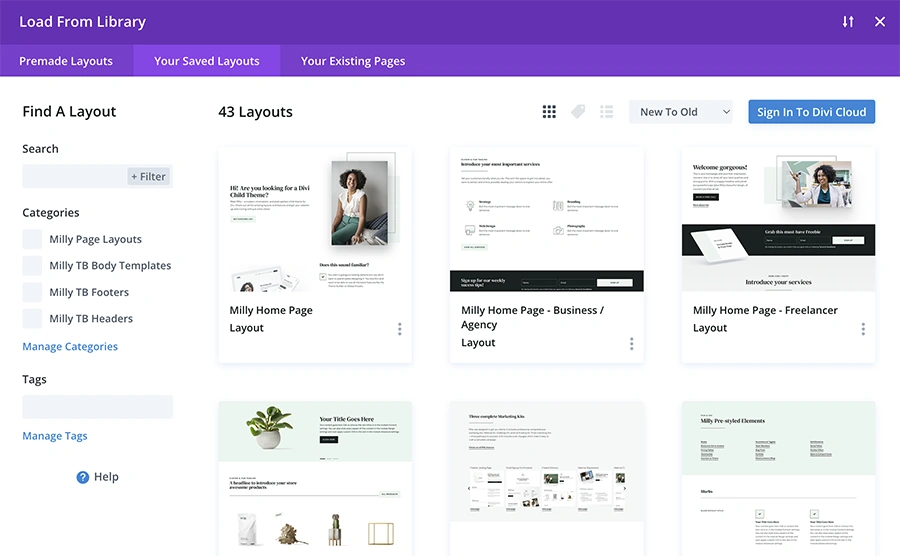
We included the following categories of page layouts and Theme Builder templates:
- Page Layouts - every Milly demo page has been saved in the Divi Library, so you can safely delete unwanted pages, refer to the Milly Demo, and load a page layout when creating a new page;
- TB Body Templates - this category includes Theme Builder Body templates used on archives and pages with dynamic content (e.g. single post and product page);
- TB Headers and TB Footers - each Milly header and footer design is saved in the library for easy access when creating new templates inside the Theme Builder.
Option #2 Section layouts
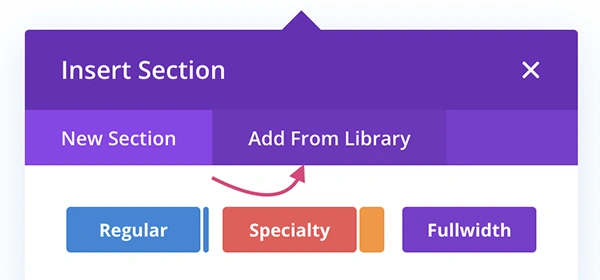
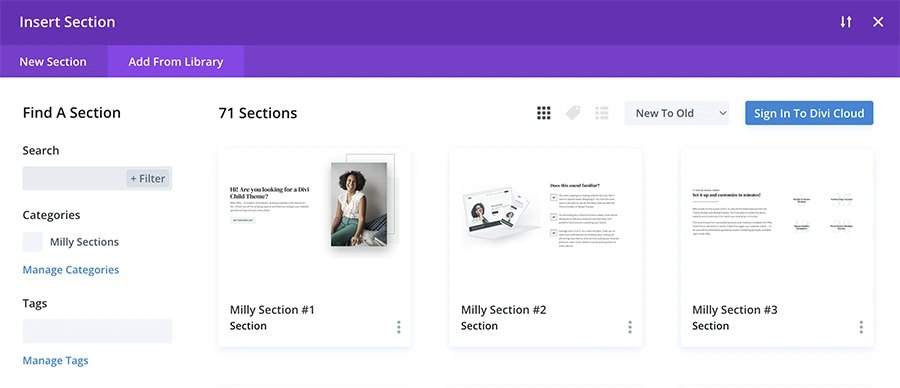
Milly comes with 70 section layouts, which you can import from the Divi Library while creating new page designs in the Builder. When adding a new section, choose the Add From Library tab and select a pre-styled Demo section.
Option #3 Modules Library
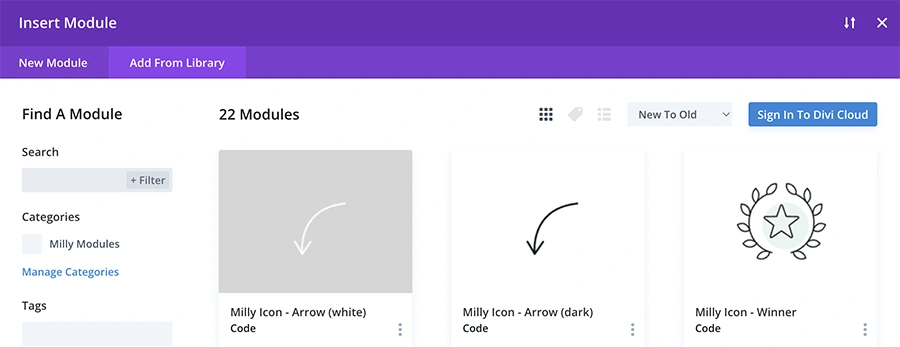
The only type of Modules saved in the Divi Library are Code modules with custom SVG Icons. If you choose the Add From Library tab when adding a new module in the Builder, you'll be able to select one of the Milly icons.
Please note:
To add a hover effect to Milly icons, please add a CSS class of milly-ico-hover (yes, ico, not icon) to one of the parent containers (the Code module itself, Column, Row, or Section).
Every other module uses Global Presets, which means that it is already styled as on the Milly Demo page and there is no need to load it from the Library.
Global Presets
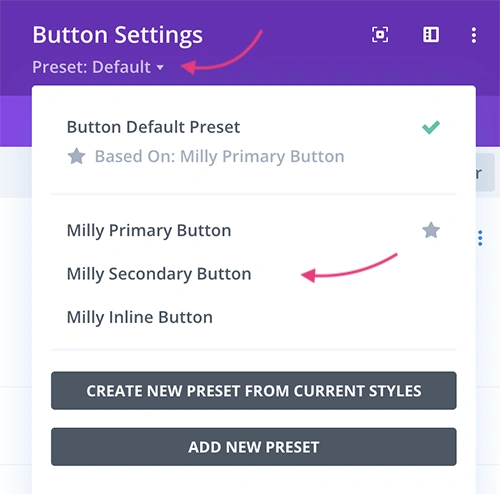
On the Elements Milly Demo page you can see a list of all pre-styled modules included inside the child theme. Every time you add a new module in the Divi Builder, it will use custom Design settings. Some modules, e.g. Buttons and Blurbs, have multiple design variations - each saved as a separate Preset. When adding a new module, you can select which Preset this module should use.
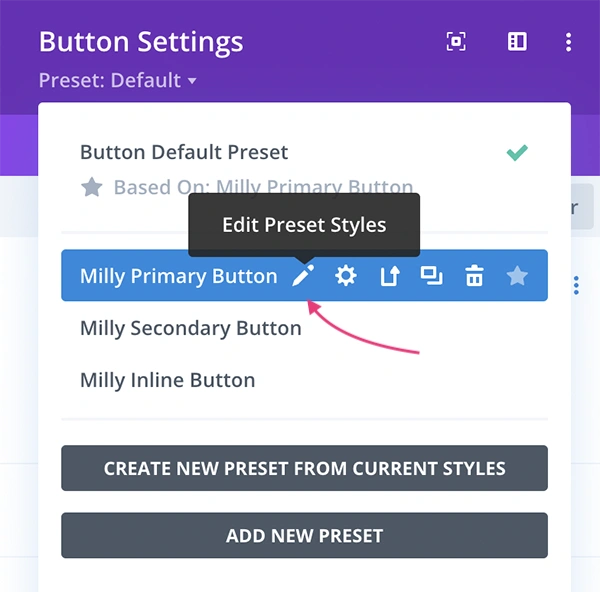
You can edit the Design settings inside every Preset, but keep in mind that updating a preset will globally modify the appearance of all modules which are using this preset across the entire website.
Custom Menu Icons
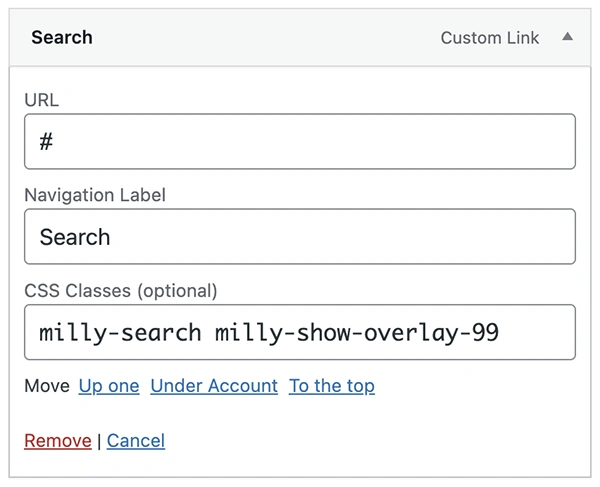
We included three custom icons inside Milly's default Menu. To change a menu link into an icon, please navigate to Appearance ➞ Menus and add one of the following CSS classes to a menu item: milly-cart, milly-account or milly-search.
Please note: The search icon on the demo page is also a custom overlay trigger and uses two CSS classes: one for the icon and another for the overlay. We added the overlay section to the Global Footer template inside the Theme Builder.
Useful CSS Classes
We added a few helpful CSS Classes which you can use with Milly. Please see the list below for details on how and when to use each class.
- milly-shadow - this class can be added to any element. It will display a nice multi-layered shadow.
- milly-scroll-icon - this class adds infinite animation to an element and can be added to any element. It was used for the Scroll Down Icon module with an anchor link.
- milly-shake - this class adds infinite animation and can be added to any element. It was used for the "hot" label inside the Promo Bar.
- milly-close-this-section - this class was used for the Close icon inside the Promo Bar. When an element with that class is clicked, the parent Section will be hidden.
- milly-content-center - this class should be added to Column settings. The Equalize Column Heights option needs to be enabled inside the Row Design tab. It is used to align modules inside the column vertically in the center.
- milly-content-bottom - this class should be added to Column settings. The Equalize Column Heights option needs to be enabled inside the Row Design tab. It is used to align modules inside the column vertically at the bottom.
- milly-reverse-columns-mobile - this class should be added to Row settings. It reverses the order of columns inside the row on both Tablet and Phones.
- milly-reverse-columns-phone - class should be added to a Row settings. It reverses order of columns inside the row on Phones.
- milly-keep-tablet-col - this class should be added to Row settings. It maintains the Desktop column structure of a 2-column Row on Tablets.
- milly-keep-phone-col - class should be added to Row settings. It maintains the Desktop column structure of a 2-column Row on Phones.
- milly-inline-module - this class should be added to a module. Modules with that class will be displayed inline, next to each other, if there is enough horizontal space.
Support
Option #1 Elegant Themes
For additional assistance with using the Divi Theme framework, Elegant Themes offers free technical support to all their members. Log in to your account at the Elegant Themes website.
Option #2 Divi Communities
You can also find support on Facebook by posting your questions in the community groups: Divi Theme Users, Divi Web Designers, Divi Lovers.
Option #3 Divi Lover Support
Haven’t found what you need in the documentation? We’ll be happy to help!
Note: how you can get support depends on where you bought Milly. See the options below.
If you bought the Milly Child Theme on divilover.com, please log in to your account and submit a ticket from the Support Area on your account page.
If you bought the Milly Child Theme on the Elegant Themes Marketplace, please submit your support ticket through the ET Marketplace system.
Option #4 1-on-1 Web Design Assistance
Ania offers additional, 1-on-1 consultations to help you with any web design questions and issues. This service goes beyond the scope of Milly support and is geared toward web designers who’d like to learn more about WordPress, Divi, CSS and web design in general. Go here for more information and pricing.
Changelog
Version 1.2 2023 February 14th
- Fixed issue with presets not importing with Divi 4.19.3+ (new Milly demo importer version only imports presets in Divi 4.19.3 and up, it will not work with Divi 4.19.2 and below, to import demo data on older Divi version, please use Milly 1.1)
- Tested with Divi 4.19.5 and WordPress 6.1.1
Version 1.1 2022 October 18th
- Fixed issue with demo import giving 404 errors on certain local servers
- Fixed a possible error and compatibility issue with PHP 7.2
- Updated header layouts (all menu module images use dynamic content with site logo)
- Tested with Divi 4.18.0 and WordPress 6.0.3
Version 1.0 2022 September 7th
- Release date