Canvas All-in-One Layout Kit Documentation
Step-by-Step Installation InstructionsGetting started
In order to install this Layout Kit on your website, you must first purchase a membership to Elegant Themes and download the Divi Theme package or the Divi Builder plugin. The Divi Theme is NOT included with this product.
We keep Canvas sections fully compatible with the latest Divi and WordPress version. Please ensure that you’ve downloaded and installed the latest version of Divi.
Please note:
Ensure you have the Divi Theme installed and activated prior to installing the Canvas Layout Kit.
IMPORTANT:
Different ways of working with the Layout Kit
Canvas: All-in-One Layout Kit is a collection of Divi Section layouts organized into 12 categories. Every section has two separate versions: light and dark. Depending on your workflow, you might want to use one of three types of Import files:
option 1 Install everything via Child Theme (one-click setup)
Installing the Layout Kit as a child theme is perfect for starting a new project. Once you install the child theme from a ZIP file, you’ll be able to use the one-click import feature to import all sections to your Divi Library. All the necessary custom code needed for the sections is included in the child theme files, so there are no additional steps needed. You can proceed with page creation, adding new sections from the library to create your page layouts.
For instructions on how to proceed with a child theme, navigate to the Child Theme Import documentation section.
Option 2 Import sections via plugin, add CSS manually
If you want to use all the sections in an existing project, but you already have a child theme installed (or don’t want to use one), you can import all section layouts to your Divi Library and then copy the provided CSS code needed for the sections to your Theme Options or Child Theme folder. Once the custom code for all sections is in place, you can proceed with page creation, adding new sections from the library to create your page layouts.
For step-by-step instructions on how to proceed with importing Canvas sections to an existing website, navigate to the Plugin Import documentation section.
Option 3 Use individual sections with integrated CSS
In addition to child theme and plugin installation, we’ve prepared a set of JSON files, which can be imported directly via Divi Builder. You can import Canvas sections using the Portability feature or drag and drop JSON files directly to any page in the Builder or Divi Cloud dashboard.
Sections imported this way are ready to use and the corresponding CSS code is included in each individual section (as a last row with a Code module). Once imported, you can move the code to your Theme Options or Child Theme.
Please navigate to the Divi Builder & Divi Cloud Imports documentation section for more information.
Download Files
File 1: Quick child theme access
After purchase, download the canvas-child-theme.zip file and from your account page on our website or from the Elegant Themes Marketplace, depending on where you made the purchase.
All files: Download additional files
You can also download the Unzip_This_First_Canvas.zip file with all supplementary import files. Unzip the file on your computer and find the following import files inside:
- Child Theme Import folder including:
- canvas-child-theme.zip - the installable Canvas child theme file,
- Plugin Import folder including:
- canvas-importer-plugin.zip - the installable Canvas plugin file,
- canvas-style.css - CSS file with custom styling for Canvas sections
- Divi Builder Imports folder containing following files:
- Divi Library Sections for Divi Cloud - set of JSON files that can be imported in the Divi Library or inside the Divi Cloud dashboard in the Builder
- Single Drag&Drop Sections - set of JSON files that can be imported directly on a page in the Builder
- Updates folder containing following files:
- Child Theme and Plugin (CSS separated) - JSON file with all new sections in selected version that can be imported in the Divi Library and CSS file with additional CSS code for new sections
- Divi Cloud (CSS included) - set of JSON files that can be imported in the Divi Library or inside the Divi Cloud dashboard, or imported directly on a page in the Builder
- ReadMe.pdf - a PDF document with links to support and this documentation page
Child Theme Import
Step 1: Install Divi Theme (if not installed yet)
Once you’ve downloaded the Divi Theme package, log in to your WordPress website and go to Appearance ➞ Themes. Find and upload the Divi parent theme. Next, click on the Add New Theme.
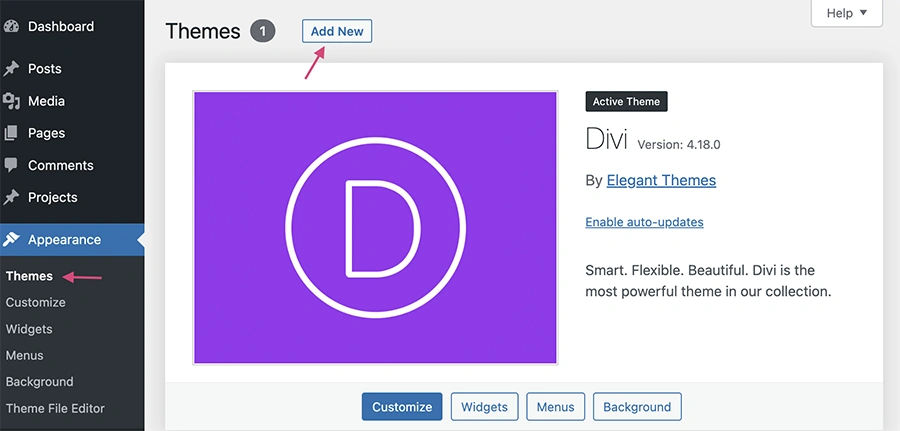
Step 2: Upload and install Canvas
Click on Upload Theme and then Choose file. Locate the canvas-child-theme.zip file on your computer, then click the Install Now button.
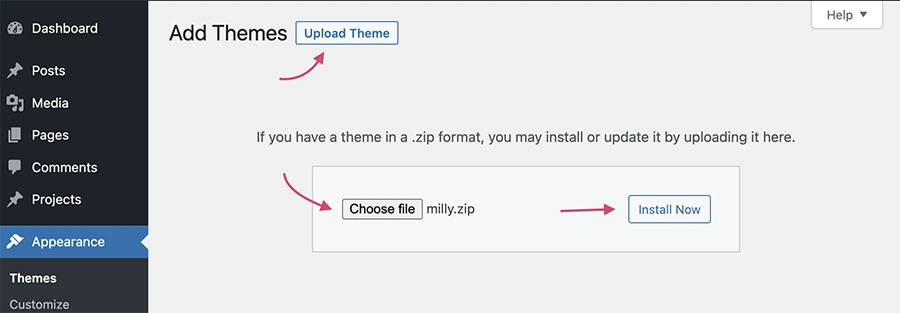
Step 3: Activate the child theme
After completing the upload, you will need to activate the theme by clicking the Activate button.
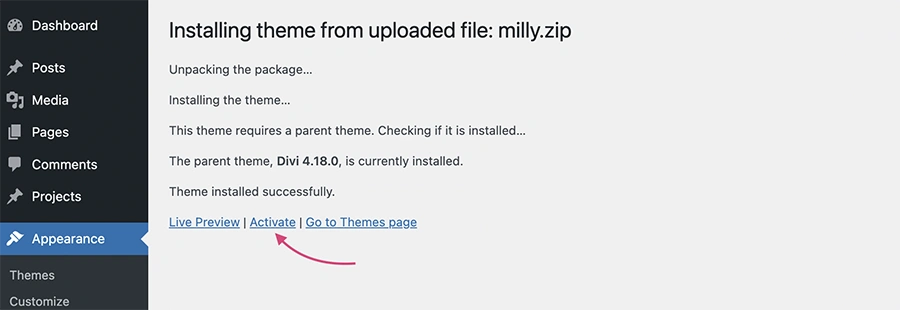
Optional: Back up your site
Imports work best on a fresh installation of WordPress with the Divi Theme installed. It is always recommended that you verify that you have a good backup prior to importing new content.
Step 4: Choose Demo Import Options
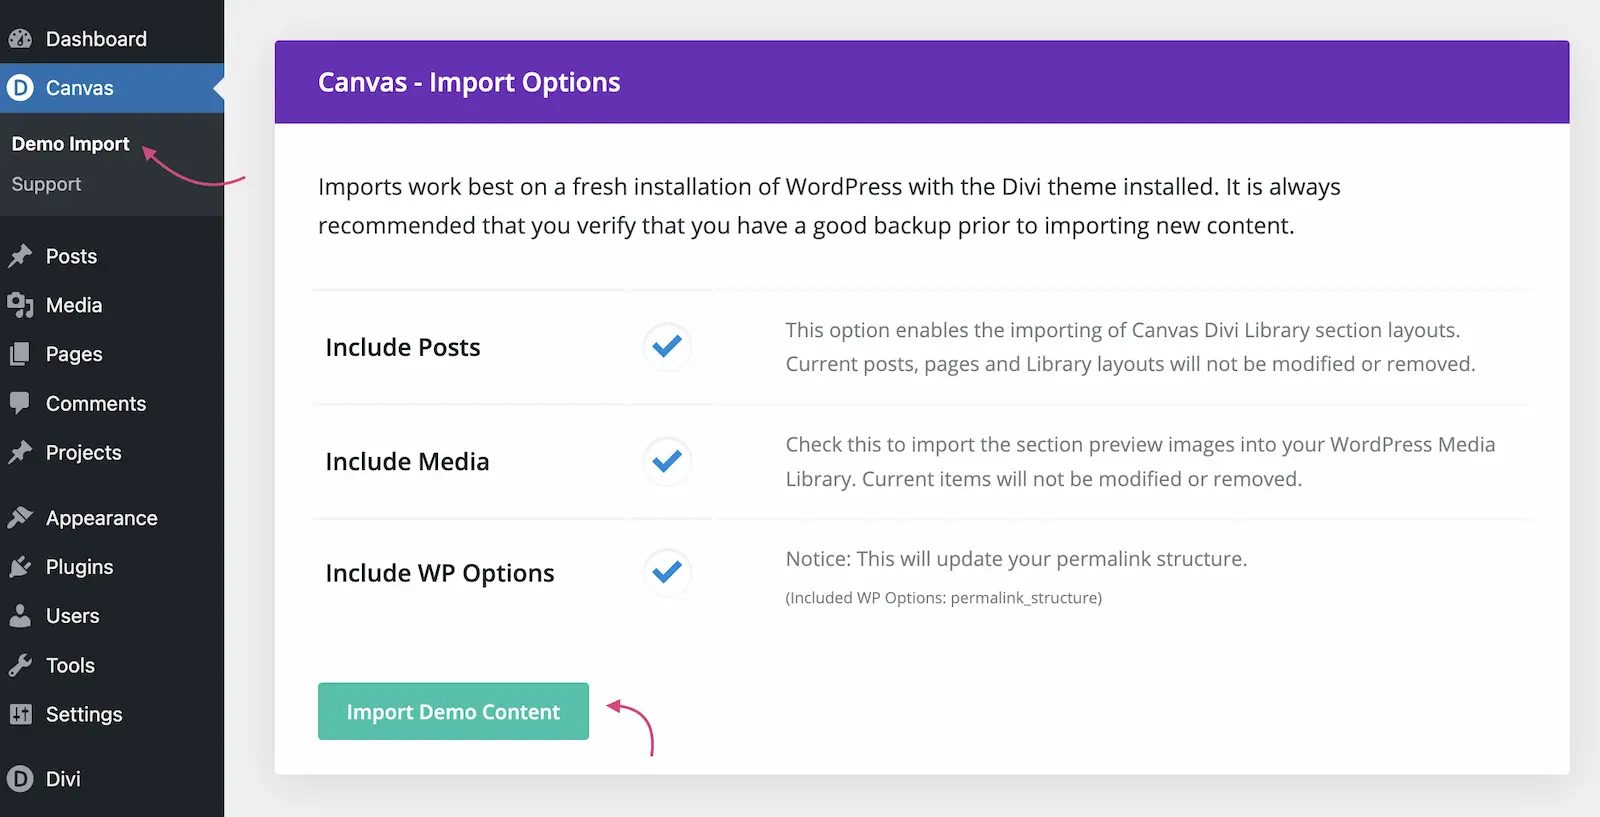
To import the Canvas sections to the Library, please navigate to the Canvas ➞ Demo Import dashboard panel. You'll see the list of all elements ready to import, including: Posts, (and that refers to the Divi Library Layouts), Media files (used for section previews in the Builder) and WP Options (which include custom permalink structure).
For non-experienced users, we recommend keeping all elements selected.
Step 5 Import Demo Sections
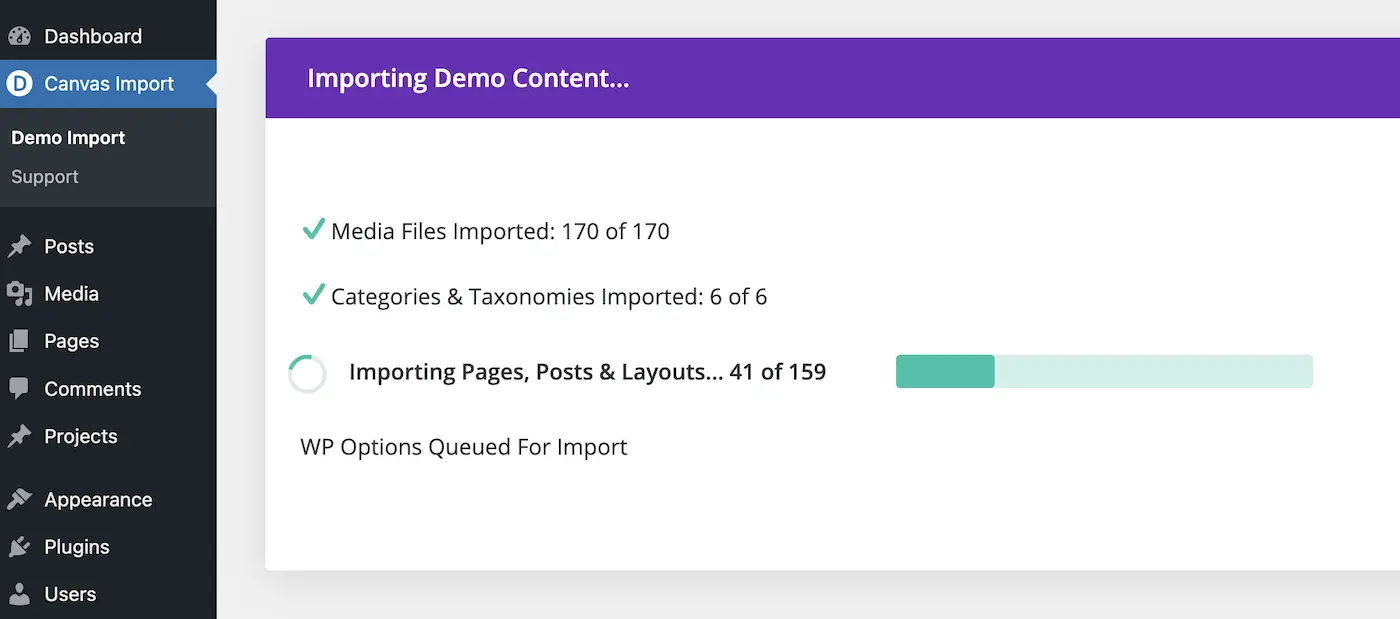
Click the Import Demo Content button. Please note: the import process may take even several minutes, depending on your internet connection speed. You'll see a progress bar with detailed information about the current import status. Please wait patiently for the import process to finish.
Optional: Remove Importer Files
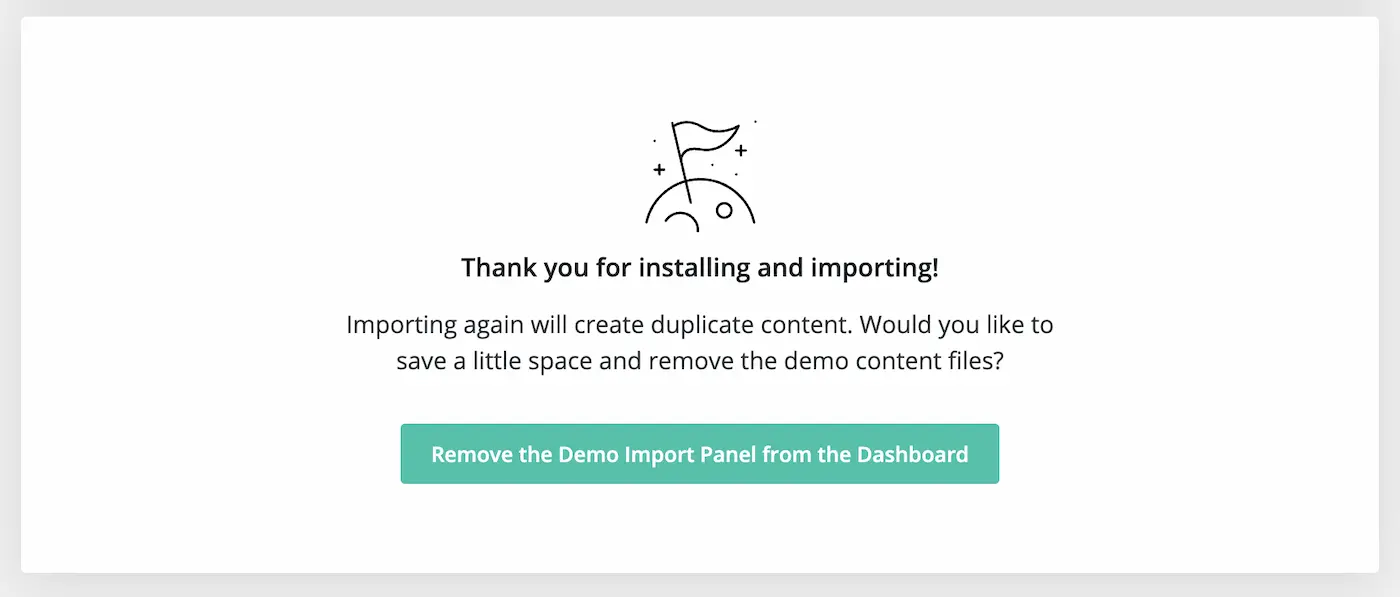
Once the import process is completed, you'll be able to delete the importer files and remove the import functionality from the Dashboard by clicking the Remove the Demo Import Panel from the Dashboard button.
All done! Proceed with website creation
Everything is set up. Now you can go ahead and start adding Canvas sections from the Library inside the Divi Builder. Learn more
Plugin Import
Step 1: Upload and install Canvas Importer
Navigate to Plugins -> Add New. Click Upload Plugin and then Choose file. Locate the canvas-installer-plugin.zip file on your computer, then click the Install Now button.

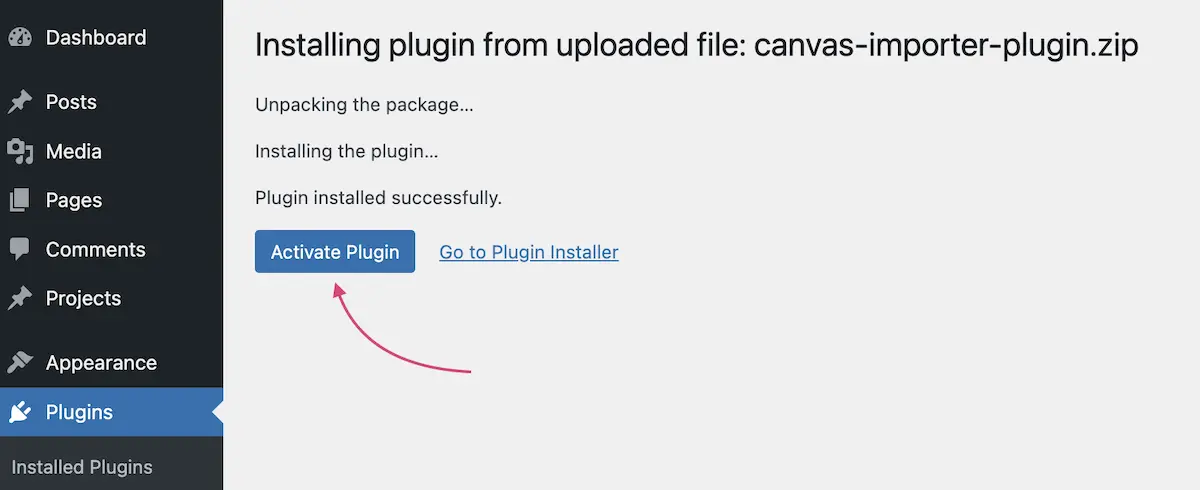
Step 2: Activate the plugin
After completing the upload, you will need to activate the plugin by clicking the Activate Plugin button.
Optional: Back up your site
Imports work best on a fresh installation of WordPress with the Divi Theme installed. It is always recommended that you verify that you have a good backup prior to importing new content.
Step 3: Choose Demo Import Options
To import the Canvas sections to the Library, please navigate to the Canvas ➞ Demo Import dashboard panel. You'll see the list of all elements ready to import, including: Posts, (and that refers to the Divi Library Layouts), Media files (used for section previews in the Builder) and WP Options (which include custom permalink structure).
For non-experienced users, we recommend keeping all elements selected.

Step 4: Import Demo Sections
Click the Import Demo Content button. Please note: the import process may take even several minutes, depending on your internet connection speed. You'll see a progress bar with detailed information about the current import status. Please wait patiently for the import process to finish.

Optional: Remove Importer Files
Once the import process is completed, you'll be able to delete the importer files and remove the import functionality from the Dashboard by clicking the Remove the Demo Import Panel from the Dashboard button.

Step 5: Add Custom CSS
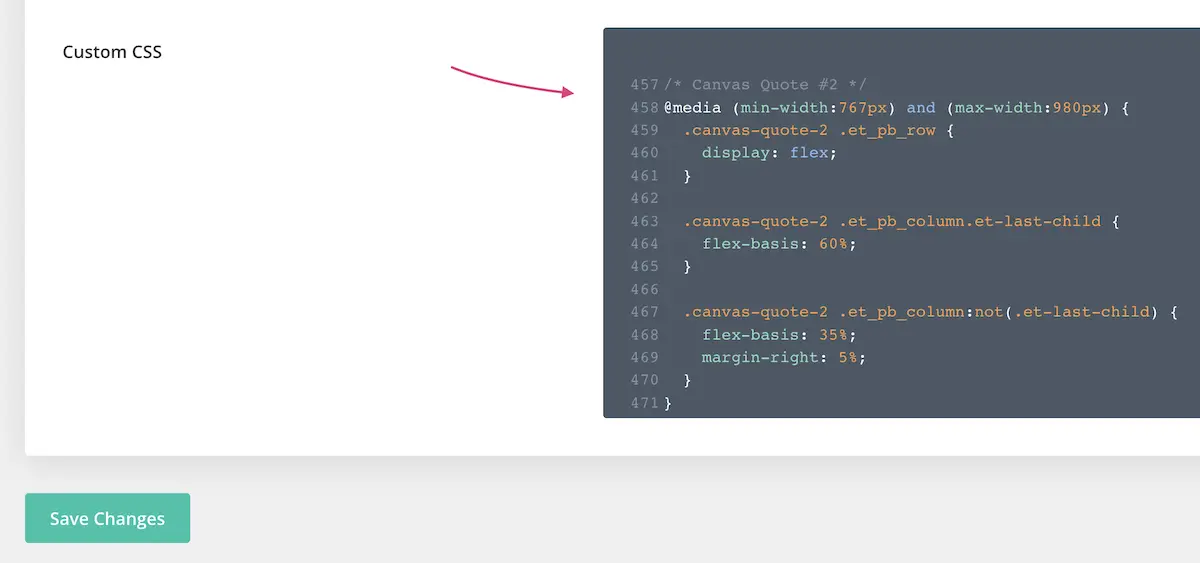
Open the canvas-style.css file you'll find in the plugin import package and copy the included CSS code. Paste the code inside the Theme Options Custom CSS box, or in your child theme stylesheet.
All done! Proceed with website creation
Everything is set up. Now you can go ahead and start adding Canvas sections from the Library inside the Divi Builder. Learn more
Adding Sections from the Library
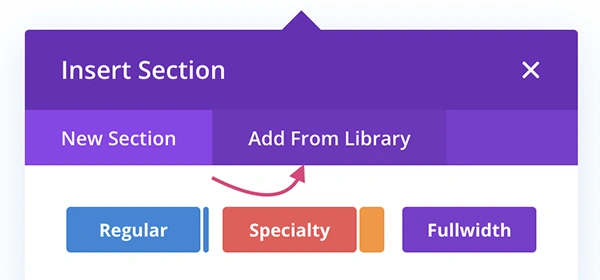
All the Canvas sections are now available inside your Divi Library. When working on a page design in the Builder, you can access all sections when adding a New Section. Instead of adding an empty section, choose Add from Library.
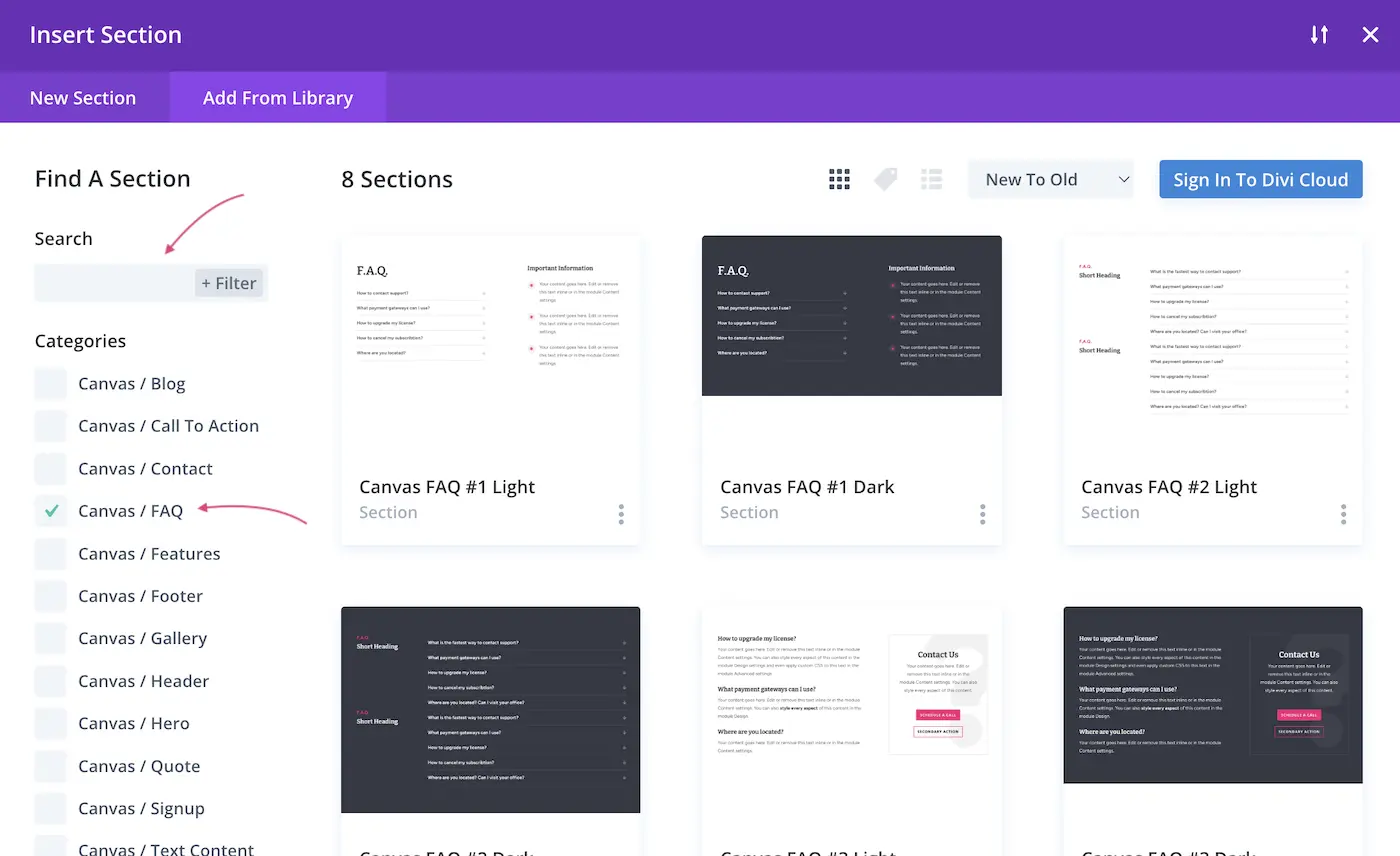
Inside the Library, you'll be able to preview all the sections included in Canvas All-in-One Layout kit. You can filter sections by tags or categories, and use search functionality to quickly find the content part you need.
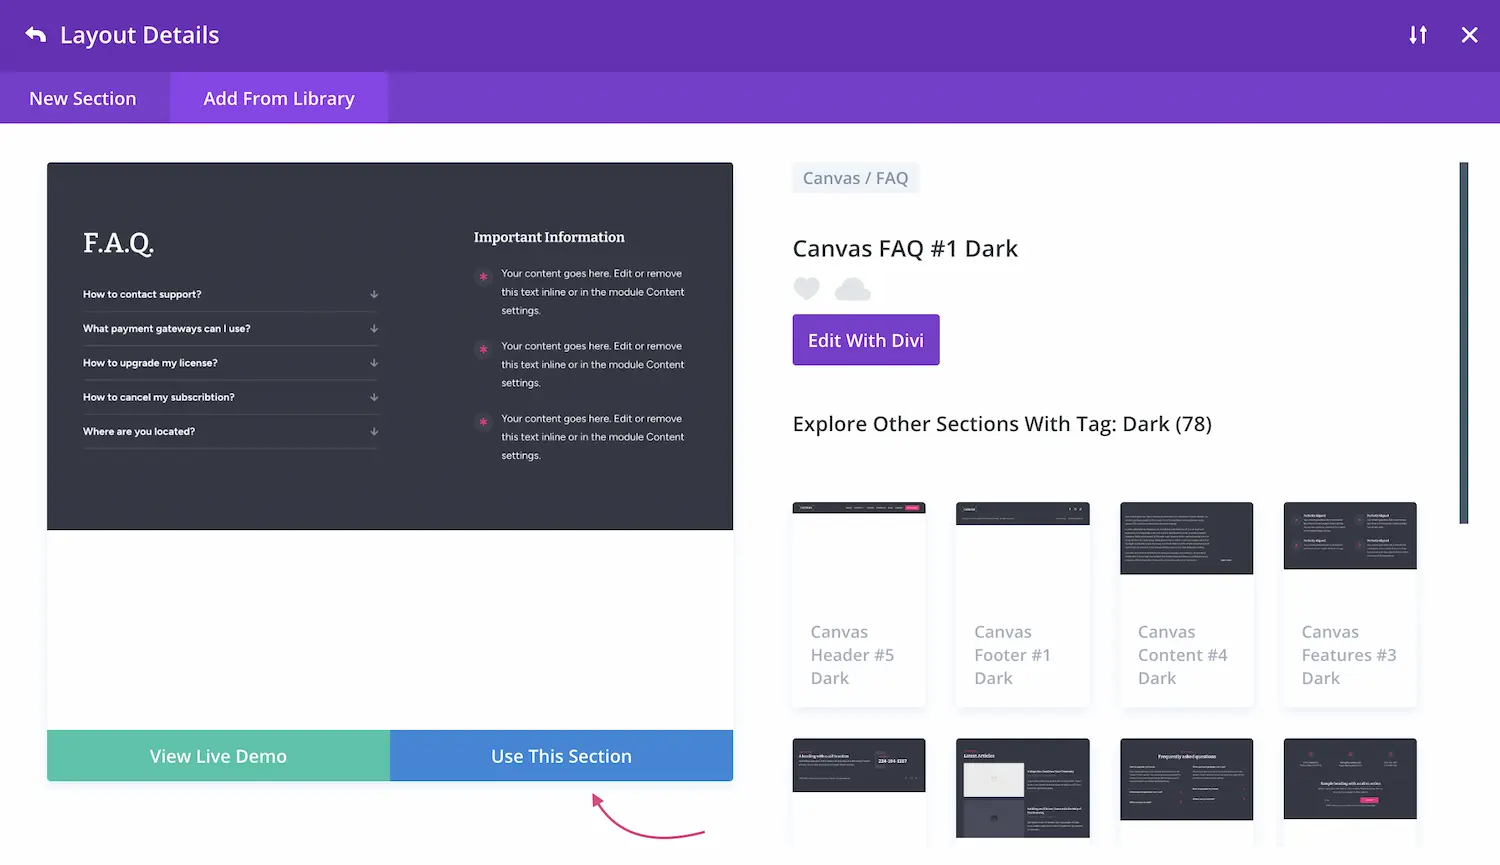
Click on the selected section and choose Use this Section button to add it to the page.
Importing sections directly to the Builder or Divi Cloud
In addition to child theme and plugin installation, we’ve prepared a set of JSON files, which can be imported directly via the Divi Builder. Sections imported this way are ready to use and the corresponding CSS code is included in each individual section (as a last row with a Code module). Once imported, you can move the code to your Theme Options or Child Theme.
Option #1: Import mulitple sections at once
In the download package, navigate to Divi Builder Imports ➞ Divi Library Sections for Divi Cloud folder, where you'll find JSON files with various sets of sections. Here, you can choose which set of sections to import:
- All sections
- All light sections
- All dark sections
- Sections from certain category (blog, call to action, contact, FAQ, features, footer, gallery, header, hero, quote, signup, text content)
You can use one of two methods of importing these files inside Divi:
Method #1: Import All Sections to Divi Library for use in Divi Cloud
First, navigate to Divi ➞ Divi Library. Click the Import & Export button.
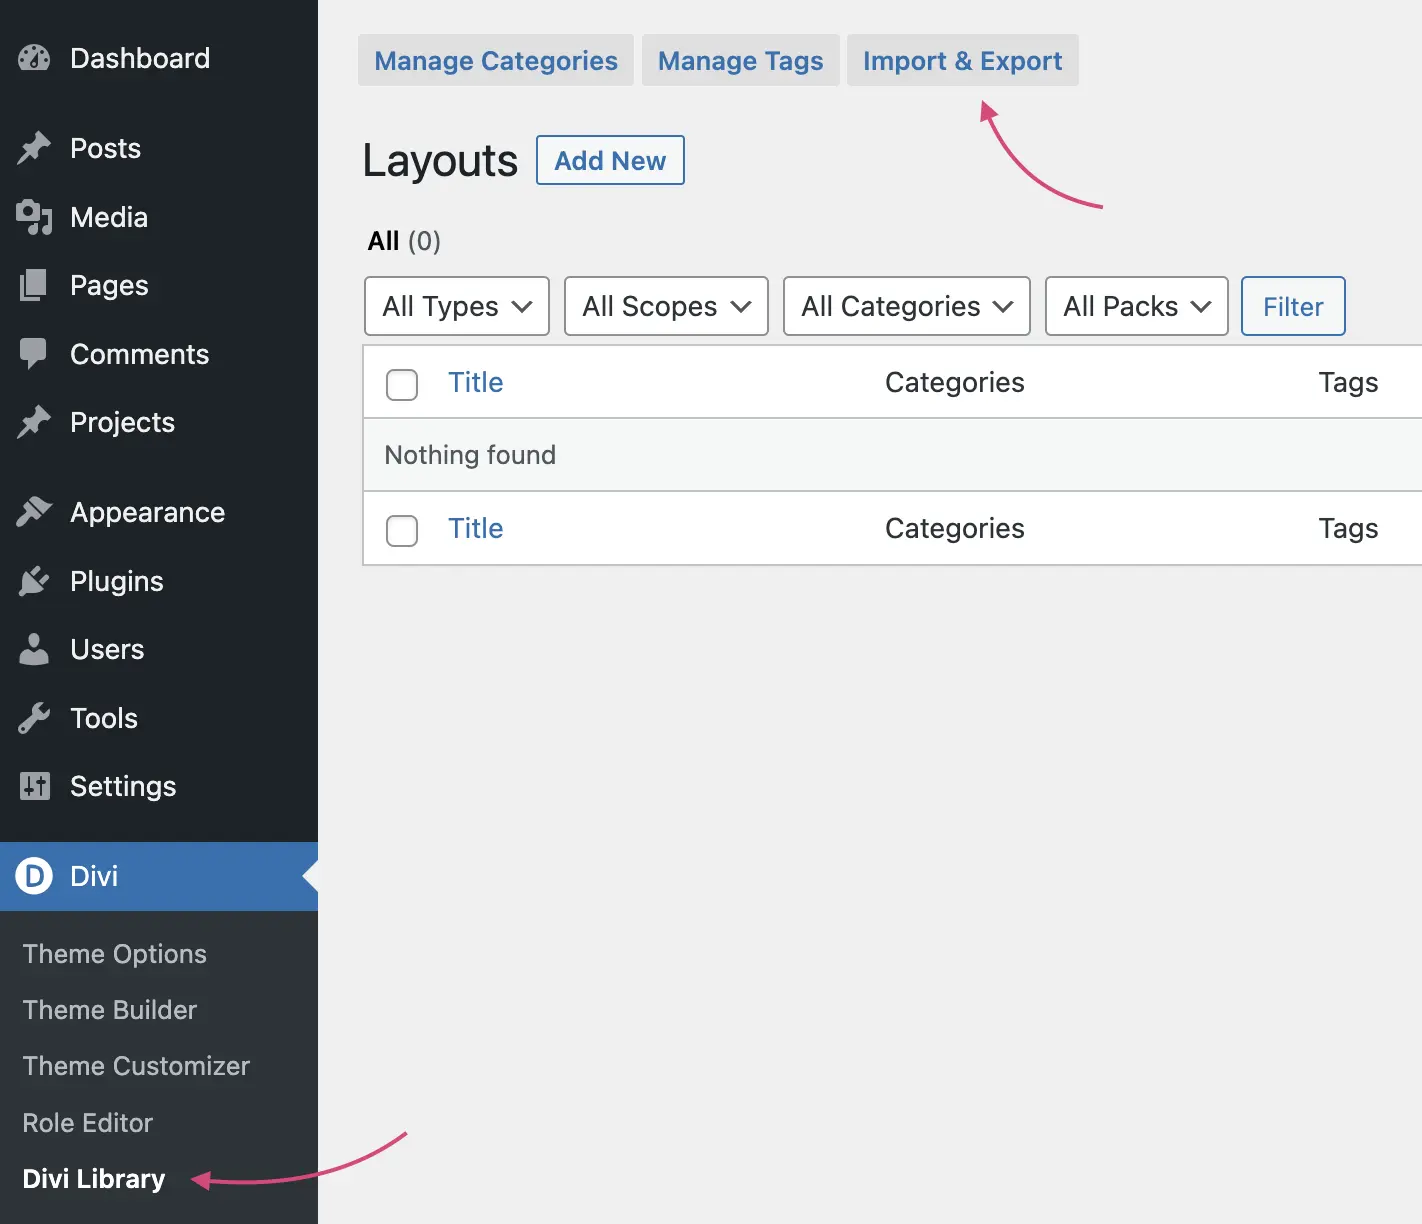
Navigate to the Import tab, select the JSON file from the Divi Library Sections for Divi Cloud folder, click the Import Divi Builder Layouts button, and wait for the import process to finish.
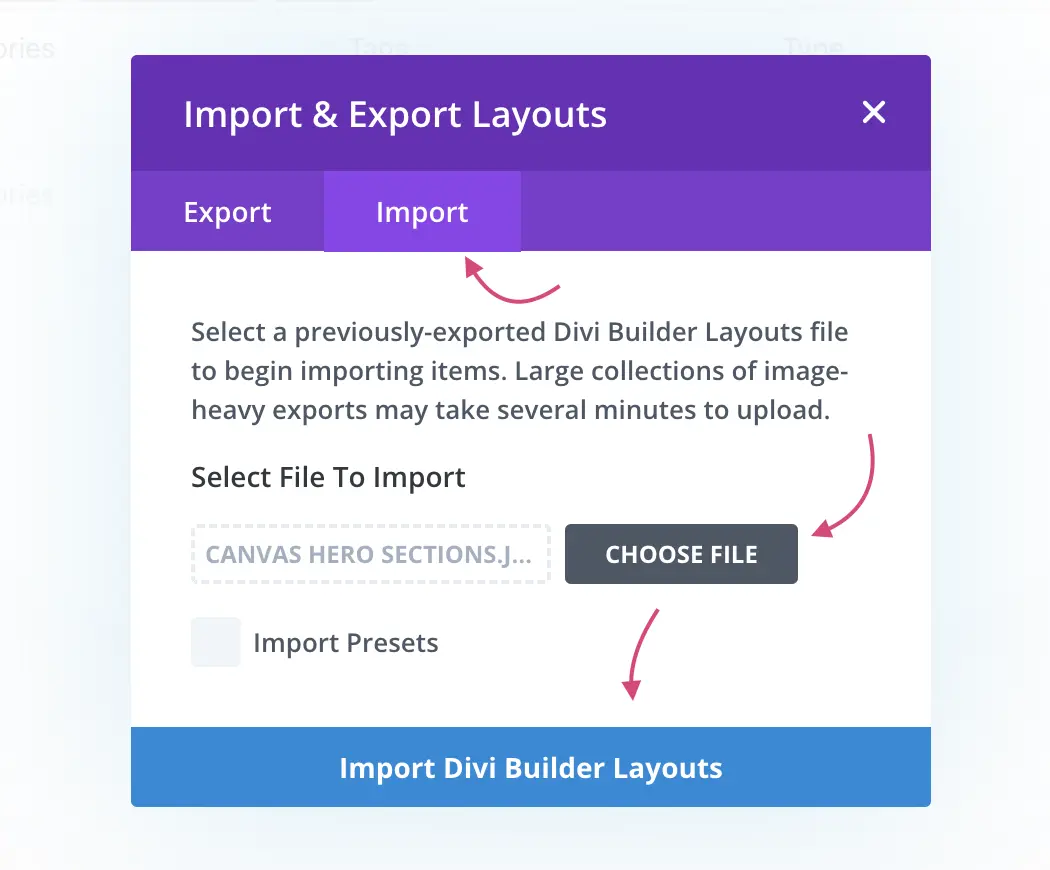
Once the sections are inside your Divi Library, you'll be able to choose and use any of the imported content when using the Divi Builder. When inserting a new Section, choose Add from Library tab:

Here, you'll see the imported selection of Canvas sections. You can search for specific sections by name or filter through imported categories. To save each section to your Divi Cloud separately, click the Cloud icon:
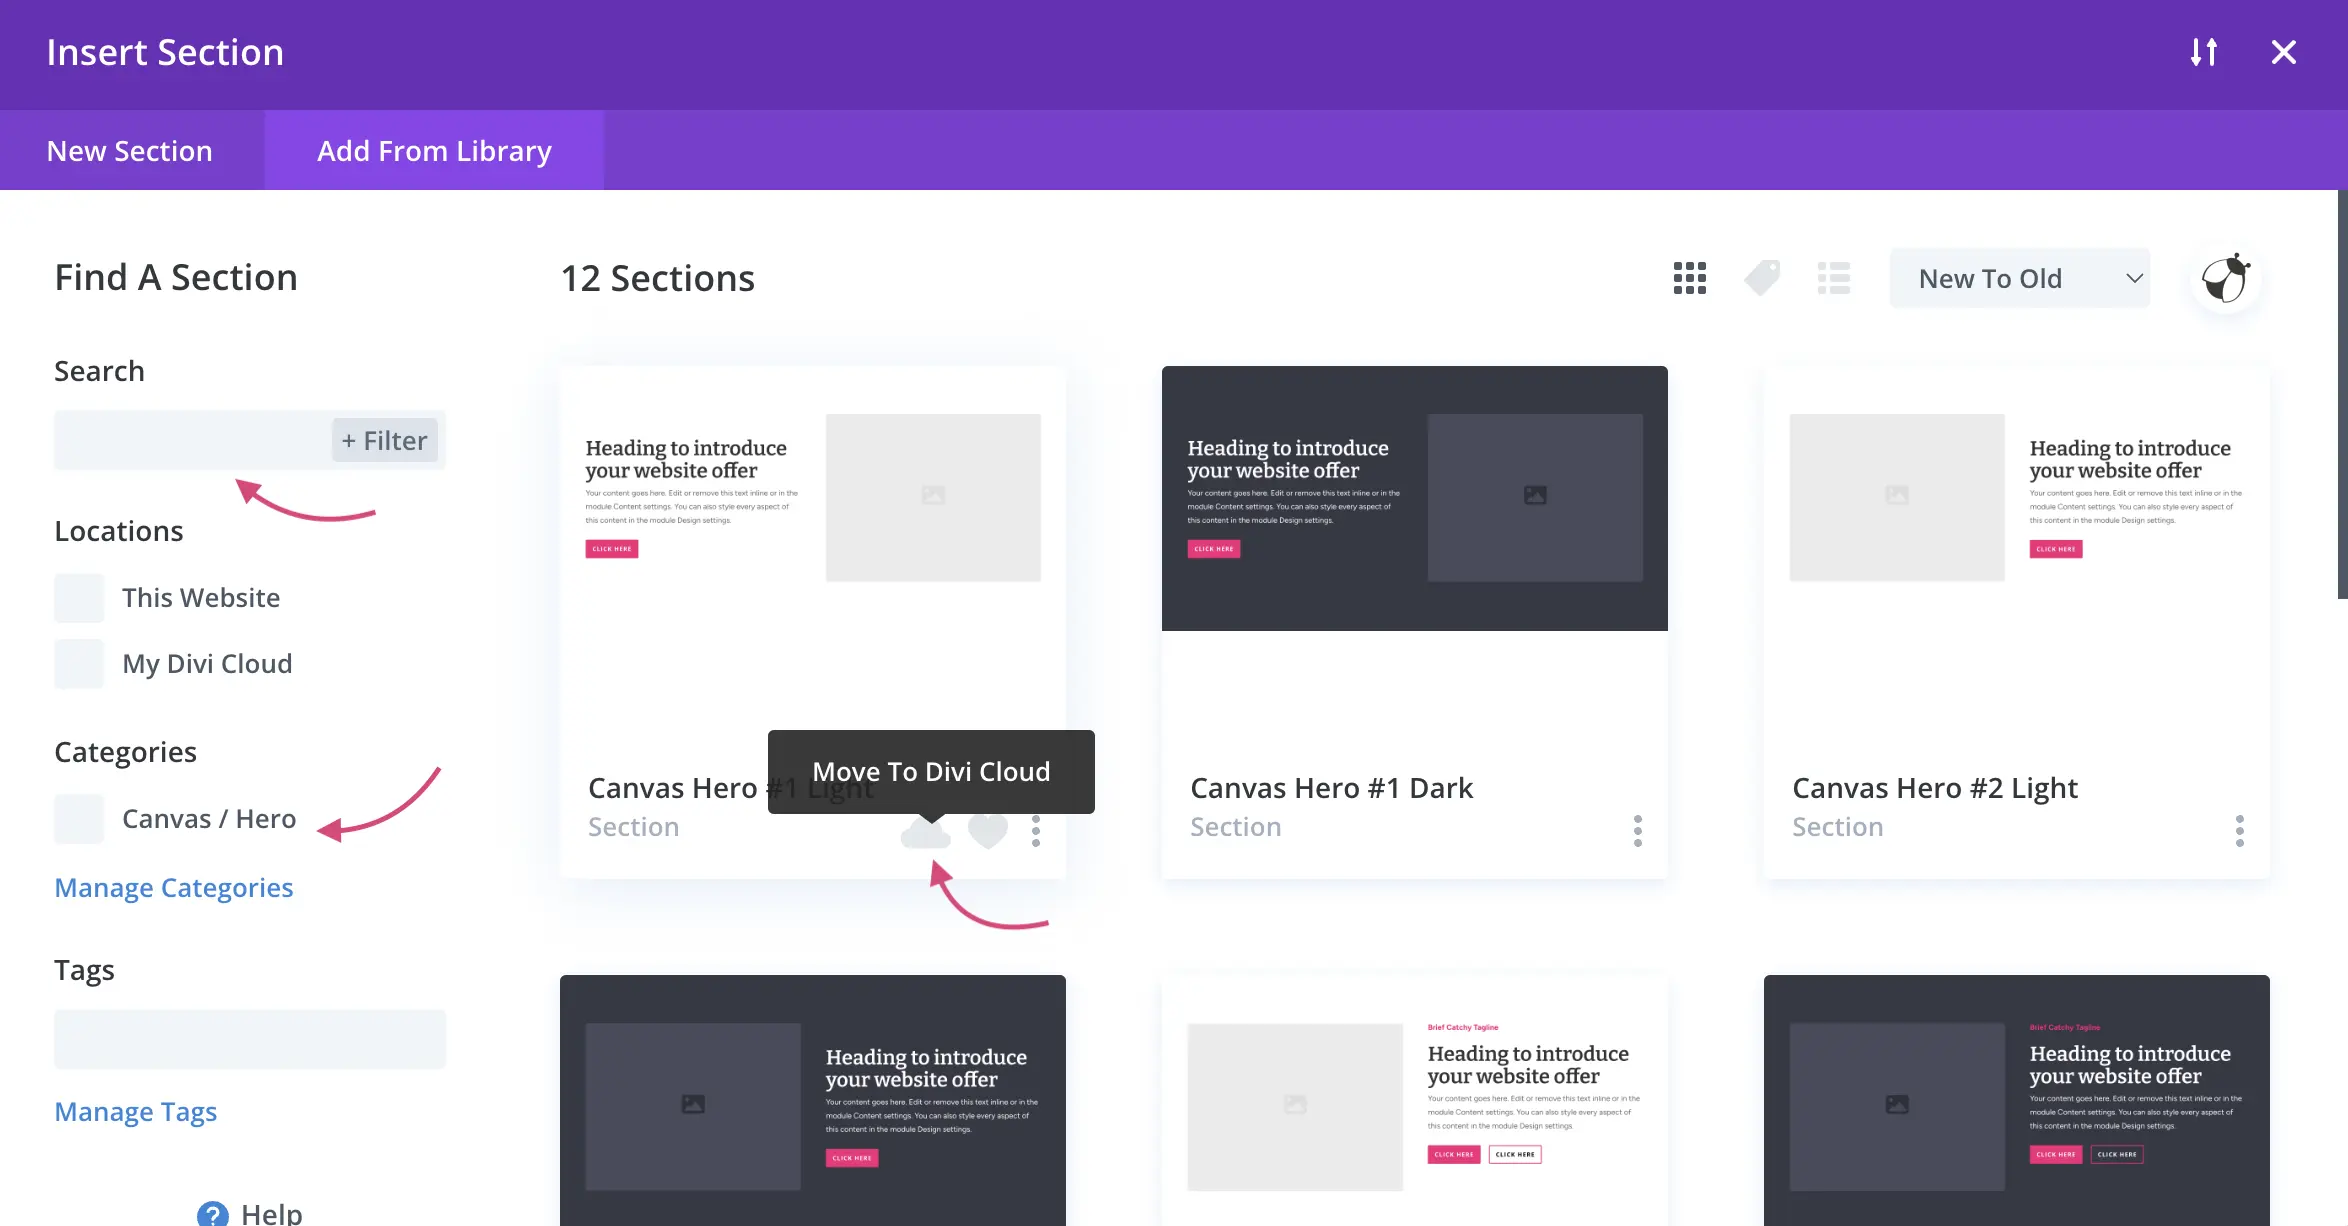
Method #2: Import All Sections directly to Divi Cloud
You can import all Sections directly to Divi Cloud when using the Divi Builder. Choose to Add a New Section from Library, and drag & drop JSON file directly onto the popup screen.
Option #2: Import a single section inside the Builder
In the download package, navigate to Divi Builder Imports ➞ Single Drag&Drop Sections folder, where you'll find the JSON files with all sections saved separately, divided into a category-based folder structure.
You can use one of two methods of importing these single Canvas sections inside Divi:
Method #1: Use the Portability feature
First, choose the Portability icon in Divi Builder Menu, navigate to Import tab, select the JSON file from Single Drag&Drop Sections folder, uncheck the "Replace Exisiting Content" option and click Import Divi Builder Layout.
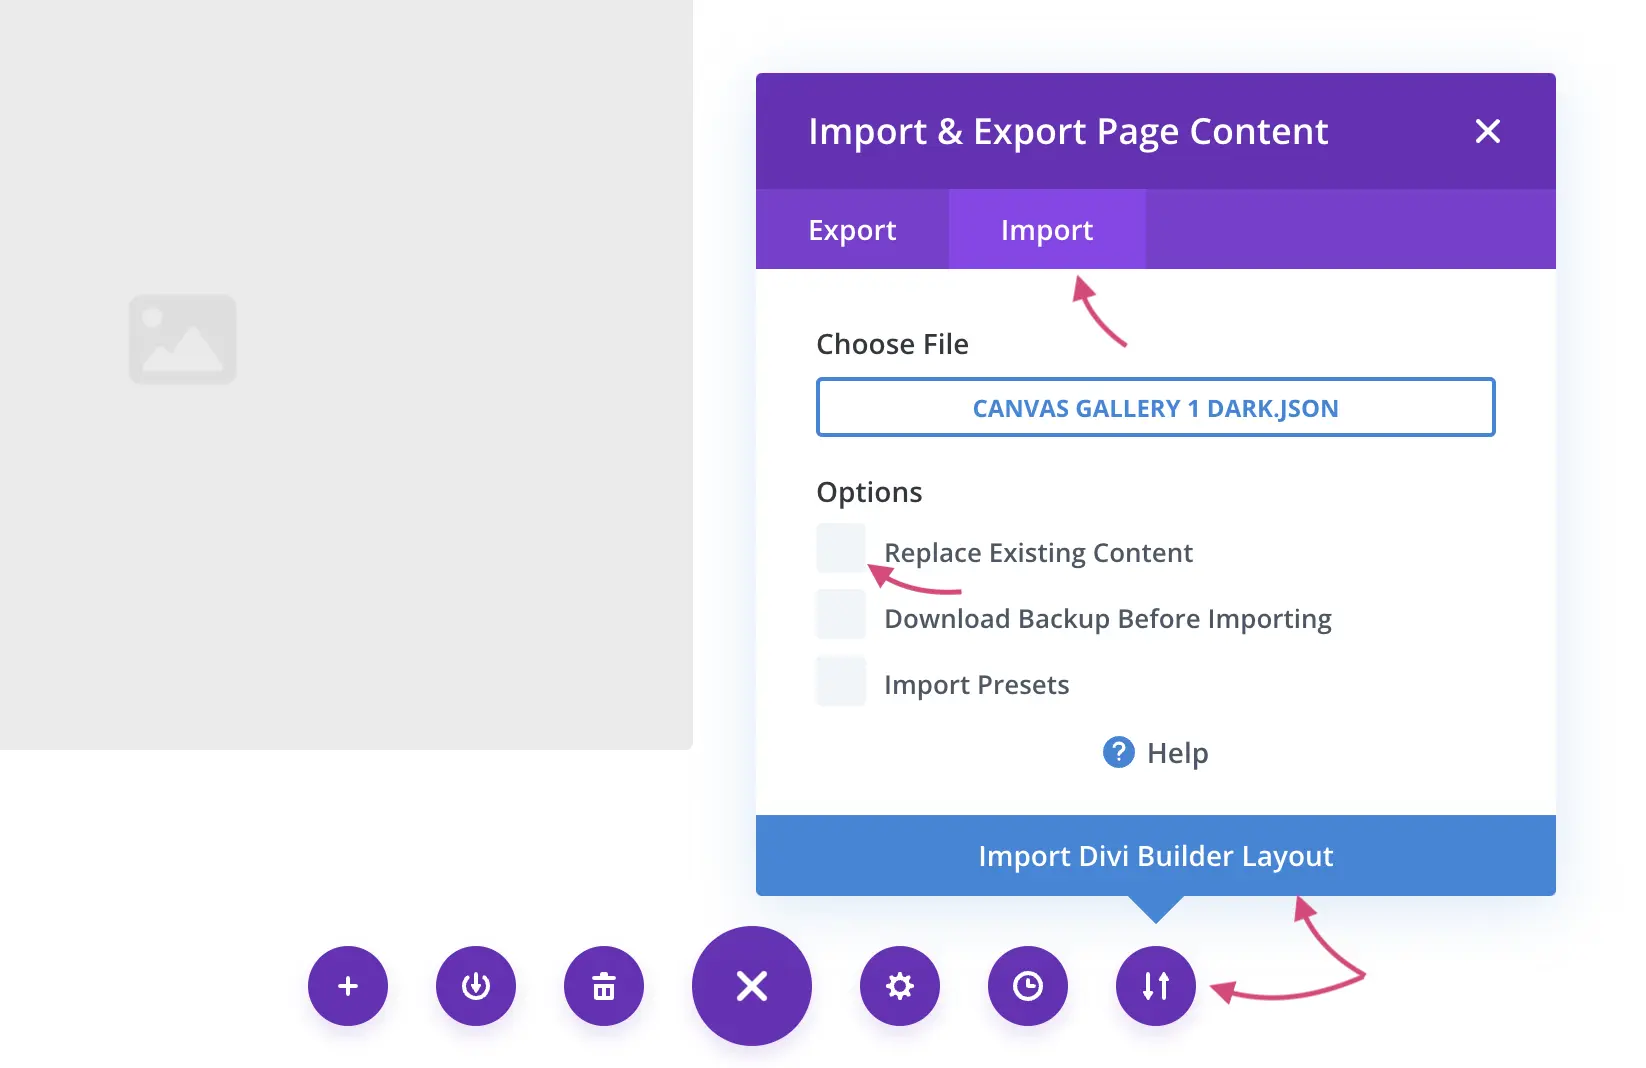
Method #2: Drag & Drop Single Sections
You can also drag & drop any of the JSON files included inside the Divi Builder Imports ➞ Single Drag&Drop Sections folder directly into the page when the Visual Builder is enabled.
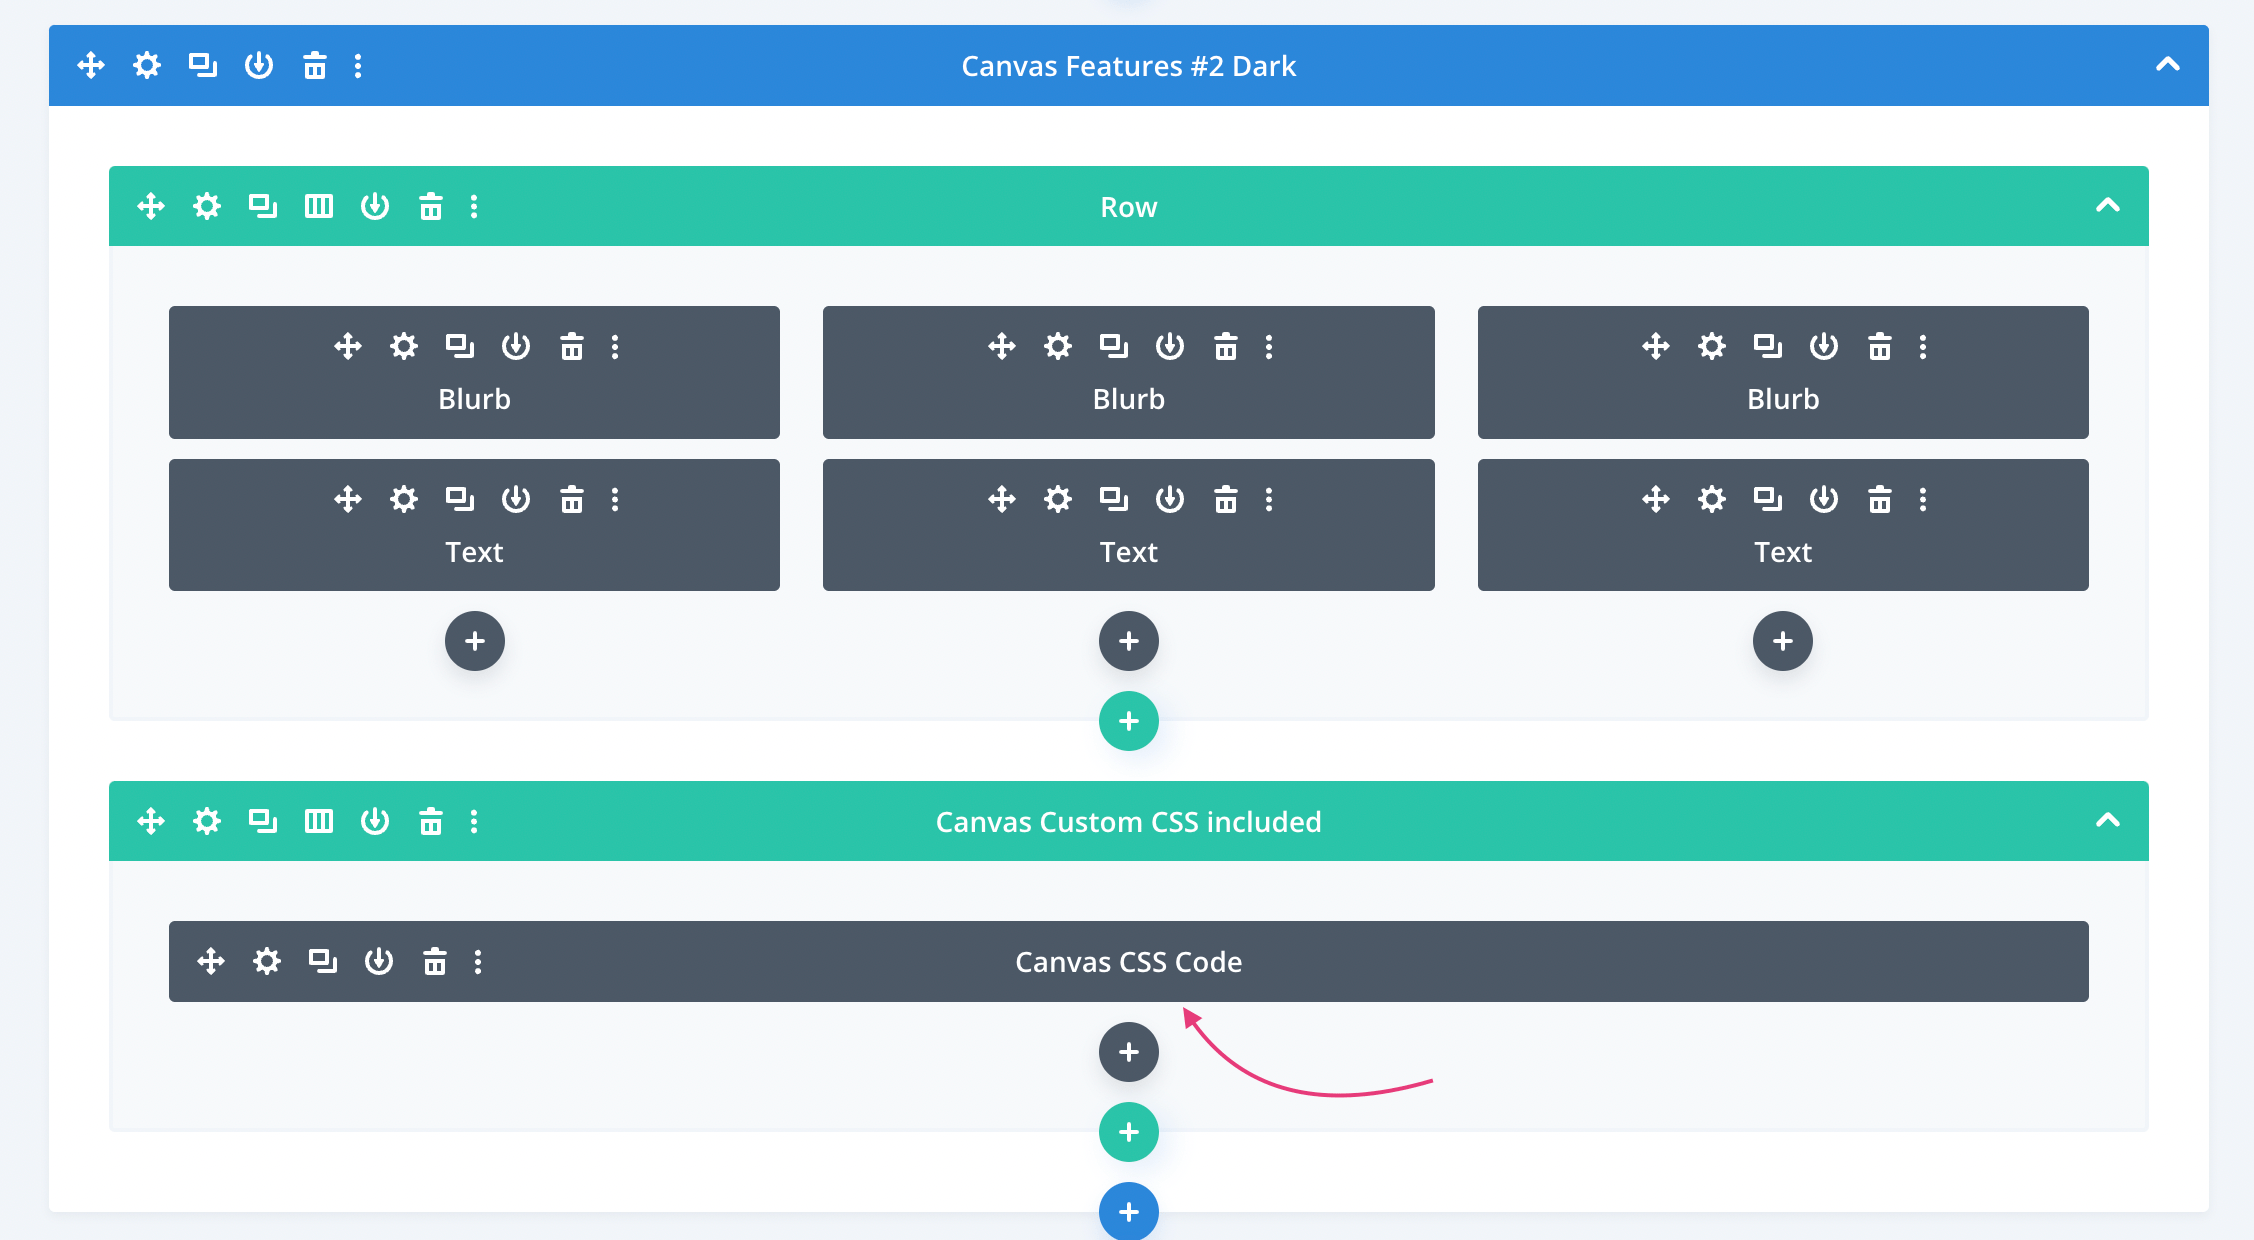
Important note: CSS Code for each section
JSON files included inside the Divi Builder Imports folder include sections (single or set of sections) with integrated CSS code. That means the Custom CSS code used for additional section styling is included inside a Code module located in the last Row of each section. The CSS code will continue to work this way, but it is recommended to move the code to your Theme Options or child theme stylesheet.
Important: Canvas Headers use Two Sections
To make sure your header and navigation works as shown on the Canvas demo page, you need to insert two sections to your page:
- Any of the Canvas Header sections
- The Canvas Fullscreen Menu Overlay section
Tip: Move the Menu Overlay to Footer Template
If you are using the Theme Builder, you can move the Overlay section to the Footer template, and include it as the last section, so that it doesn't get in the way of desigining the rest of the page when the Divi Builder is enabled.
How to Update
In the updated plugin ZIP file, which you can download from your account page, you'll find a new Updates folder. Depending on your workflow and how you've imported the previous version of Canvas section, you can use on of two methods to add new updated sections to your website:
Option #1:
Import all new sections and CSS separately (for Child Theme or Plugin users)
Use this option, if you originally imported Canvas sections using a child theme or our importer plugin. In the download package, navigate to Updates ➞ Canvas x.x ➞ Child Theme and Plugin (CSS separated) folder, where you'll find folowing files:
- Canvas x - All sections.json file - use it to import Sections via Divi Library.
- canvas-x-additional-style.css file - copy the CSS code from this file and paste it at the end of your current custom CSS (in the Child Theme stylesheet, or inside the Theme Options Custom CSS field).
- Featured Images - you can use the PNG images from this folder to assign a featured image to each section for easier access in the Builder.
option #2:
Import all new sections with CSS included (for Divi Cloud or individual Builder access)
Use this option, if you originally imported Canvas sections using Divi Builder imports, or if you'd like to import all new sections to your Divi Cloud library. In the download package, navigate to Updates ➞ Canvas x.x ➞ Divi Cloud (CSS included) folder. Here, you can choose which set of sections to import:
- All new sections
- All new sections from certain category
- Individual new sections
Support
Option #1 Elegant Themes
For additional assistance with using the Divi Theme framework, Elegant Themes offers free technical support to all their members. Log in to your account at the Elegant Themes website.
Option #2 Divi Communities
You can also find support on Facebook by posting your questions in the community groups: Divi Theme Users, Divi Web Designers, Divi Lovers.
Option #3 Divi Lover Support
Haven’t found what you need in the documentation? We’ll be happy to help!
Note: how you can get support depends on where you bought Canvas. See the options below.
If you bought Canvas: All-in-One Layout Kit on divilover.com, please log in to your account and submit a ticket from the Support Area on your account page.
If you bought Canvas: All-in-One Layout Kit on the Elegant Themes Marketplace, please submit your support ticket through the ET Marketplace system.
Option #4 1-on-1 Web Design Assistance
Ania offers additional, 1-on-1 consultations to help you with any web design questions and issues. This service goes beyond the scope of Canvas support and is geared toward web designers who’d like to learn more about WordPress, Divi, CSS and web design in general. Go here for more information and pricing.
Changelog
Version 3.0 - 2023 October 27th
- Pricing Sections added
Version 2.0 - 2023 Februrary 14th
- Fullscreen Menu Overlay section updated
- Number Counters Sections added
Version 1.0 - 2022 November 23rd
- Release date