Updated for Divi 5: When you don't use a Theme Builder template, Divi 5 still shows your blog page, categories, tags, archives and search results with the same default template as Divi 4, so the jQuery and CSS from this tutorial work in Divi 5 without changes. I also added the Divi 5 way to design these pages visually, with the Theme Builder.
How does the Divi blog page work?
Your blog page, category pages, tag pages, author pages, date archives and search results are not regular pages, so you can't open them in the Divi Builder. Divi displays them with one default template file, unless you assign your own template to them in the Theme Builder.
If you're using Divi Theme to create a website with a blog, you might be wondering why it's not possible to use the Divi Builder to edit your categories or archives, especially if you're just starting out.
When you assign a static page as your Homepage in WordPress Dashboard (under Settings → Reading), you'll have the option to select a separate "Posts page". Any page chosen as a "Posts page" will become the main blog index page: the page that lists all the latest posts (instead of that page content).
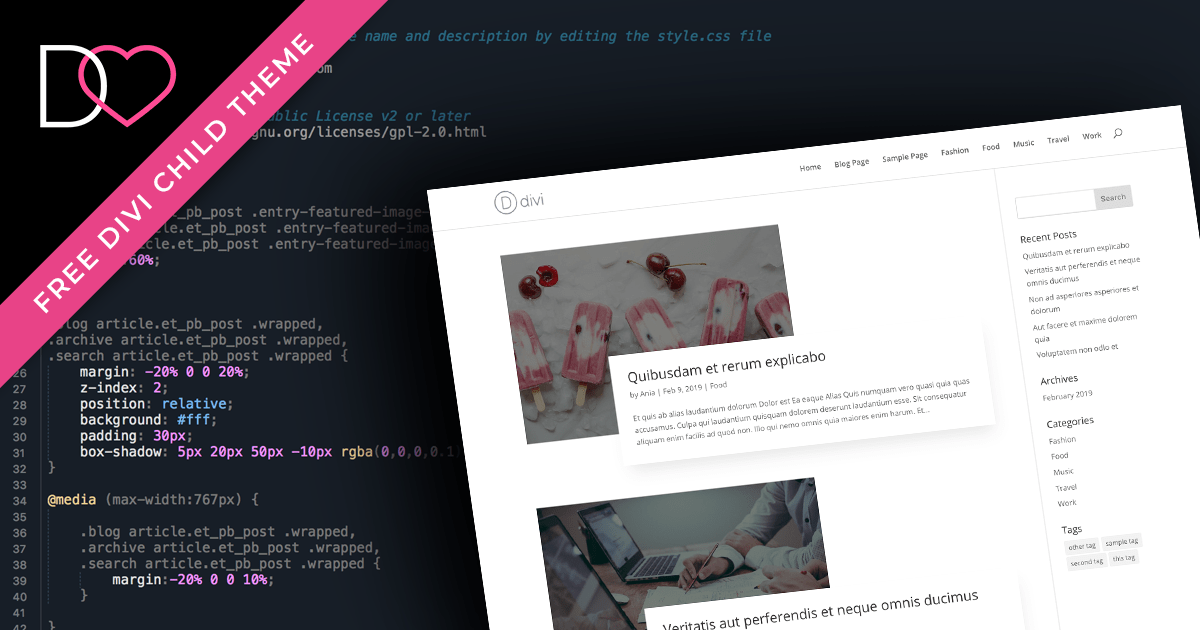
In this tutorial, I'd like to show you how to use custom CSS and JavaScript code to change the default, boring Divi blog list, into a fun layout with the overlapping effect!

The video was recorded in Divi 4. The code is the same in Divi 5; only the place where you paste it has a new name in some cases (see the steps below).
Want to see it live? Check out the live preview of the blog page.
How to edit the blog layout in Divi?
There are two ways: build your own template for these pages in the Divi Theme Builder, or keep Divi's default blog template and change its look with CSS (and a little jQuery). This tutorial uses the second way, but here is a quick look at both.
Option 1: Design a template in the Theme Builder
Since Divi 4.0 (and in Divi 5), you can design blog and archive pages visually:
- Go to Divi → Theme Builder and add a new template.
- Choose where to use it. All Archive Pages covers every archive. You can also pick All Category Pages, Specific Category Pages, All Tag Pages, All Author Pages, All Date Pages or Search Results. Your main posts page is the Blog option in the Posts group.
- Build a custom body. To show the name of the current category, use dynamic content Post/Archive Title in a Heading or Text module. Category Description is also available as dynamic content inside the Theme Builder.
- Add a Blog module and turn on Posts For Current Page (Content tab → Content), so it lists the posts of the category, tag or archive the visitor is looking at.
- In Divi 5 you can design the post cards yourself with the Loop Builder: select a module (for example a Group), go to Content tab → Loop, turn on Loop Element and set Query Type to Posts for Current Page. Then fill the card with dynamic content (featured image, title, excerpt).
Keep in mind that the code below is written for Divi's default blog template. As soon as a Theme Builder template is assigned to a page, that page uses your template instead, and the code won't change it.
Option 2: Change Divi's default blog template
There is just one file in the Divi theme folder, which handles the output of all the blog index pages. By "index pages" I mean: blog archives (yearly, monthly etc.), blog categories, authors pages, tags pages, search results page, and even custom post type archives etc. The file is called index.php and one way to edit these pages would be to copy the file from Divi to your child theme folder and make your edits there.
I'm not a huge fan of this method, because it requires you to keep track of Divi theme updates. If Elegant Themes decides to make changes in Divi's index.php file you'd need to update your copy of the file, so it reflects the changes as well. That is the reason I like to use custom CSS to add my modifications.
How to target Divi index pages with CSS
Use the CSS classes WordPress adds to the <body> tag: .blog on the posts page, .archive on category, tag, author, date and custom post type archives, and .search on search results.
WordPress has a very useful feature, which isn't that obvious to beginners. Each WordPress page (or type of page) has a custom CSS class assigned to the body element. In fact, the <body> tag in WordPress has multiple classes: some classes are generated by WP, some by the theme you're using, and some are generated by the plugins you have active on your website.
You can check the current page body CSS class by inspecting the page source in the browser. Most browsers come with some sort of inspector tool you can use to do that (right-click the page and choose Inspect).
There are three CSS classes we need to target to customize all of the blog index pages in Divi: blog, archive and search CSS class.
How to modify the post HTML structure with jQuery
A short jQuery snippet wraps the post excerpt in its own paragraph and puts everything except the featured image into one container, so CSS can move the text box over the image.
The problem with the default blog post structure in Divi is that the post excerpt isn't wrapped in a separate container, which we could target with CSS. Additionally, in order to achieve the overlapping effect, we need to have two parent elements to target: the image and the content, each wrapped in a separate HTML tag. (Divi 5 still outputs the same post structure as Divi 4 here.)
This is a JavaScript code we can use to achieve the desired HTML structure for each of the posts on our posts lists:
jQuery(document).ready(function($) {

	// wrap blog article elements on archive pages
	$('.et_pb_post').contents().filter(function() {
	    return this.nodeType == 3 && $.trim(this.nodeValue).length;
		})
		.wrap('<p class="post-content">');

	$('.blog .et_pb_post, .archive .et_pb_post, .search .et_pb_post').each(function () {
		$('>:not(a.entry-featured-image-url)', this).wrapAll('<div class="wrapped"></div>');
	});

});
The easiest place for it is Divi → Theme Options → Integration → Add code to the < head > of your blog. Paste the code between <script> and </script> tags and make sure Enable header code is on. Divi 5 still loads jQuery on the front end, so the code runs as it did in Divi 4.
If you're not sure where to add that code, please follow the instructions from this article, or use the free child theme provided with this tutorial.
The CSS magic: how to create the overlapping effect
Make the featured image 60% wide, then pull the new text container up and to the right with negative top margin and left margin, and give it a white background and a soft shadow.
Now, with the HTML structure ready, we can easily change the appearance of each post, by using this bit of CSS:
.blog article.et_pb_post .entry-featured-image-url,
.archive article.et_pb_post .entry-featured-image-url,
.search article.et_pb_post .entry-featured-image-url {
	width:60%;
}

.blog article.et_pb_post .wrapped,
.archive article.et_pb_post .wrapped,
.search article.et_pb_post .wrapped {
	margin: -20% 0 0 20%;
	z-index: 2;
	position: relative;
	background: #fff;
	padding: 30px;
	box-shadow: 5px 20px 50px -10px rgba(0,0,0,0.1);
}
This will create the overlapping effect, but we need to add some adjustments for smaller screen sizes:
@media (max-width:767px) {

	.blog article.et_pb_post .wrapped,
	.archive article.et_pb_post .wrapped,
	.search article.et_pb_post .wrapped {
		margin:-20% 0 0 10%;
	}

}

@media (max-width:400px) {

	.blog article.et_pb_post .wrapped,
	.archive article.et_pb_post .wrapped,
	.search article.et_pb_post .wrapped {
		margin:0;
	}

	.blog article.et_pb_post .entry-featured-image-url,
	.archive article.et_pb_post .entry-featured-image-url,
	.search article.et_pb_post .entry-featured-image-url {
		width:100%;
		margin-bottom:0;
	}

}
And to add a nice overlay on top of each post image we'll use this CSS code:
.blog article.et_pb_post .entry-featured-image-url:after,
.archive article.et_pb_post .entry-featured-image-url:after,
.search article.et_pb_post .entry-featured-image-url:after {
	content: '';
	display: block;
	position: absolute;
	bottom: 0;
	right: 0;
	left: 0;
	top: 0;
	background: rgba(0,0,0,0.5);
	transition: all .3s ease-in-out;
}

.blog article.et_pb_post:hover .entry-featured-image-url:after,
.archive article.et_pb_post:hover .entry-featured-image-url:after,
.search article.et_pb_post:hover .entry-featured-image-url:after {
	opacity: 0;
}
Add the CSS to Divi → Theme Options → General → Custom CSS or to the style.css file of your child theme. The percentage margins are calculated from the width of the post list, so the overlap scales with the screen.
That's it!
That is all the code you need to make your Divi blog look like our demo page. If you'd like to quickly use the same effect on your website, download the free Divi child theme, which includes all these modifications!
Free download
Blog Archive Child Theme
A small Divi child theme with the CSS and jQuery from the tutorial that restyles the blog and category archive pages. Install it in Appearance → Themes → Add New → Upload. Works in Divi 5 and Divi 4.
Get the free downloadDon't like to mess with the code?
Then a plugin is the simpler way: Divi Toolbox has settings for blog posts and archives, so you can change your blog without editing CSS.
If you're looking for a simpler way you can edit your Divi Blog, without the need to edit CSS and copy and paste some custom code you don't necessarily understand, check out my bestselling plugin: the Divi Toolbox.
The video shows an older version of Divi Toolbox and Divi 4.
Have you changed your Divi blog with this tutorial? Share it in my Divi Lovers Facebook group. And if you need 1-on-1 help with your Divi website, check out the ways to work with me.