Updated for Divi 5: The CSS in this tutorial targets WooCommerce's own account page markup, which Divi does not change, so the snippets work in Divi 5 and Divi 4. What changed in Divi 5 is where you add CSS classes and IDs (Advanced → Attributes) and the paths to the CSS fields.
How to style the WooCommerce account page in Divi
You style the WooCommerce account page in Divi with CSS that targets WooCommerce's own classes (like .woocommerce-MyAccount-navigation and .woocommerce-MyAccount-content), plus a few Divi modules for custom tabs. Divi 5 has WooCommerce modules for product, cart and checkout pages, but no My Account module, so CSS is still the way to go.
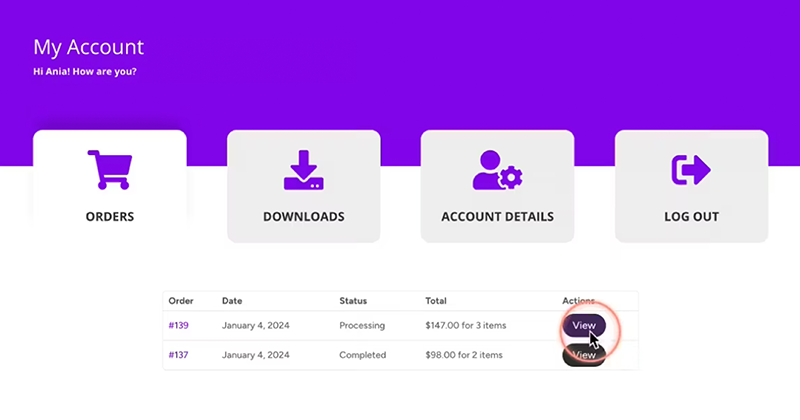
Welcome to the ultimate guide on WooCommerce Account Page styling in Divi! This comprehensive, 2-hour tutorial covers every aspect of customizing the customer area, helping you transform it into a beautifully styled and user-friendly part of your webshop.
Inside this tutorial, you'll learn how to:
- Add dynamic usernames to personalize the user experience,
- Style the account navigation with CSS and add icons for a polished look,
- Build custom account tabs using the Divi Builder,
- Highlight active tabs with CSS
- And refine the styling of the content within each section.
Ready to get started? Watch the video and use the code snippets provided in this article to transform your WooCommerce account page into a stunning, functional part of your Divi site.
Important! This walkthrough was originally shared with my Divi Stylist Academy community, where students get exclusive access to in-depth design sessions like this one and more.
The video was recorded in Divi 4. The code works the same in Divi 5, but you add CSS classes and IDs in Advanced → Attributes instead of Advanced → CSS ID & Classes (see the next section).
Where to add the code in Divi 5 (and Divi 4)
Add the PHP snippet to your child theme's functions.php file (or a code snippets plugin) and the CSS to Divi → Theme Options → General → Custom CSS, your child theme's style.css, or the account page's own Page Settings. The CSS classes and IDs used by the snippets go on Divi modules and sections.
Below, you'll find all the code snippets used in this tutorial to help you style and customize your WooCommerce account page in Divi. These snippets cover everything from adding dynamic usernames to styling the account navigation and customizing account tabs.
While you can copy and paste these directly into your site, I highly recommend watching the video tutorial first to fully understand how each snippet works and how to modify them to fit your design.
- Site-wide CSS: Divi → Theme Options → General → Custom CSS (the same in Divi 4).
- CSS for the account page only: if you build the page with the Divi Builder, open the gear icon top-left → Page Settings → Advanced → Custom CSS (Divi 4: Page Settings → Advanced → Custom CSS).
- CSS class on a module (for example
tab-orderson a Blurb): in Divi 5, Advanced → Attributes → Add Attribute → CSS Class; in Divi 4, Advanced → CSS ID & Classes. - CSS ID on a section (
dl-account, used by the content snippets): in Divi 5, Advanced → Attributes → Add Attribute → CSS ID; in Divi 4, Advanced → CSS ID & Classes.
Let's dive in!
How to show the logged-in user's name on the account page
Use a small PHP snippet that registers the shortcode [current_user_display_name], then type that shortcode in a Text module, for example "Hello, [current_user_display_name]!". Divi 5's dynamic content can show user fields only inside a Loop Builder user loop, not for the current visitor, so the shortcode is still the simplest way.
This PHP snippet creates a custom shortcode [current_user_display_name], allowing you to display the logged-in user's display name dynamically on the WooCommerce account page.
function display_current_user_display_name() {
    $user = wp_get_current_user();
    return esc_html( $user->display_name );
}
add_shortcode( 'current_user_display_name', 'display_current_user_display_name' );
I added esc_html() to the original snippet, so the name is always printed as plain text. For logged-out visitors the shortcode prints nothing.
How to style the default WooCommerce account navigation
Target nav.woocommerce-MyAccount-navigation and its links: WooCommerce marks the current page with the class is-active on the list item, so li.is-active a styles the active tab. Divi doesn't add its own styles to this menu, so the CSS works the same in Divi 4 and Divi 5.
This CSS snippet enhances the account navigation with a modern design, including background colors, padding, uppercase text, and smooth transitions. It also applies hover effects and styles the active tab distinctly.
nav.woocommerce-MyAccount-navigation ul {
    list-style: none;
    padding: 0;
}

nav.woocommerce-MyAccount-navigation a {
    display: block;
    background: #f3f3f3;
    padding: 0.5em 1em;
    color: #000;
    font-weight: 600;
    text-transform: uppercase;
    font-size: .9em;
    letter-spacing: 0.02em;
    margin-bottom: 2px;
    transition: all .3s;
}

nav.woocommerce-MyAccount-navigation a:hover {
    background: mediumpurple;
    color: #fff;
}

nav.woocommerce-MyAccount-navigation li.is-active a {
    color: #fff;
    background: #3c3c3c;
}
How to add icons to the WooCommerce account navigation
Add the icon with a ::before pseudo-element on each link and pick the glyph with content: each menu item has its own class, like li.woocommerce-MyAccount-navigation-link--orders or --downloads. You can use Divi's own icon font (ETmodules) or FontAwesome, which also comes with Divi.
Icons from the Elegant Themes icon font (ETmodules)
This snippet adds Elegant Themes' built-in icons to the WooCommerce account navigation menu, giving each menu item a unique visual identifier.
nav.woocommerce-MyAccount-navigation a::before {
    display: inline-block;
    content: '\e012';
    font-family: 'ETmodules';
    margin-right: 10px;
}

li.woocommerce-MyAccount-navigation-link--orders a::before {
    content: '\e015';
}

li.woocommerce-MyAccount-navigation-link--downloads a::before {
    content: '\e020';
}
Icons from FontAwesome
If you prefer FontAwesome icons over ET's icons, use this CSS snippet to apply custom icons to the account navigation links.
nav.woocommerce-MyAccount-navigation a::before {
    display: inline-block;
    content: '\f02e';
    font-family: 'FontAwesome';
    margin-right: 10px;
}

li.woocommerce-MyAccount-navigation-link--orders a::before {
    content: '\f07a';
}

li.woocommerce-MyAccount-navigation-link--downloads a::before {
    content: '\f019';
}
The free FontAwesome cart ('\f07a') and download ('\f019') icons exist only in the solid style. The links in the navigation snippet are bold (600), so the browser picks the solid font. If you change the links to a normal font weight, add font-weight: 900; to the a::before rule.
Why the icons show up as empty squares
Divi loads its icon fonts only when a module on the page needs them. With Dynamic Icons on, a page without Divi icons gets a small subset of the ETmodules font, and the icons used above are not in it. FontAwesome loads only when a module on the page uses a FontAwesome icon.
- ETmodules icons: use a Divi icon in any module on the account page (for example a Blurb icon in your custom tabs), or turn off Divi → Theme Options → General → Performance → Dynamic Icons to load the full icon font on every page. Divi turns this option off by default when a child theme is active.
- FontAwesome icons: use at least one FontAwesome icon in a module on the same page (for example in a Blurb).
How to build custom account tabs with the Divi Builder
Hide the default WooCommerce navigation with CSS, build your own tabs from Divi modules (the video uses Blurb modules) that link to the account pages, and highlight the active tab with the body class WooCommerce adds to each account page.
Hide the default account navigation
This snippet removes the default WooCommerce account navigation when replacing it with a custom-built navigation using the Divi Builder, and lets the account content use the full width.
nav.woocommerce-MyAccount-navigation {
    display: none;
}

body.woocommerce-account .woocommerce-MyAccount-content {
    width: 100%;
}
Highlight the active tab
Give each tab module its own class (tab-orders, tab-downloads, tab-account, tab-logout) in Advanced → Attributes → Add Attribute → CSS Class (Divi 4: Advanced → CSS ID & Classes). WooCommerce adds a body class for each account endpoint, like woocommerce-orders on the Orders page, so each tab can be highlighted on its own page. With the default endpoint slugs, the tabs link to /my-account/orders/, /my-account/downloads/, /my-account/edit-account/ and /my-account/customer-logout/ (you can check or change the slugs in WooCommerce → Settings → Advanced → Account endpoints).
These styles apply a subtle background color and shadow effect to indicate the currently active tab, improving usability.
body.woocommerce-orders .tab-orders,
body.woocommerce-downloads .tab-downloads,
body.woocommerce-edit-account .tab-account,
body.woocommerce-customer-logout .tab-logout {
    background: #fff;
    box-shadow: 0px -20px 20px -10px rgba(0,0,0,0.2);
}
How to style WooCommerce messages, tables and forms in Divi
Give the section that holds the account content the CSS ID dl-account and scope your CSS to #dl-account, so it only changes the account page. WooCommerce messages need !important because Divi's own WooCommerce styles set their colors with !important (in Divi 5 too).
WooCommerce info messages and links
This CSS snippet customizes WooCommerce success messages and notifications, applying a white background with a purple border while styling links to match.
#dl-account .woocommerce-info,
#dl-account .woocommerce-message {
    background: #fff!important;
    color: #333!important;
    border: 2px #8300e9 solid;
}

#dl-account .woocommerce-info a:not(.button),
#dl-account .woocommerce-message a:not(.button) {
    color: #8300e9;
    text-decoration: underline;
}
My account tab content
These styles refine various sections within the account page, including order tables, account forms, and customer details, ensuring a polished and cohesive appearance.
/* Order tables */
#dl-account table.shop_table,
#dl-account table.shop_table td,
#dl-account table.shop_table th {
    border-width: 2px;
}

#dl-account table.shop_table td,
#dl-account table.shop_table th {
    padding: 10px 15px;
}

#dl-account table.my_account_orders {
    font-size: 1em;
}

/* Order details */
section.woocommerce-order-details {
    margin-top: 40px;
}

#dl-account .woocommerce-customer-details address {
    border-width: 2px;
    padding: 30px;
}

/* Account Forms */
#dl-account label {
    font-weight: 600;
    color: #333;
}

#dl-account input {
    margin-bottom: 1em;
    background: transparent;
    border: 2px #ccc solid;
    font-weight: 500;
    border-radius: 5px;
}

#dl-account input:focus {
    border-color: mediumpurple;
}

#dl-account form.edit-account button.button {
    padding: 1em 2em!important;
}

/* Italic text */
#dl-account em {
    font-style: normal;
}
And that's it!
I know that this was quite an advanced tutorial, so if you have any questions, feel free to ask in my Divi Lovers Facebook group. And if you need 1-on-1 help, check out the best ways to work with me here.