This guide is for Base on Divi 5. Base is a layout pack: a small plugin, Base Installer, imports 207 ready-made sections into your Divi Library, in 14 categories, each in a light and a dark version, together with the Divi presets and images they use.
Your existing pages and posts are not changed. The sections wait in your Divi Library, and you add the ones you need to any page in the Visual Builder.
Already have a website built with Canvas on Divi 4? See Migrating to Divi 5.
Getting started
To use Base, you need an Elegant Themes membership and the Divi theme, updated to Divi 5. Divi is not included with Base.
Base works with your current Divi setup: it doesn’t replace your theme or child theme, it only adds sections to your Divi Library. You can use it on a brand-new website or add it to one you’ve already started.
Download the Base package from your Divi Lover account (Downloads). The file is called base-installer-1.0.zip. Don’t unzip it: WordPress installs it as it is.
Installing the Base Installer plugin
Base is installed like any other WordPress plugin:
- Go to Plugins → Add Plugin and click Upload Plugin at the top.
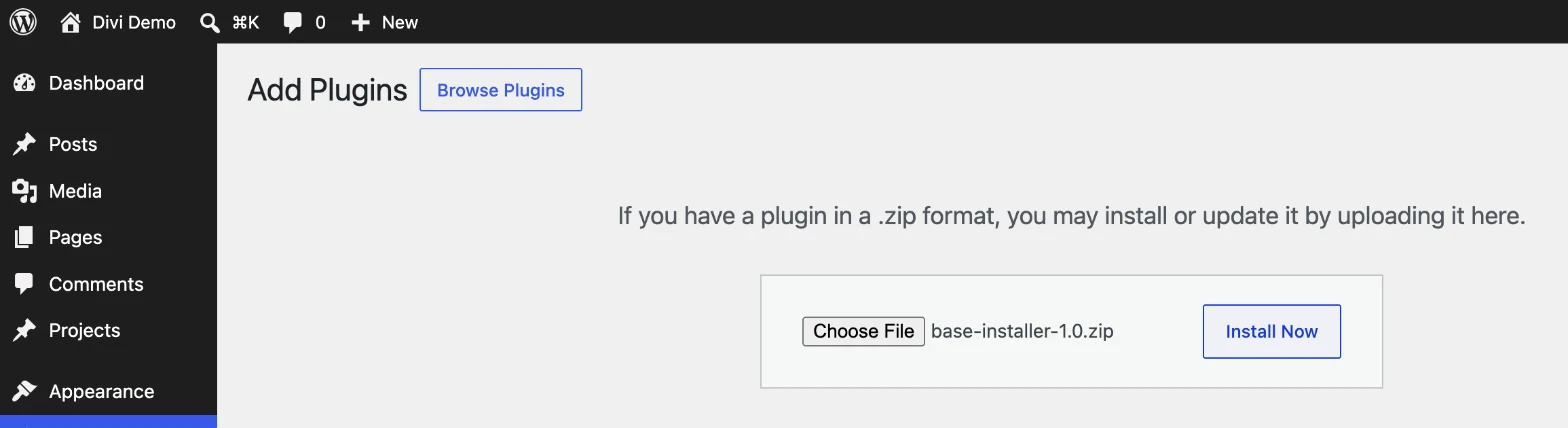
- Click Choose File, select base-installer-1.0.zip and click Install Now.
- When WordPress says the plugin was installed, click Activate Plugin.
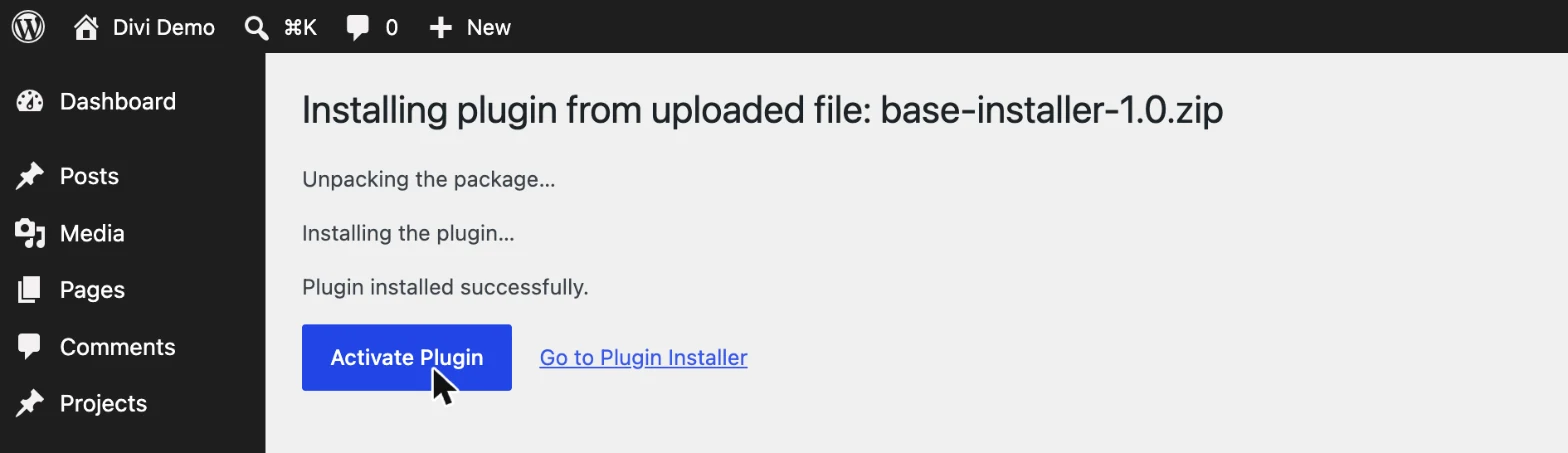
After the activation, WordPress opens the Base Installer page, where you import the layouts.
Activating your license
The first box on the Base Installer page is Step 1: Activate your license. Paste your Base license key and click Activate License. You’ll find the key in your purchase confirmation email and in your Divi Lover account, under License keys.
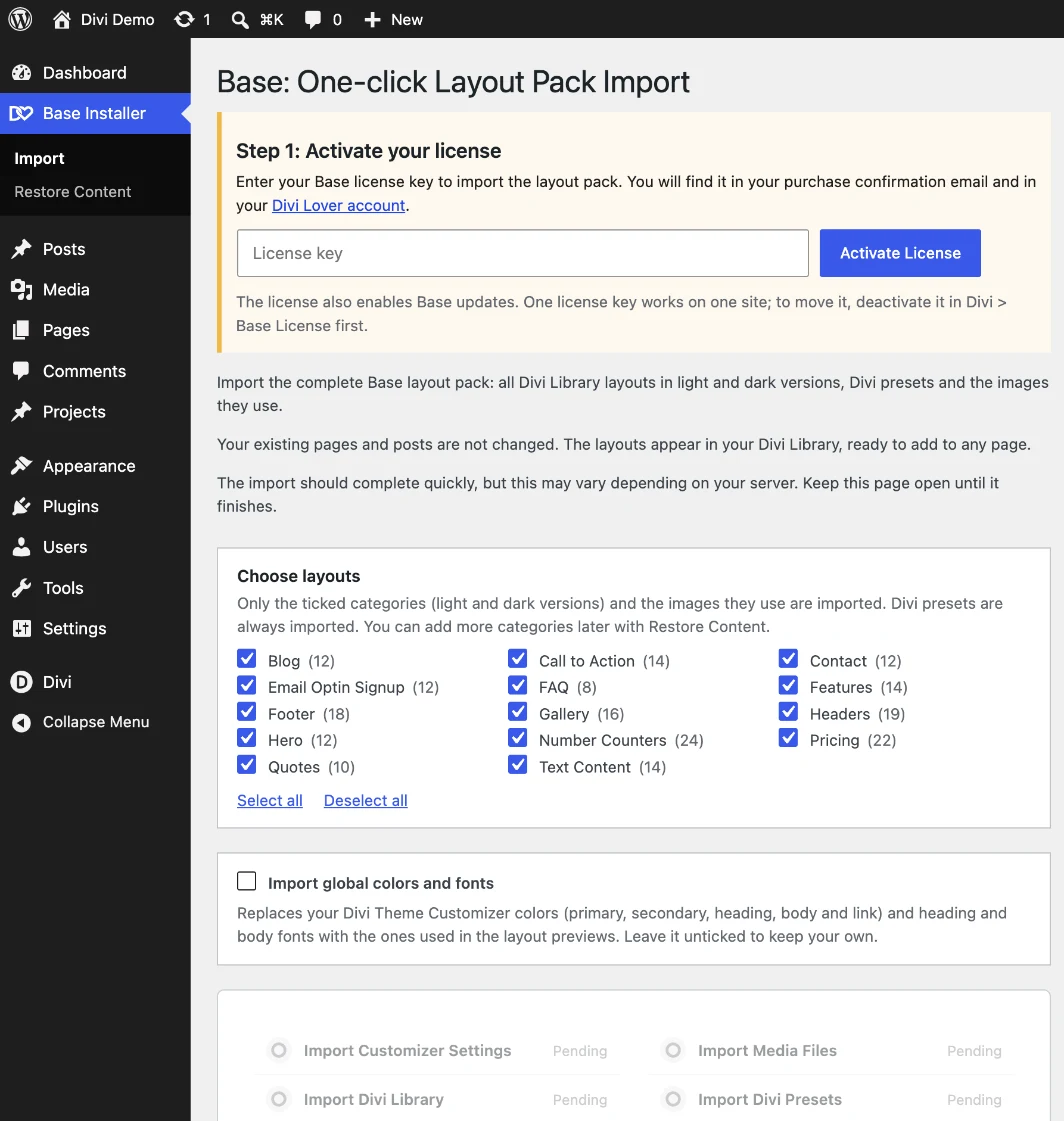
The import buttons appear as soon as the license is active. The license also enables Base updates.
One license key works on one website. You can see it, or deactivate it, in Divi → Base License. Moving Base to another website? Deactivate the license there first, then activate it on the new site.
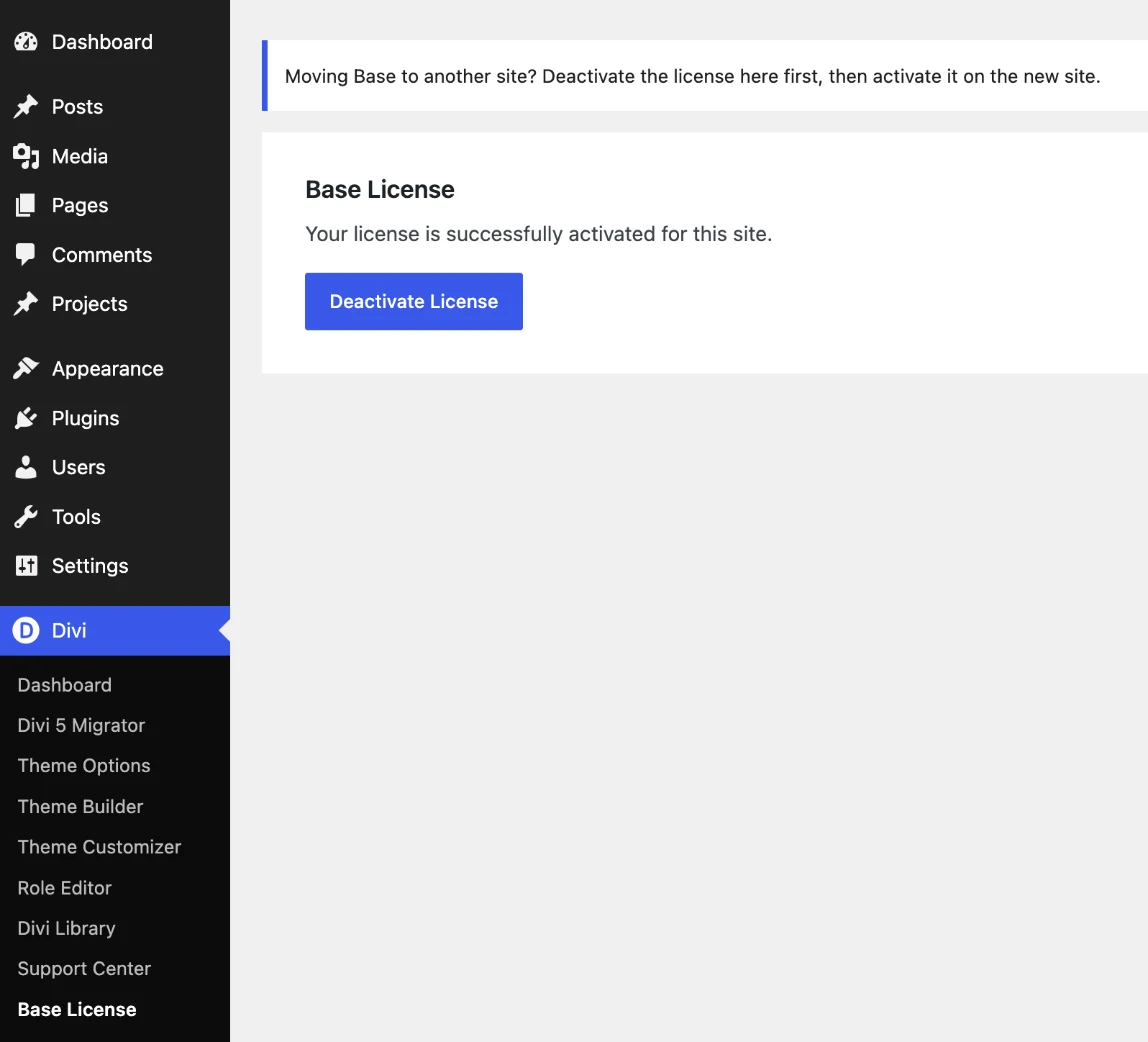
Bought Base on the Elegant Themes Marketplace? Your version has no license step: the import buttons are there right away, and updates come through Elegant Themes.
Importing the layouts
Below the description, choose what to import:
- Choose layouts: the 14 section categories, with the number of sections in each. All of them are ticked by default. Each category is imported in both versions, light and dark. Untick the ones you don’t need: only the ticked categories and the images they use are imported. You can add the others later (see Restoring layouts and adding categories later).
- Import global colors and fonts: unticked by default, and in most cases it’s best to leave it that way (see below).
Click Start Import.
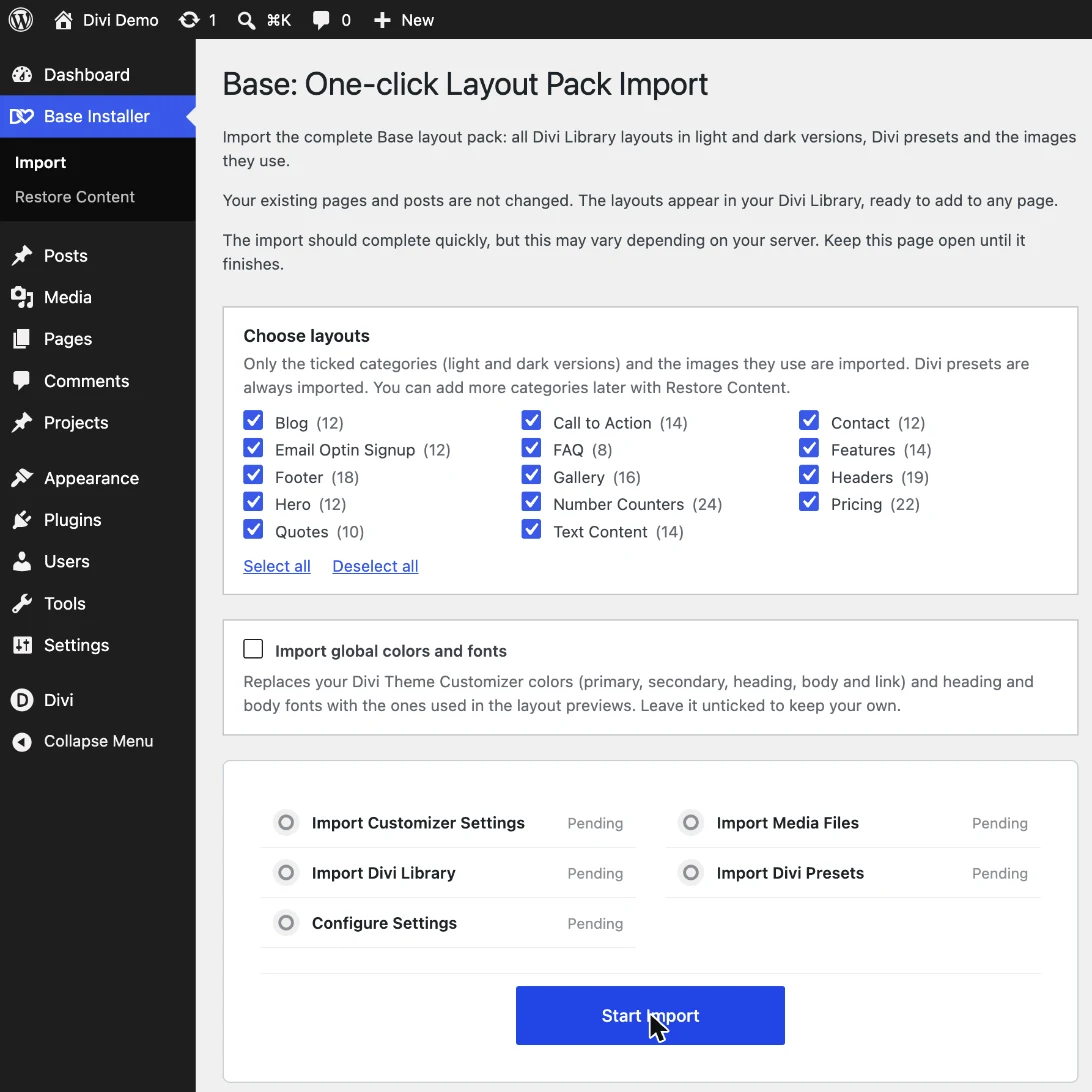
Should you tick “Import global colors and fonts”? Base sections don’t have their own fixed colors and fonts. They use your website’s global colors (primary, secondary, heading, body and link) and your heading and body fonts, so they fit the design you already have. Leave the option unticked to keep your own colors and fonts. Tick it only if you want the sections to look exactly like the previews right away: it replaces your colors and fonts with the Base ones (pink primary color, Bitter for headings, Figtree for body text). You can change them again at any time.
The import takes a moment, depending on your server. Keep the page open until you see Import completed successfully!
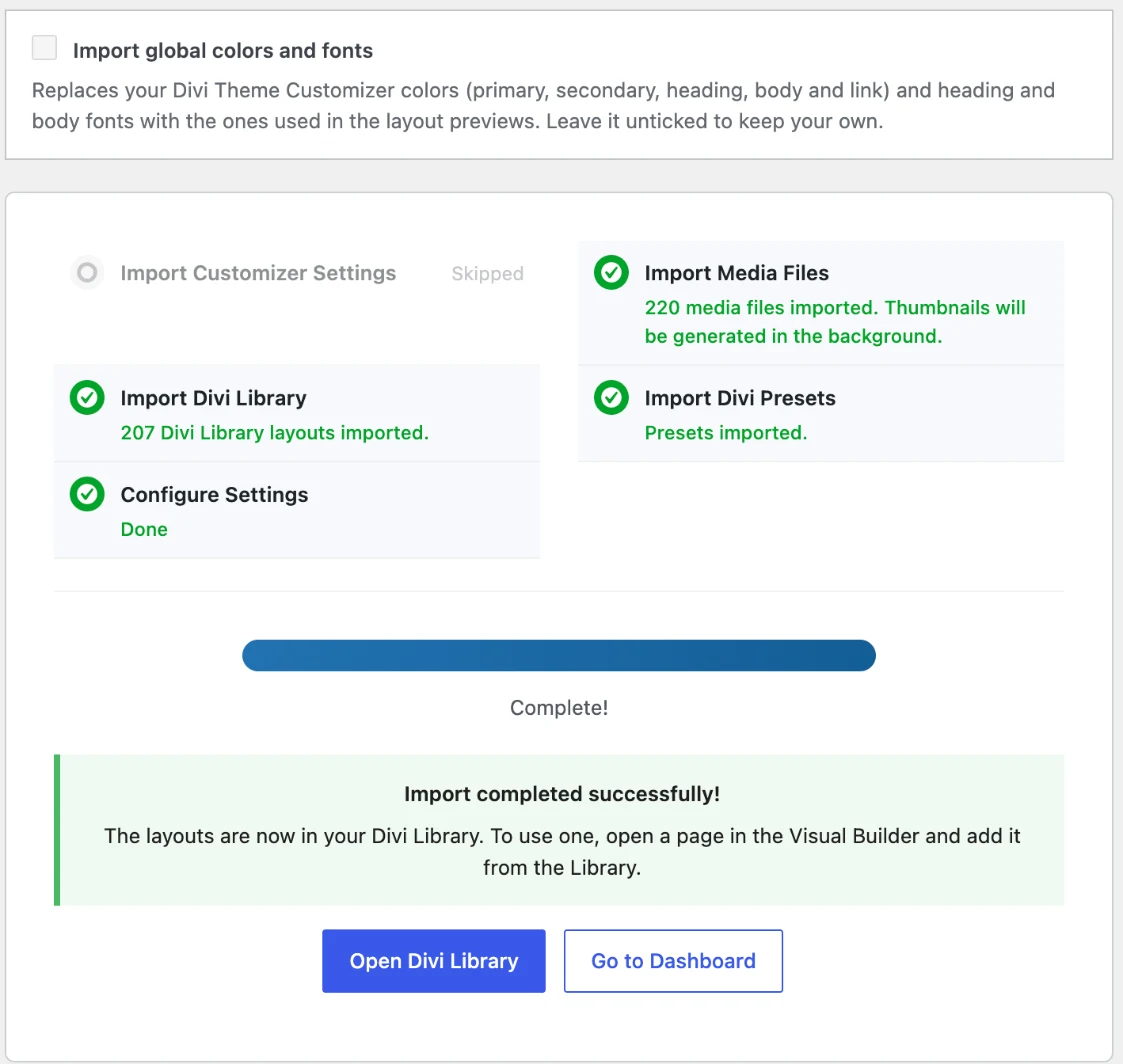
Divi presets are always imported, as the sections use them for their styling. Divi Library layouts and images are added next to anything already on your site; nothing is replaced.
After the import, the Base Installer menu item disappears. You’ll find its tools in the Divi menu: Divi → Base License and Divi → Base Restore Content.
Finding the sections in the Divi Library
All imported sections are in Divi → Divi Library. Each section has a category (for example Base – Hero or Base – Pricing) and a light or dark tag, and the name tells you which is which, for example Base – Footer #7 Light and Base – Footer #7 Dark.
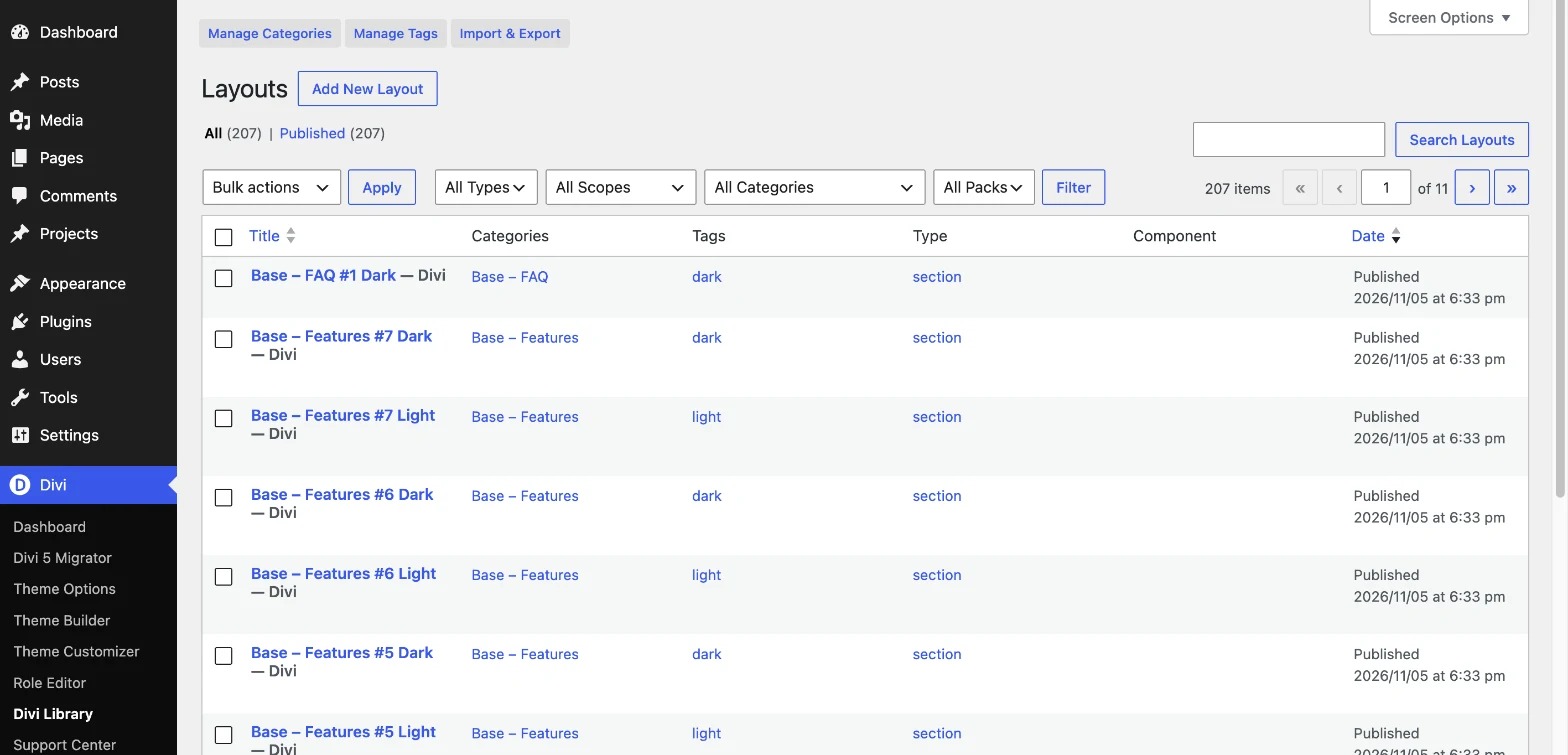
You don’t have to work from this list: the easiest way to use the sections is to add them straight from the Visual Builder.
Adding a Base section to a page
- Open the page in the Visual Builder.
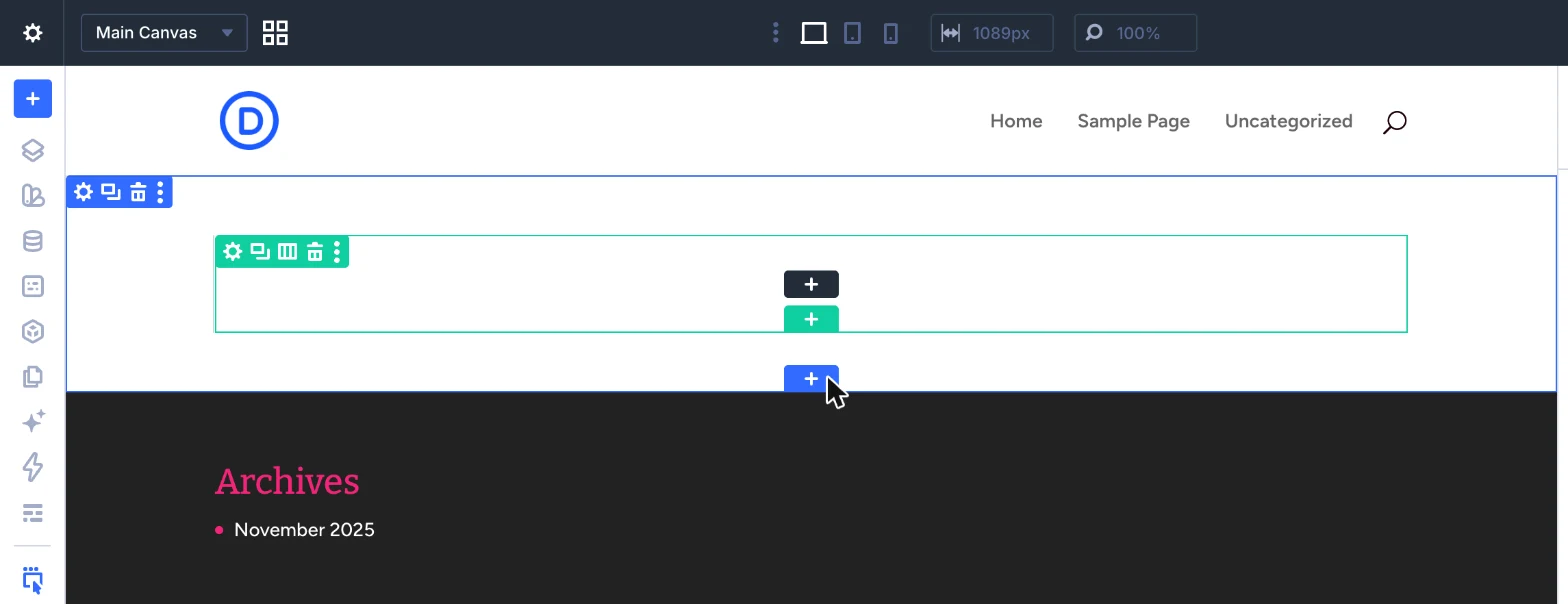
- Hover over a section and click the blue + below it to add a new section after it.
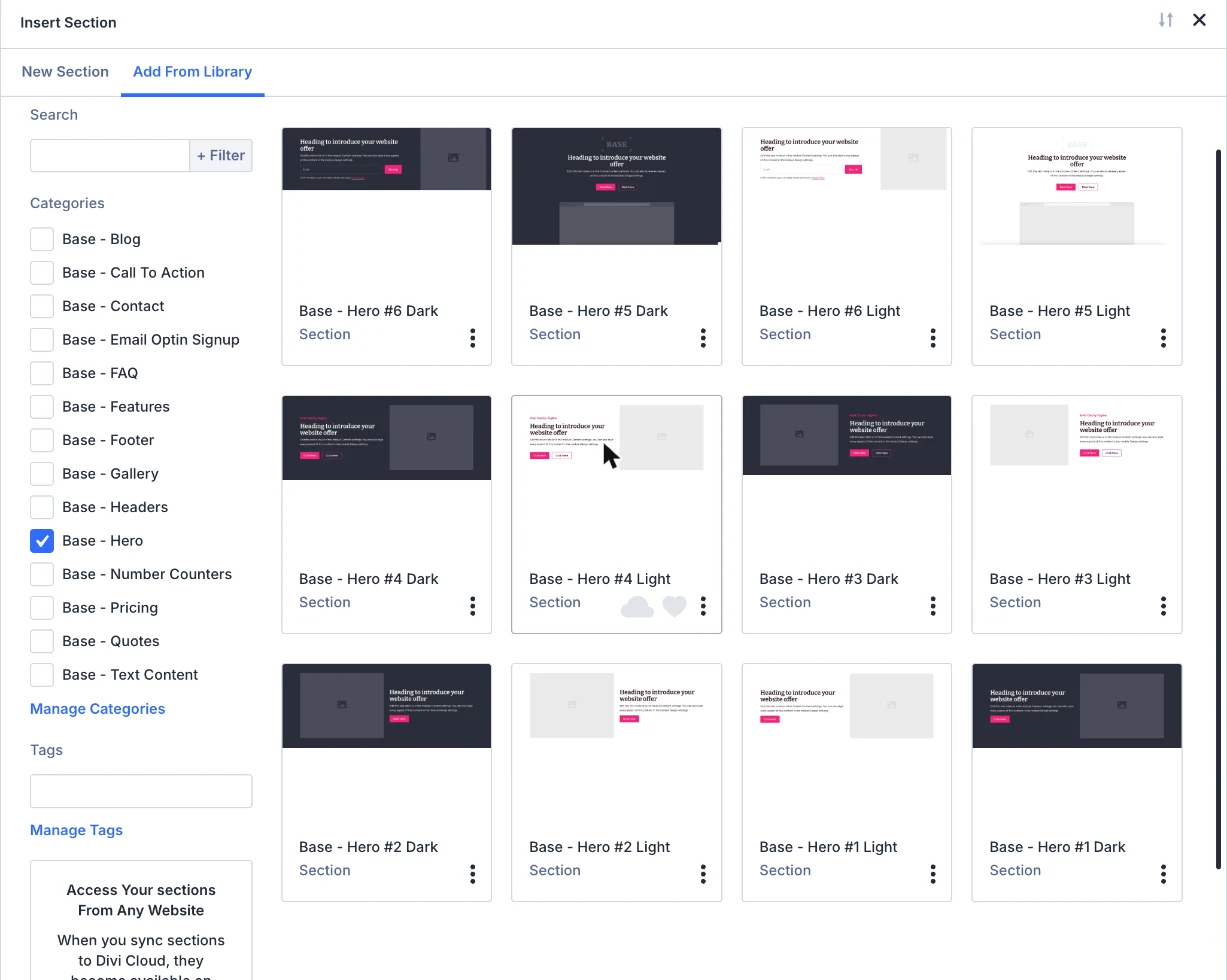
- In the Insert Section window, open the Add From Library tab. Tick a category on the left (for example Base – Hero) to see only those sections. Each section is there in a light and a dark version.
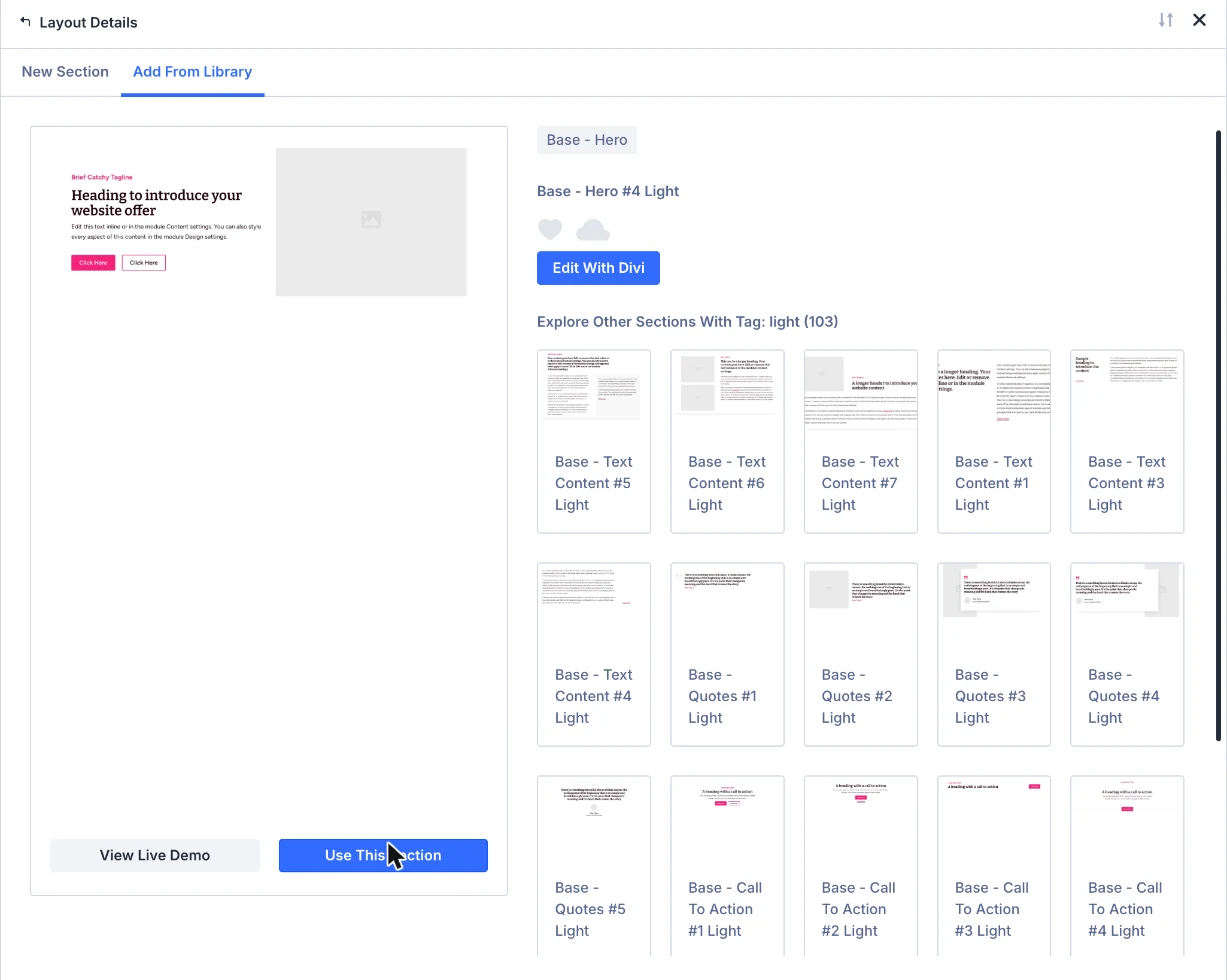
- Click a section to see a bigger preview, then click Use This Section.
The section is added to your page, ready to edit. Replace the texts, images and buttons, then save the page.
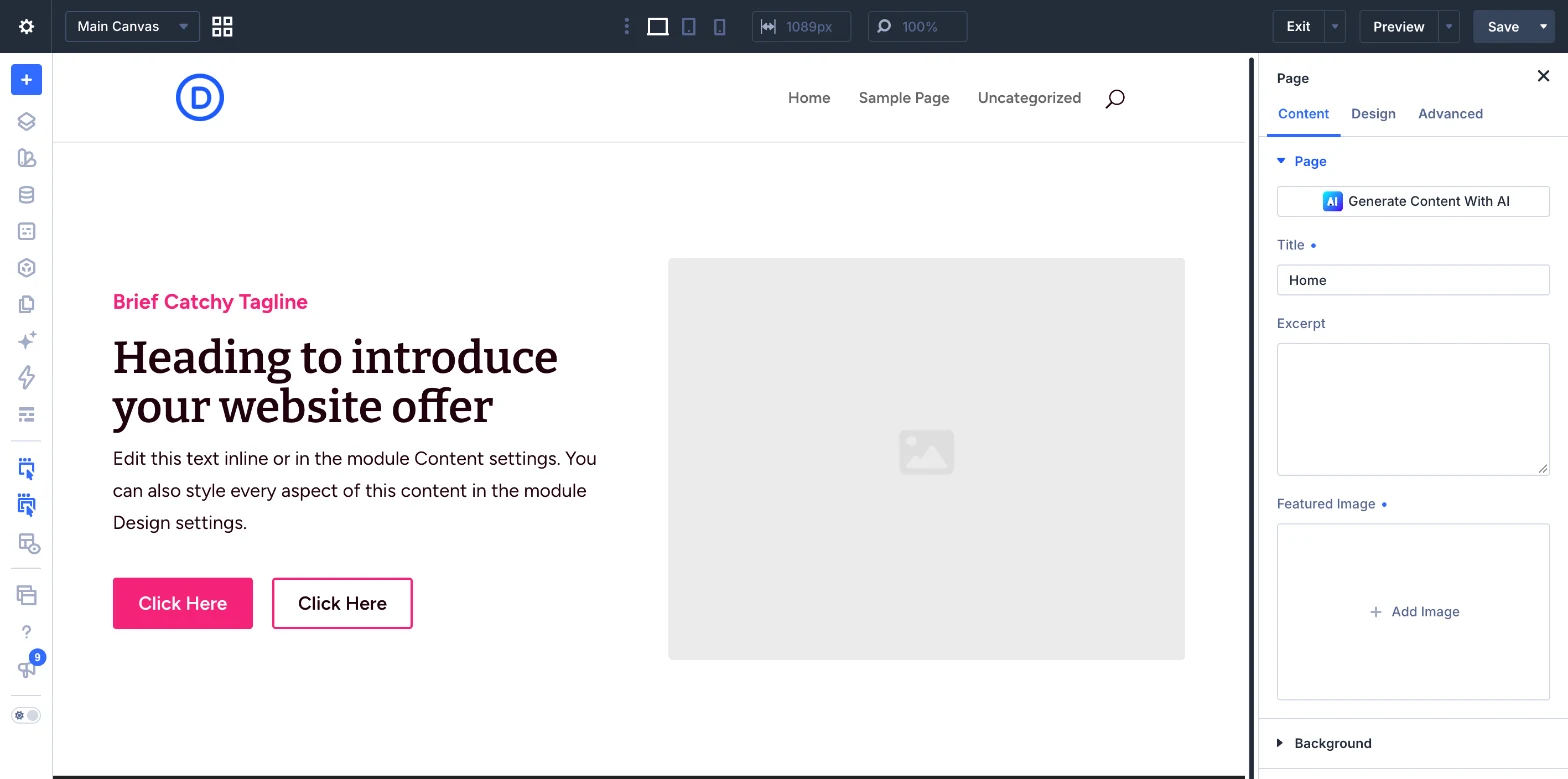
Each section is a copy: changes you make on the page don’t change the section in your Divi Library, so you can use the same section on as many pages as you like.
Matching Base to your brand
Base sections take their look from your website’s global settings, so you change it in one place, not section by section.
- Colors: in the Visual Builder, open the Variable Manager (left toolbar) and expand Colors. Primary Color and Secondary Color are the ones to change: the lighter and darker shades Base uses (named primary-tint-…, primary-shade-…, secondary-…) are calculated from them, so they follow automatically. Click Save Variables.
- Fonts: in the same panel, under Fonts, set your Heading and Body fonts.
- Spacing and text sizes: under Numbers, the base-space-… and base-text-… variables control the section spacing and font sizes. They scale smoothly with the screen width, so the sections are responsive without any extra settings.
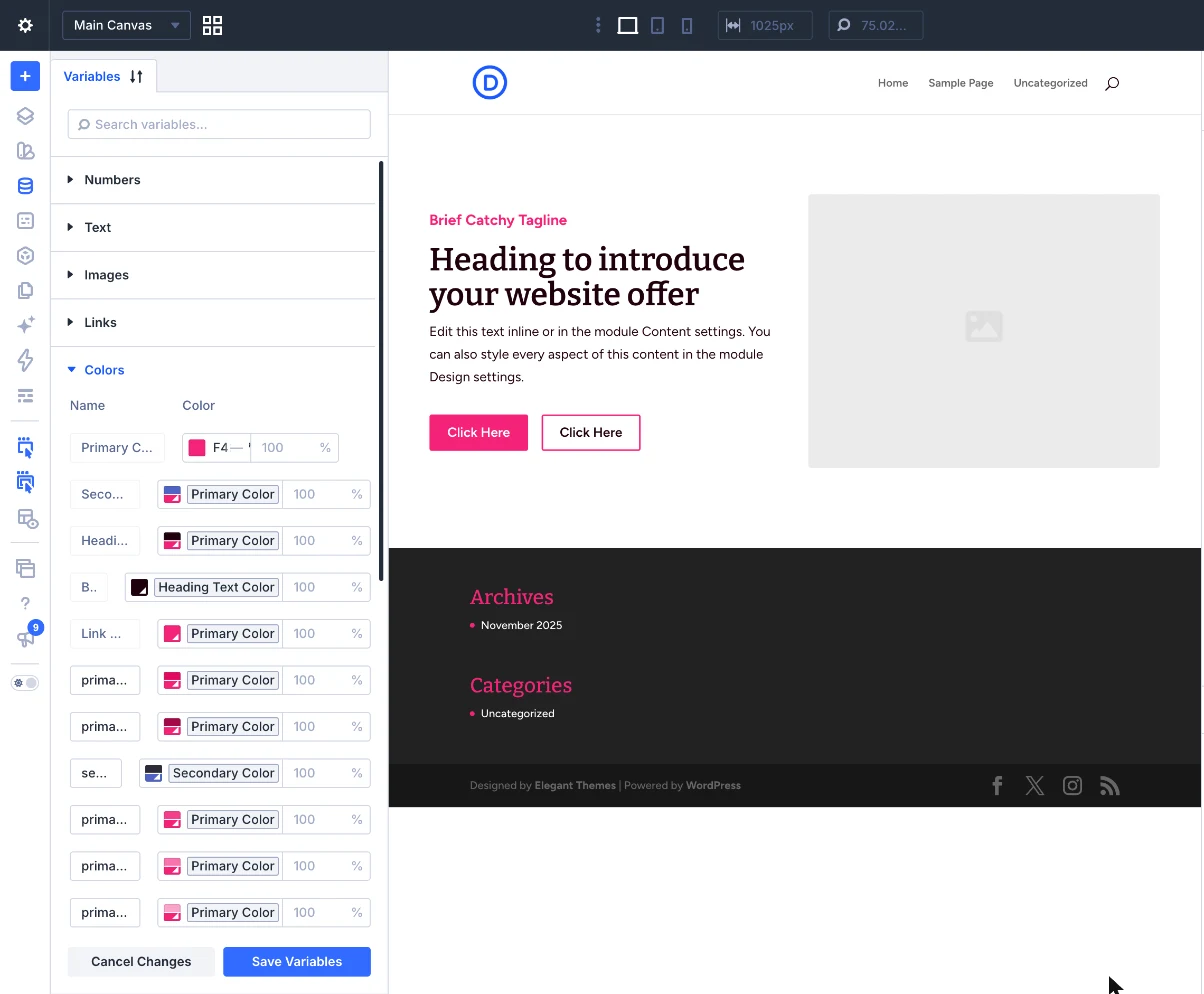
Section styles like buttons and headings come from the imported Divi presets, so editing a preset updates every section that uses it.
Restoring layouts and adding categories later
Deleted a section by mistake, or skipped some categories during the import? Go to Divi → Base Restore Content.
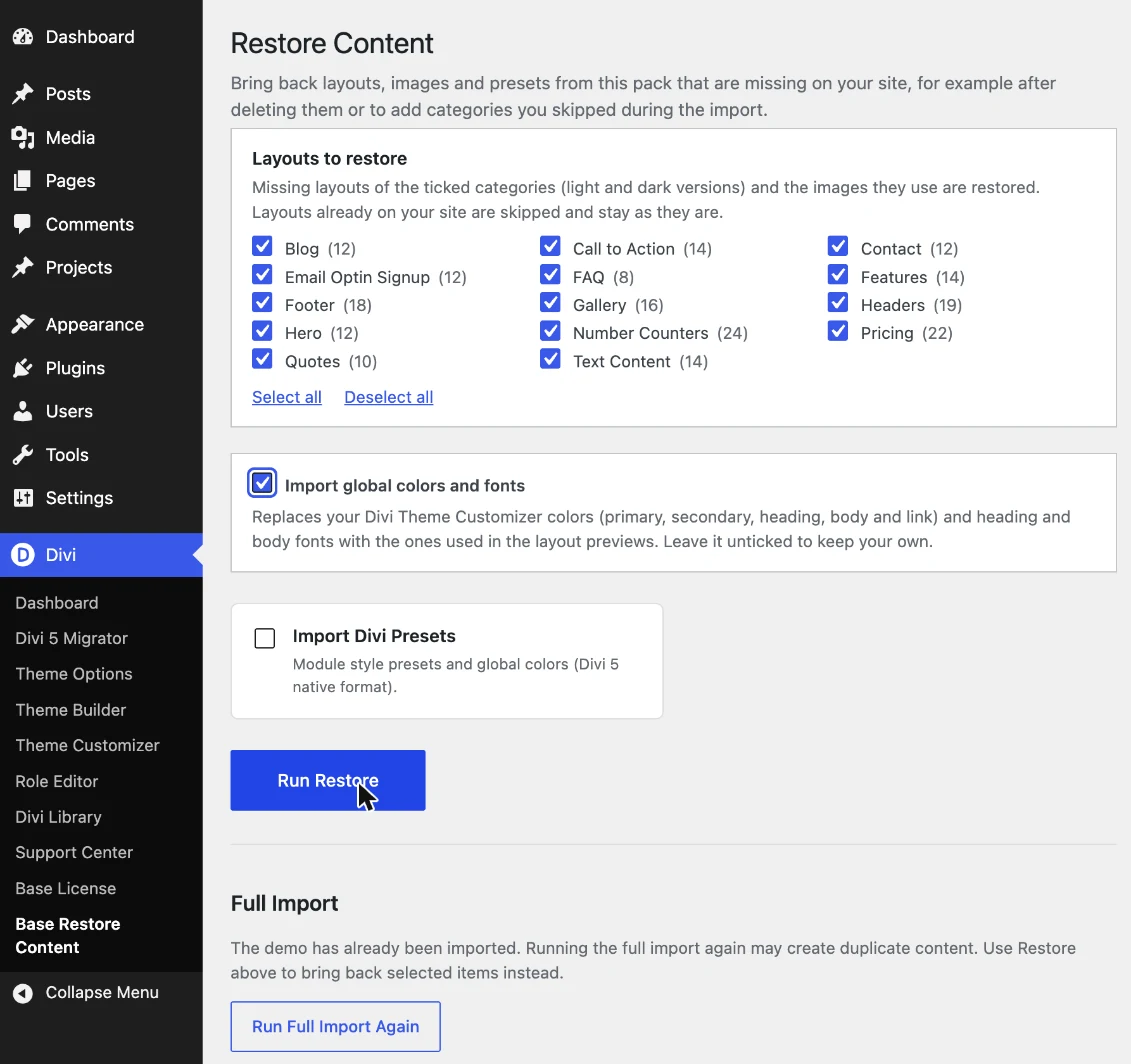
- Layouts to restore: tick the categories you want. Only the sections that are missing on your website are added (with their images); sections already in your Divi Library are skipped and stay as they are, including your changes.
- Import global colors and fonts: tick it to apply the Base colors and fonts now, if you didn’t during the import.
- Import Divi Presets: brings back Base presets you deleted.
Click Run Restore.
Below, Run Full Import Again repeats the whole import. You usually don’t need it: it may create duplicate sections, so use Restore instead.
Updating Base
With an active license, Base updates appear in Dashboard → Updates and on the Plugins page, like any other plugin. See what changed in the Base changelog.
When an update brings new sections, go to Divi → Base Restore Content and click Run Restore to add them to your Divi Library. Sections you already have aren’t touched.
Already have a website built with Canvas on Divi 4? This guide shows you how to move it to Divi 5 with Divi’s built-in Migrator. Canvas sections are regular Divi sections, so the Migrator converts them together with the rest of your website – there’s nothing extra to install.
We tested the migration on a website built from Canvas sections: the pages kept their design, with only small layout differences in a few sections.
Before you start
If your Canvas website still runs on Divi 4, you don’t have to migrate right away. Divi 4 keeps receiving security and bug-fix updates for at least 12 months after the official Divi 5 release (February 26, 2026), so staying on Divi 4 a little longer is a safe choice – especially if your site relies on third-party Divi modules or plugins that aren’t Divi 5 compatible yet.
When you’re ready to switch, the Divi 5 Migrator converts your Divi 4 content, including all Canvas sections, to the new Divi 5 format. The Canvas CSS stays where it is – in the Canvas child theme or in your Theme Options – and keeps styling the sections after the migration, so keep it in place.
Starting a new website? Don’t migrate Canvas sections for it – use Base, rebuilt from the ground up for Divi 5. Prefer to stay on Divi 4 for now? There’s nothing you need to do – see Using Divi 4.
Back up your website and use a staging site
Before migrating, back up your entire website – the database, the uploads folder, and your theme and plugin files. Most hosting providers offer one-click backups; if yours doesn’t, a backup plugin works just as well.
We also recommend running the migration on a staging copy of your site first, rather than directly on your live website. Once everything looks right on staging, repeat the same steps on your live site.
Updating Divi to Divi 5
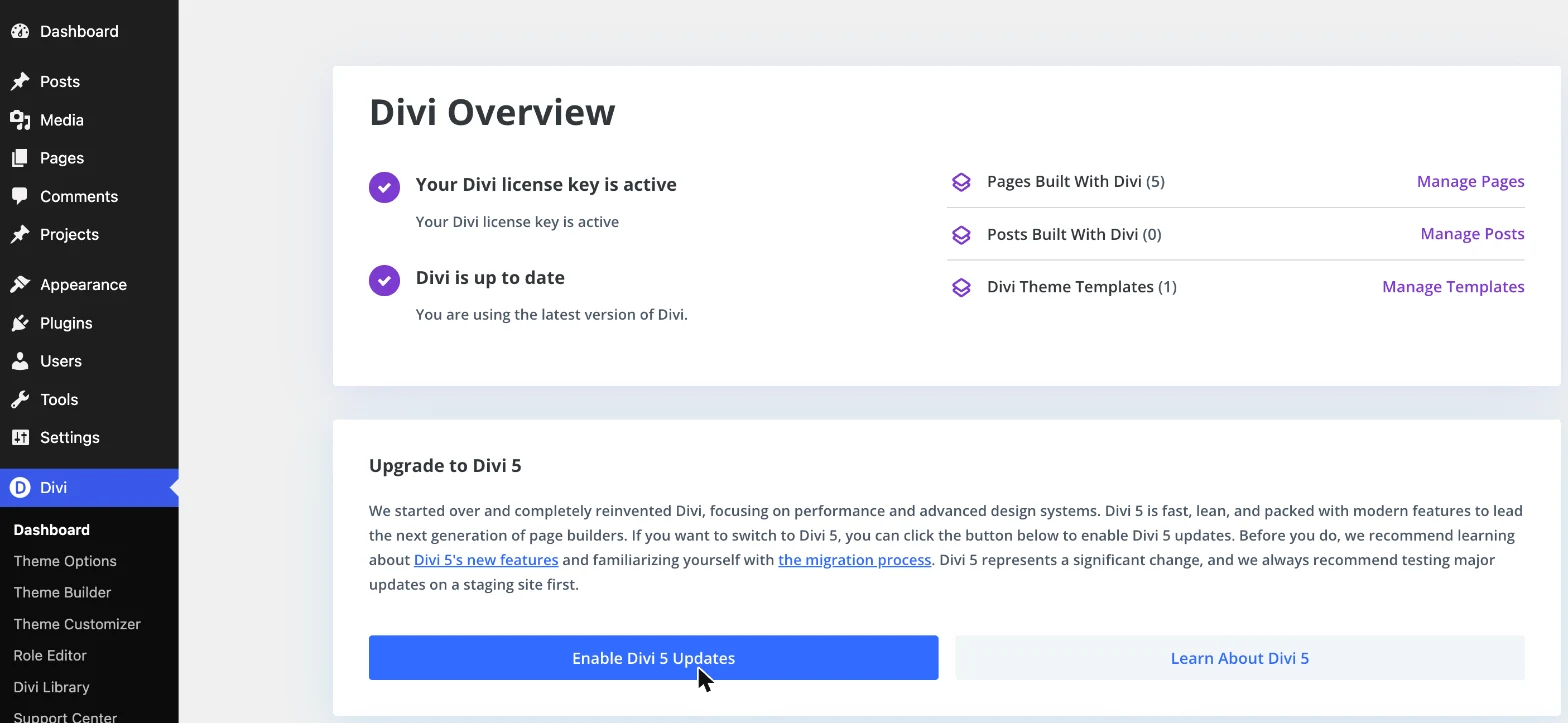
Step 1: Switch to the Divi 5 update path
Go to Divi → Dashboard and click Enable Divi 5 Updates in the Upgrade to Divi 5 card.
Step 2: Update Divi
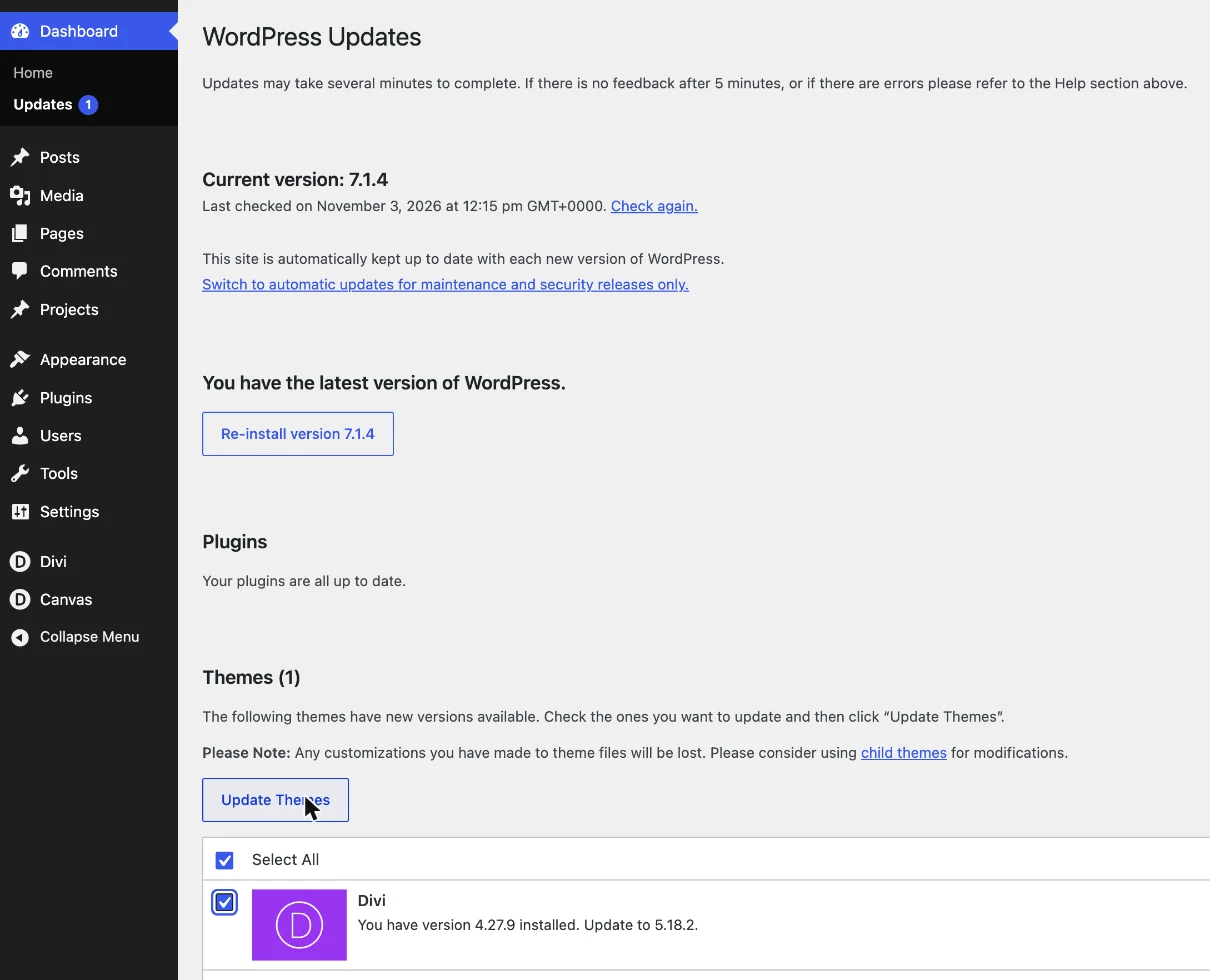
Go to Dashboard → Updates, select Divi and click Update Themes. This installs Divi 5 itself. Your website still looks the same at this point: until you migrate, Divi 5 shows your Divi 4 content in backward-compatibility mode.
Running the Divi 5 Migrator
Step 1: Run the compatibility check
Go to Divi → Divi 5 Migrator. It checks your pages, posts, Theme Builder templates, Divi Library items and widgets. Canvas sections are fully compatible with Divi 5 – if the Migrator flags anything, it comes from another plugin or module on your website.
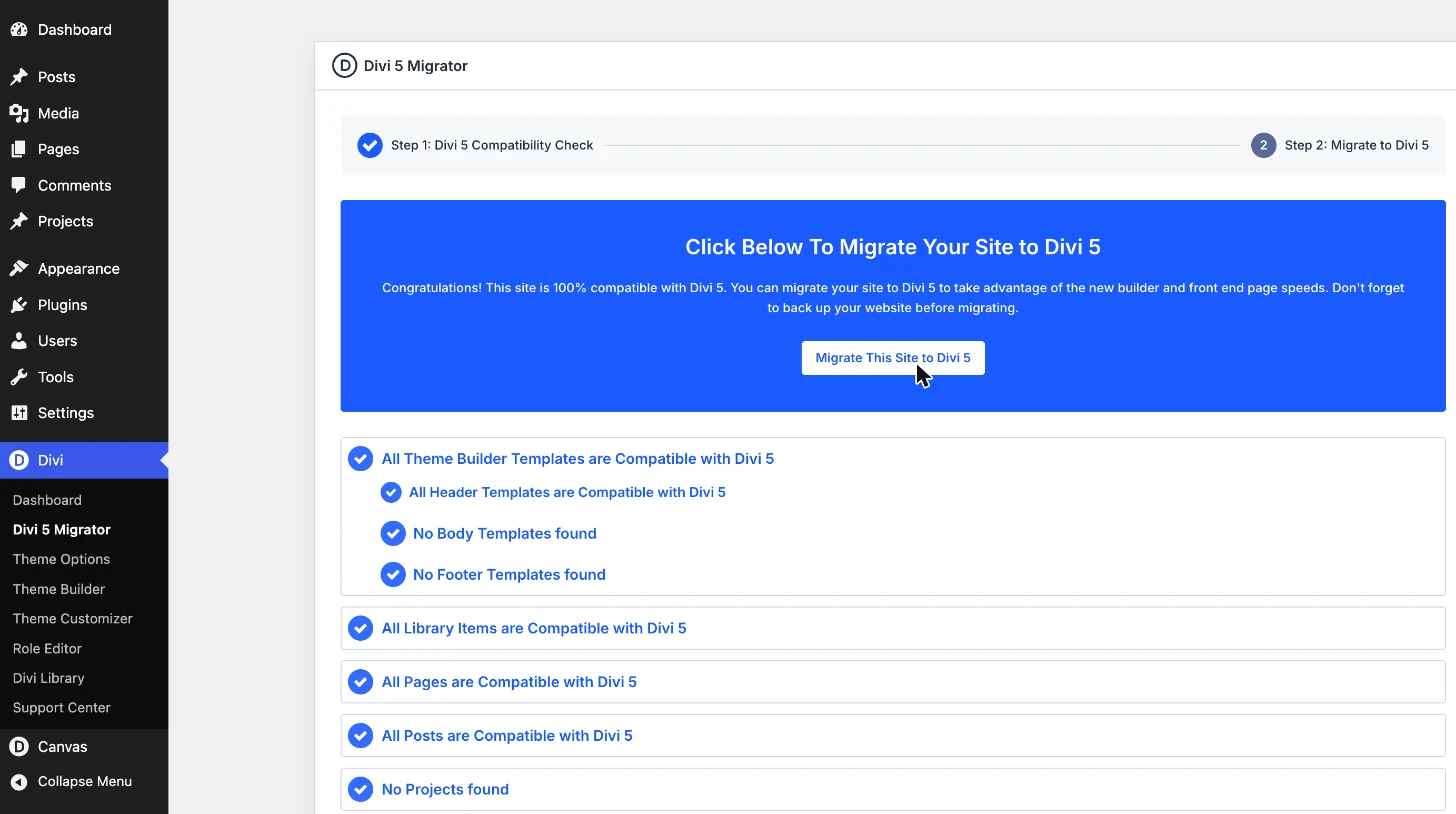
Step 2: Migrate
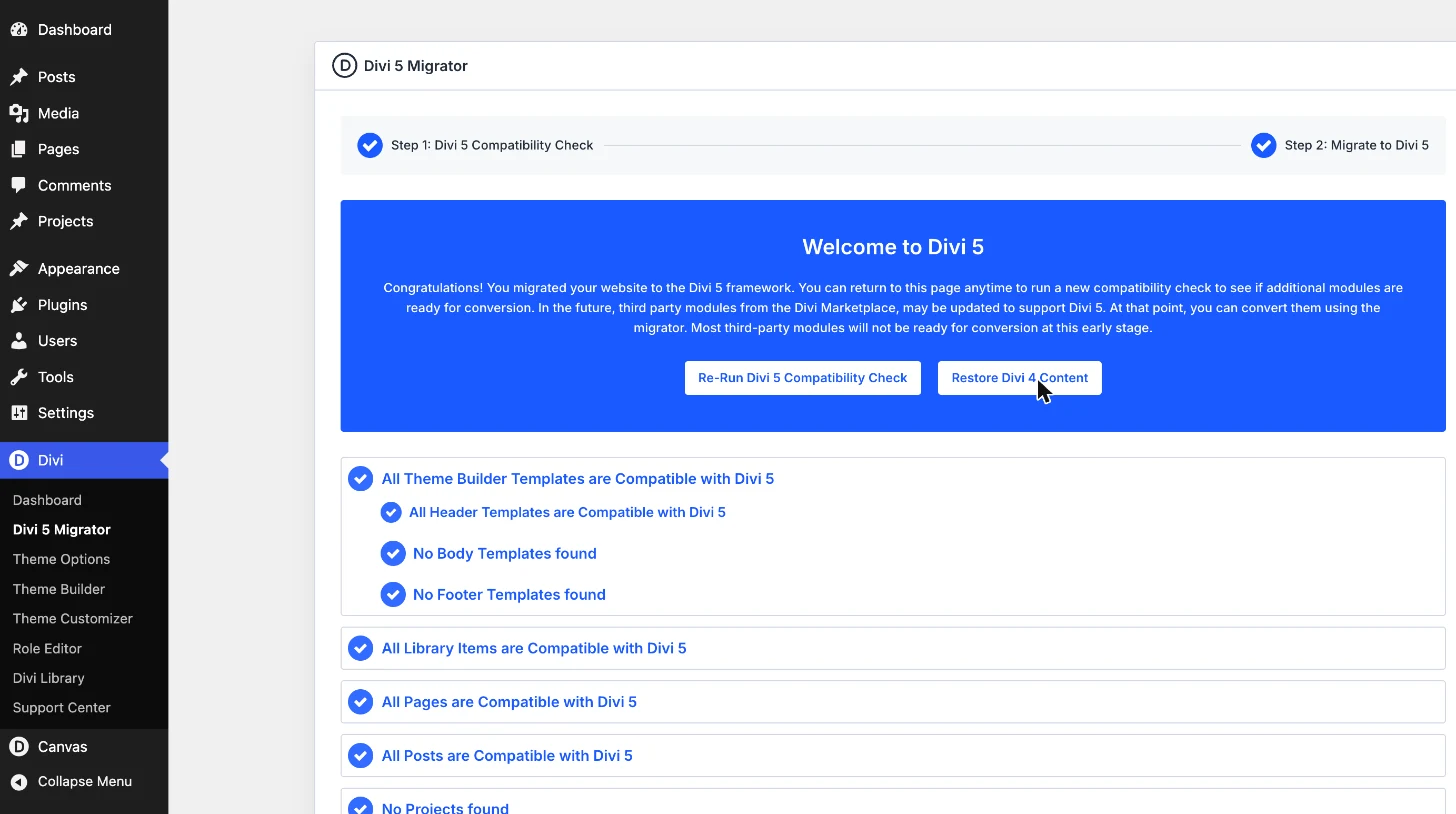
Click Migrate This Site to Divi 5, then Confirm. On our test website, the migration took less than a minute. When it’s done, you’ll see the Welcome to Divi 5 card.
The Migrator also converts the Canvas sections in your Divi Library, so you can keep adding them to new pages in Divi 5: click the blue + below a section and open the Add From Library tab.
Fixing layout differences
The Migrator converts every Canvas section, but Divi 5 builds layouts differently from Divi 4, so small differences can appear in some sections – for example a signup form whose fields stack instead of sitting in one row, or a bit more space below an image.
After the migration, go through your pages one by one, on desktop and on your phone. Most differences take just a quick tweak in the Divi Builder – usually a spacing, width or alignment setting.
You don’t have to fix every section, though. If a section doesn’t look right, you can simply replace it with the matching section from Base, rebuilt from the ground up for Divi 5. If you bought Canvas, you also have access to Base.
Using Canvas sections from Divi Cloud?
If you saved Canvas sections to your Divi Cloud, we recommend importing Base and replacing them with the Base sections. This way, the sections you add to new pages are built for Divi 5.
Checking your website after migration
Once the migration finishes, take a few minutes to check that everything looks right:
- Visit your most important pages on the front end, on desktop and on your phone.
- Open the fullscreen menu in your header and check that it opens and closes.
- Test your signup and contact forms.
- Open a few pages in the Divi Builder and confirm you can still edit sections, rows and modules.
- Check your Theme Builder templates under Divi → Theme Builder.
If something looks off, clear your browser cache, the Divi cache and any caching-plugin cache first – that resolves most glitches. A plugin that isn’t Divi 5 compatible yet is the next most common cause.
Not happy with the result? Right after migrating, you can click Restore Divi 4 Content on the Divi 5 Migrator page, then reinstall Divi 4. The longer you keep editing on Divi 5, the harder a clean rollback becomes, so it’s best to check everything soon after migrating.
This guide is for websites that use Canvas on Divi 4. Canvas: All-in-One Layout Kit is the legacy Divi 4 version of Base. It still works on Divi 4, but sections imported on Divi 4 keep their Divi 4 structure and won’t automatically gain the new Divi 5 features.
Starting a new website? We strongly recommend building it on Divi 5 with Base, rebuilt from the ground up for Divi 5 with Flexbox and Grid layouts, global variables and presets. If you bought Canvas, you also have access to Base. Already have a Canvas website on Divi 4? You can move it to Divi 5 with the Divi 5 Migrator in Divi → Divi 5 Migrator.
Getting started
To use Canvas, you need an Elegant Themes membership and the Divi Theme or the Divi Builder plugin. Divi is not included with Canvas.
We keep Canvas sections compatible with the latest Divi 4 and WordPress versions, so make sure Divi is updated before you start, and that it’s installed and activated before you install Canvas.
Prefer to watch? Here’s a video walkthrough of Canvas:
Choosing an import method
Canvas is a collection of Divi section layouts in 12 categories, each in a light and a dark version. There are three ways to add it to your website – pick the one that fits your project:
Option 1: Child theme (one-click setup)
Best for starting a new website. Install the Canvas child theme and import all sections to your Divi Library with one click. The CSS the sections need is included in the child theme, so there are no extra steps. See Child theme import.
Option 2: Importer plugin + CSS
Best for an existing website that already has a child theme (or doesn’t use one). Import all sections to your Divi Library with the importer plugin, then copy the provided CSS to your Theme Options or child theme. See Plugin import.
Option 3: Individual sections with integrated CSS
Import Canvas sections from JSON files with the Portability feature, or drag and drop them onto any page in the Builder or into Divi Cloud. Each section includes its own CSS in a Code module in its last row – you can move it to your Theme Options or child theme later. See Importing sections to the Builder or Divi Cloud.
Download files
Download the files from your account or from the Elegant Themes Marketplace, depending on where you bought Canvas.
Quick child theme access
canvas-child-theme.zip – the installable Canvas child theme.
All files
Unzip_This_First_Canvas.zip includes all the import files. Unzip it on your computer to find:
- Child Theme Import – canvas-child-theme.zip, the installable Canvas child theme.
- Plugin Import – canvas-importer-plugin.zip, the installable Canvas importer plugin, and canvas-style.css, the CSS for Canvas sections.
- Divi Builder Imports – Divi Library Sections for Divi Cloud (JSON files to import in the Divi Library or in the Divi Cloud dashboard in the Builder) and Single Drag&Drop Sections (JSON files to import directly on a page in the Builder).
- Updates – new sections for each version: Child Theme and Plugin (CSS separated) (a JSON file for the Divi Library plus a CSS file for the new sections) and Divi Cloud (CSS included) (JSON files for the Divi Library, Divi Cloud or a page in the Builder).
- ReadMe.pdf – links to support and this documentation.
Child theme import
Step 1: Install the Divi theme
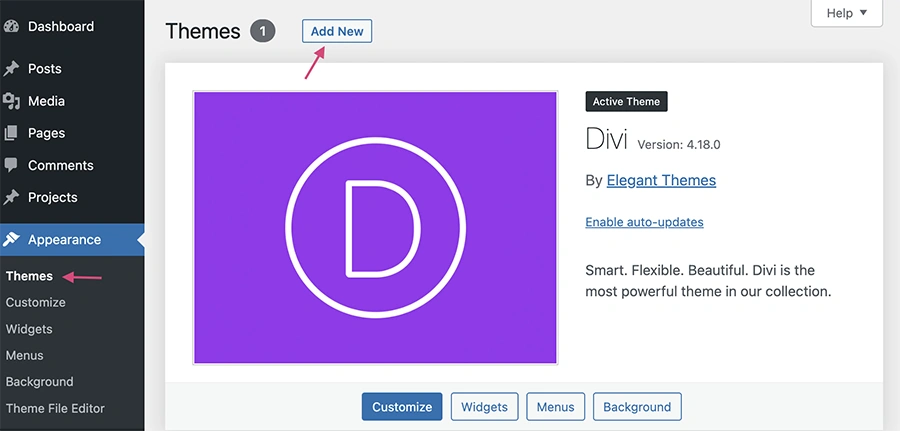
If Divi isn’t installed yet, go to Appearance → Themes, click Add New Theme and upload the Divi theme package.
Step 2: Upload and install Canvas
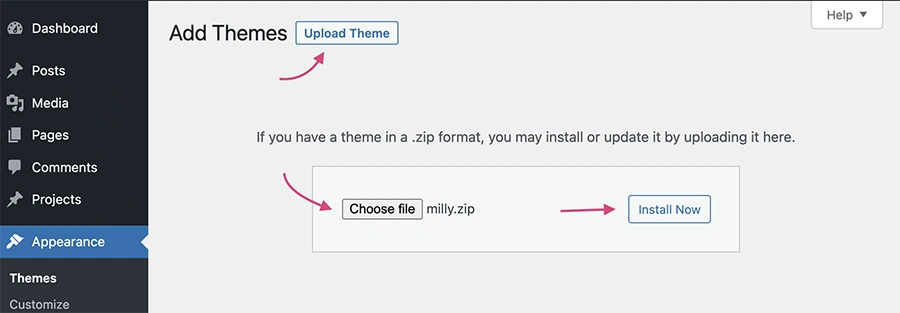
Click Upload Theme, then Choose file. Select canvas-child-theme.zip and click Install Now.
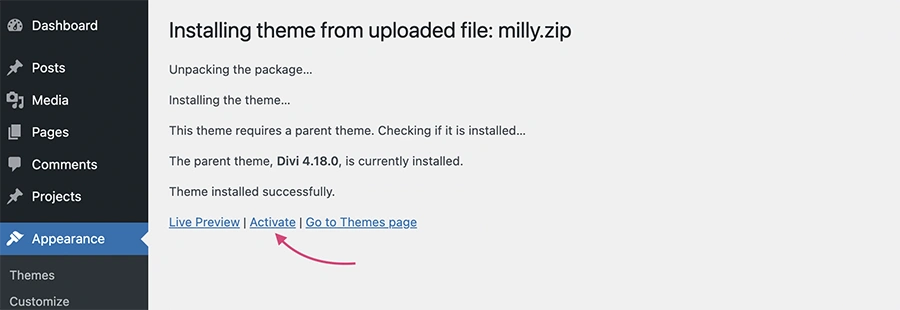
Step 3: Activate the child theme
When the upload is complete, click Activate.
Step 4: Choose the import options
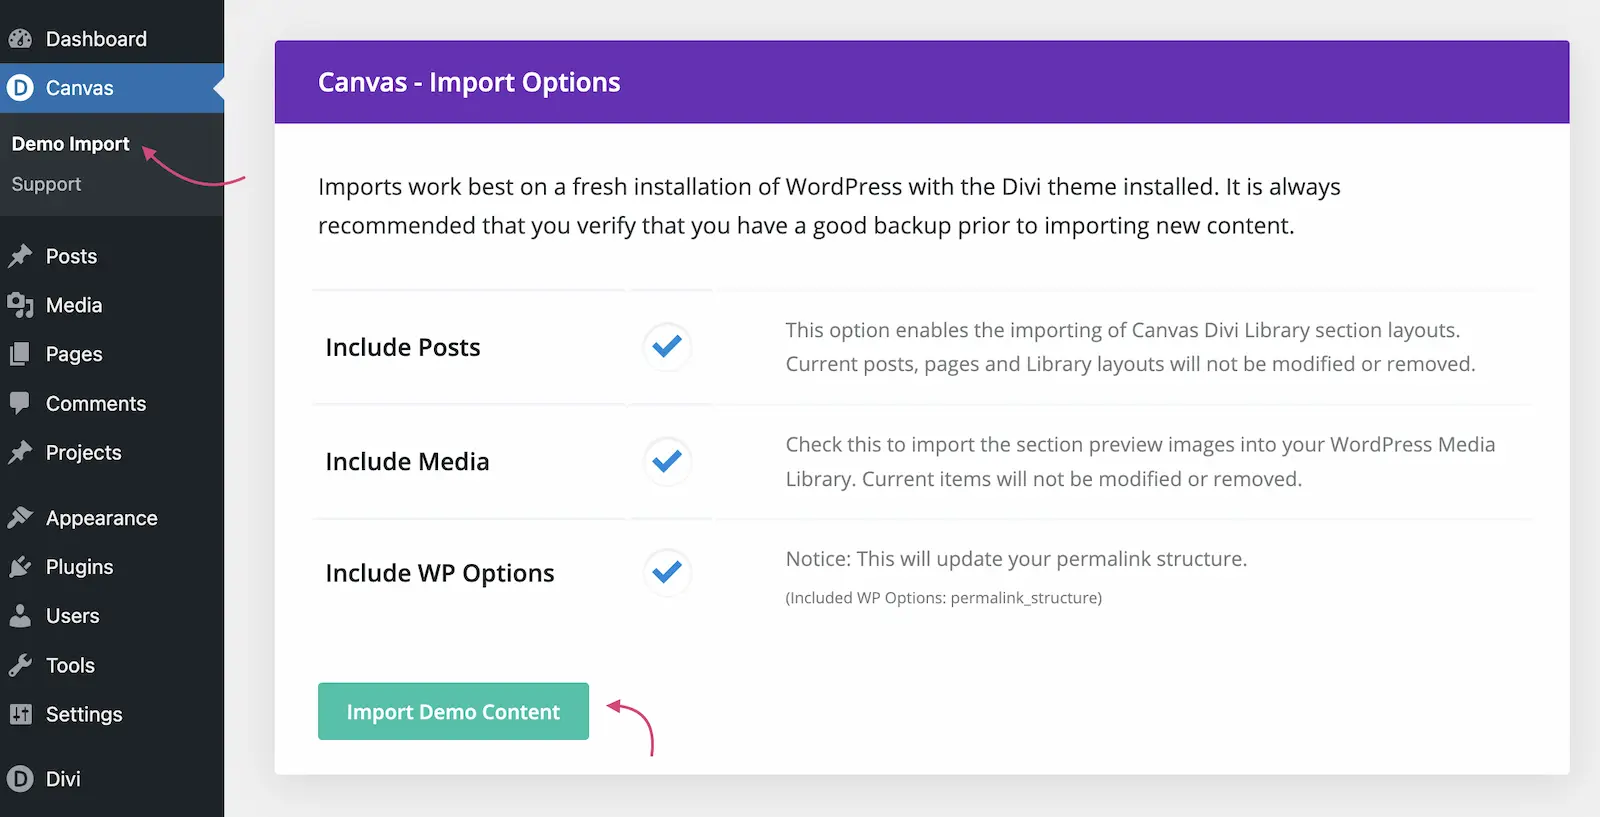
Imports work best on a fresh WordPress installation with Divi. Make sure you have a backup before you import new content.
Go to Canvas → Demo Import. You’ll see everything that will be imported: Posts (the Divi Library layouts), Media files (the section previews in the Builder) and WP Options (including the permalink structure). If you’re not sure, keep all of them selected.
Step 5: Import the sections
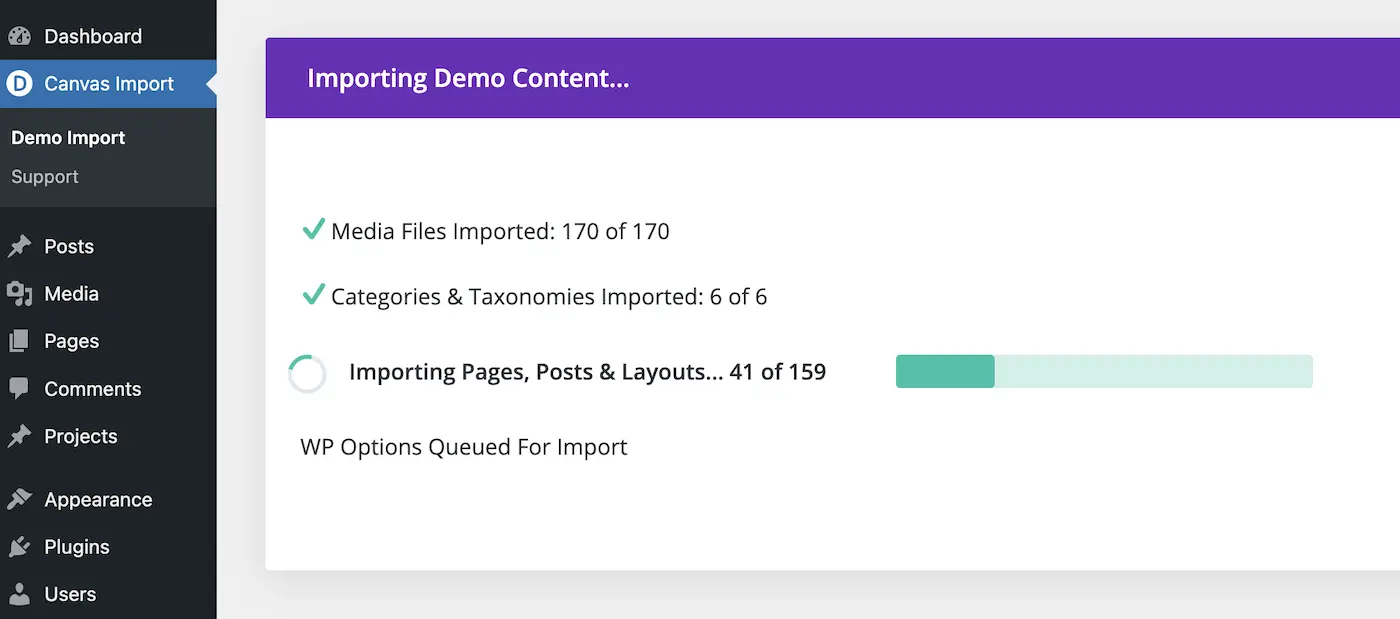
Click Import Demo Content. The import can take several minutes, depending on your connection – a progress bar shows the current status. Keep the page open until it finishes.
Optional: Remove the importer
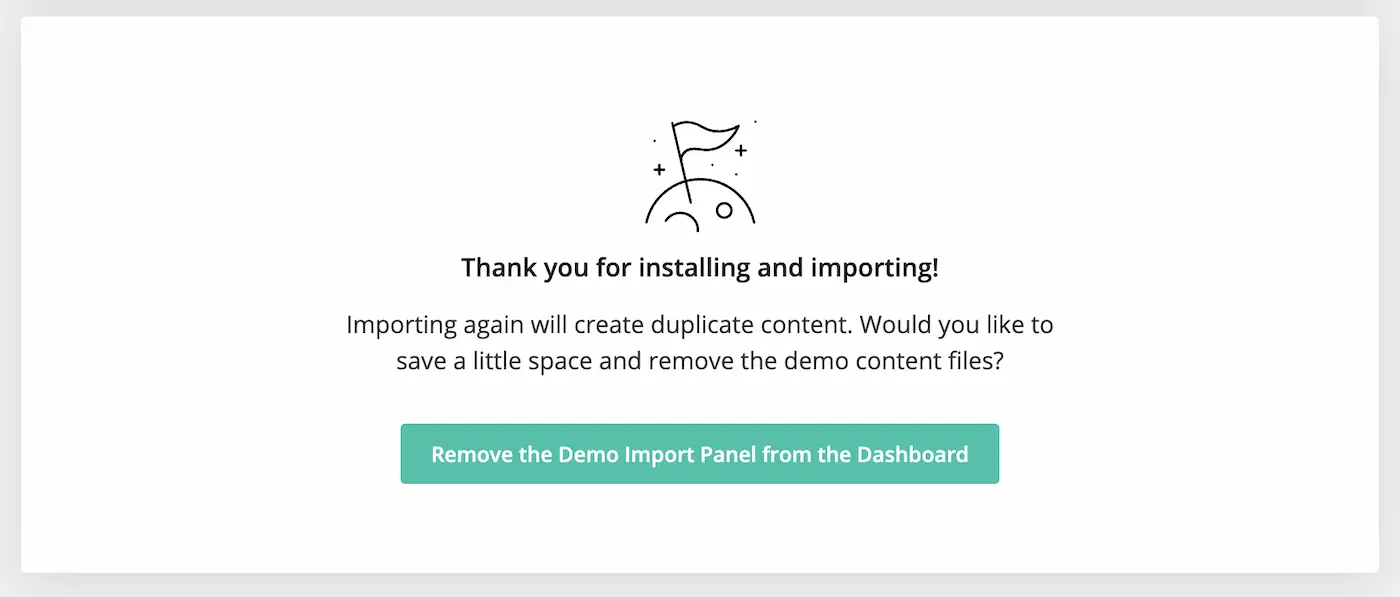
When the import is complete, you can remove the importer files and the Demo Import panel by clicking Remove the Demo Import Panel from the Dashboard.
All done! You can now add Canvas sections from the Divi Library – see Adding sections from the Library.
Plugin import
Step 1: Upload and install the Canvas importer
Go to Plugins → Add New, click Upload Plugin, then Choose file. Select canvas-importer-plugin.zip and click Install Now.
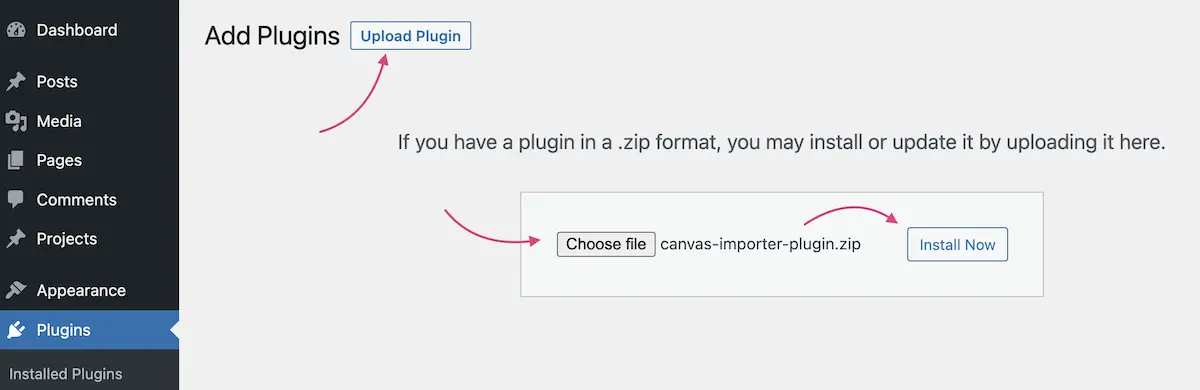
Step 2: Activate the plugin
When the upload is complete, click Activate Plugin.
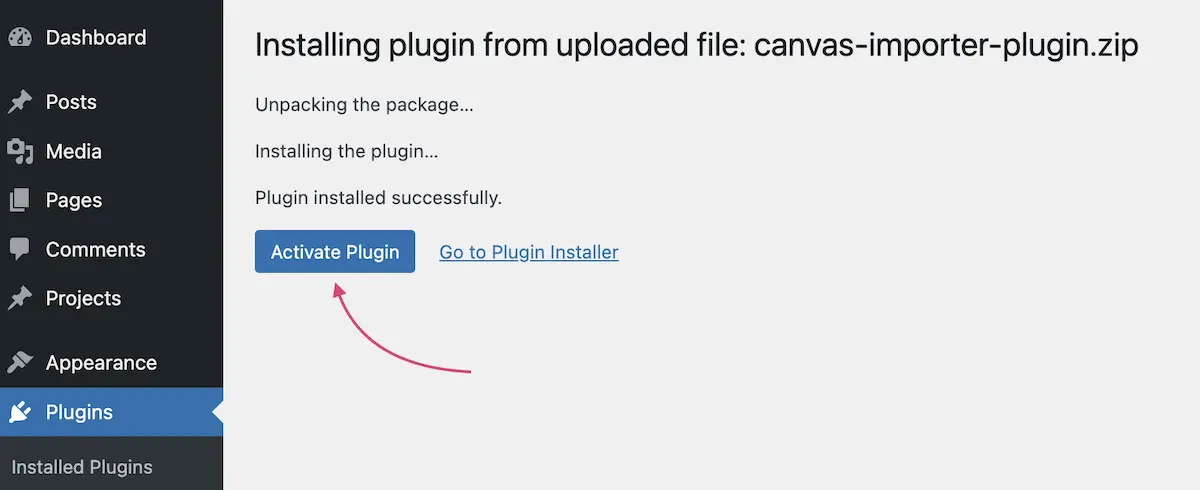
Step 3: Choose the import options
Make sure you have a backup before you import new content. Go to Canvas → Demo Import. You’ll see everything that will be imported: Posts (the Divi Library layouts), Media files (the section previews in the Builder) and WP Options (including the permalink structure). If you’re not sure, keep all of them selected.
Step 4: Import the sections
Click Import Demo Content. The import can take several minutes, depending on your connection – a progress bar shows the current status. Keep the page open until it finishes.
Optional: Remove the importer
When the import is complete, you can remove the importer files and the Demo Import panel by clicking Remove the Demo Import Panel from the Dashboard.
Step 5: Add the custom CSS
Open canvas-style.css from the Plugin Import folder and copy the code. Paste it into Divi → Theme Options → Custom CSS, or into your child theme’s stylesheet.
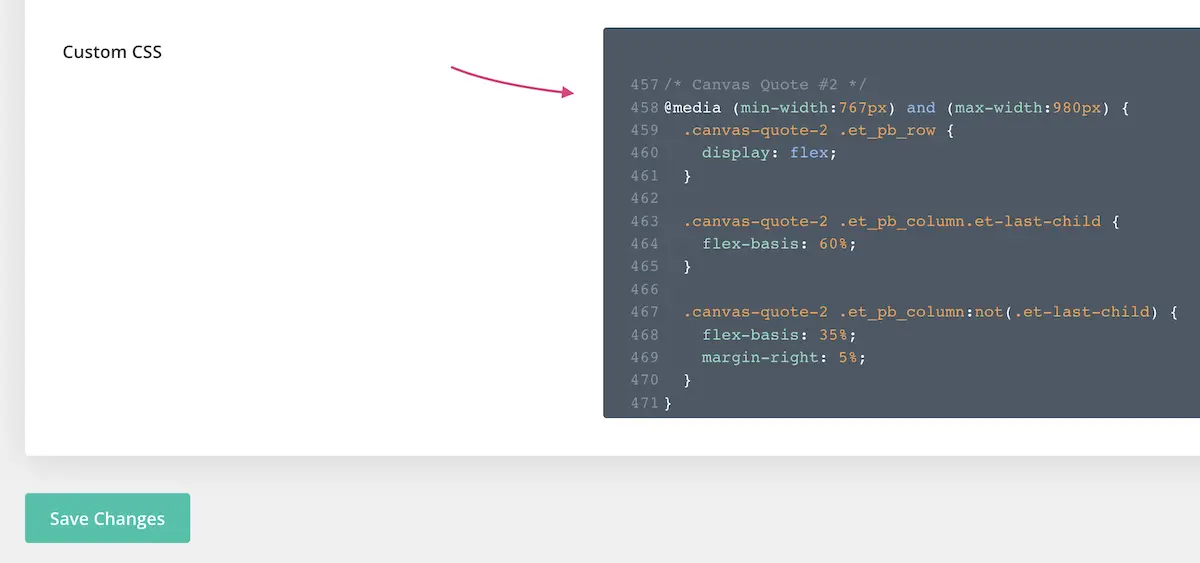
All done! You can now add Canvas sections from the Divi Library – see Adding sections from the Library.
Adding sections from the Library
All Canvas sections are now in your Divi Library. When you add a new section in the Builder, choose Add From Library instead of an empty section.
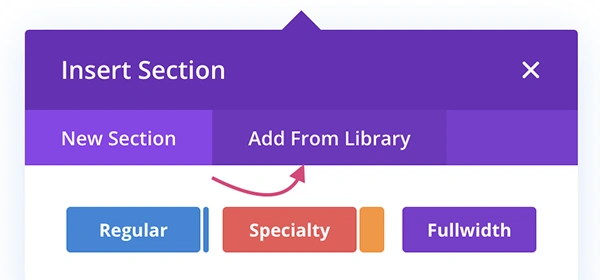
In the Library you can preview every Canvas section, filter them by category or tag, and search for the one you need.
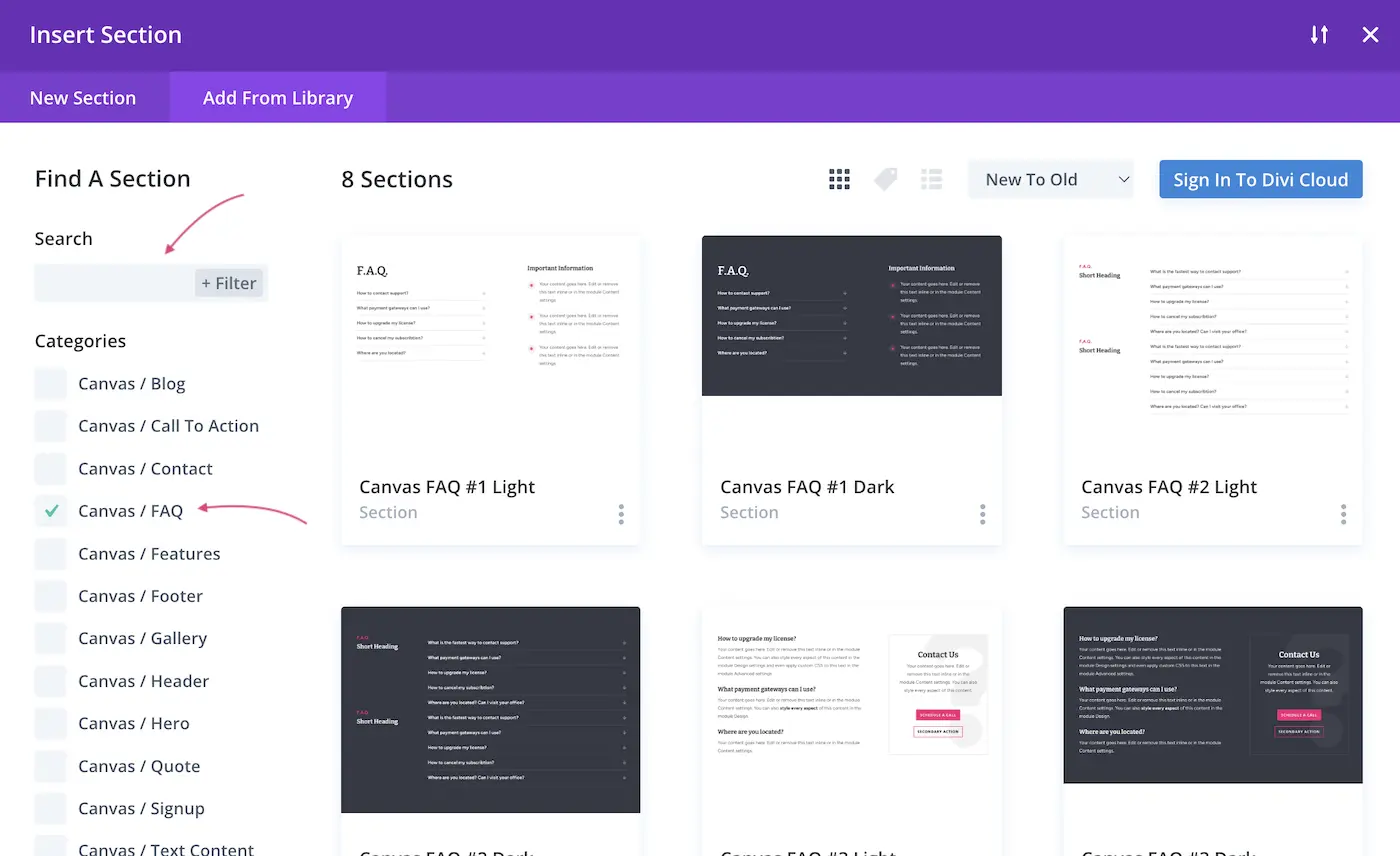
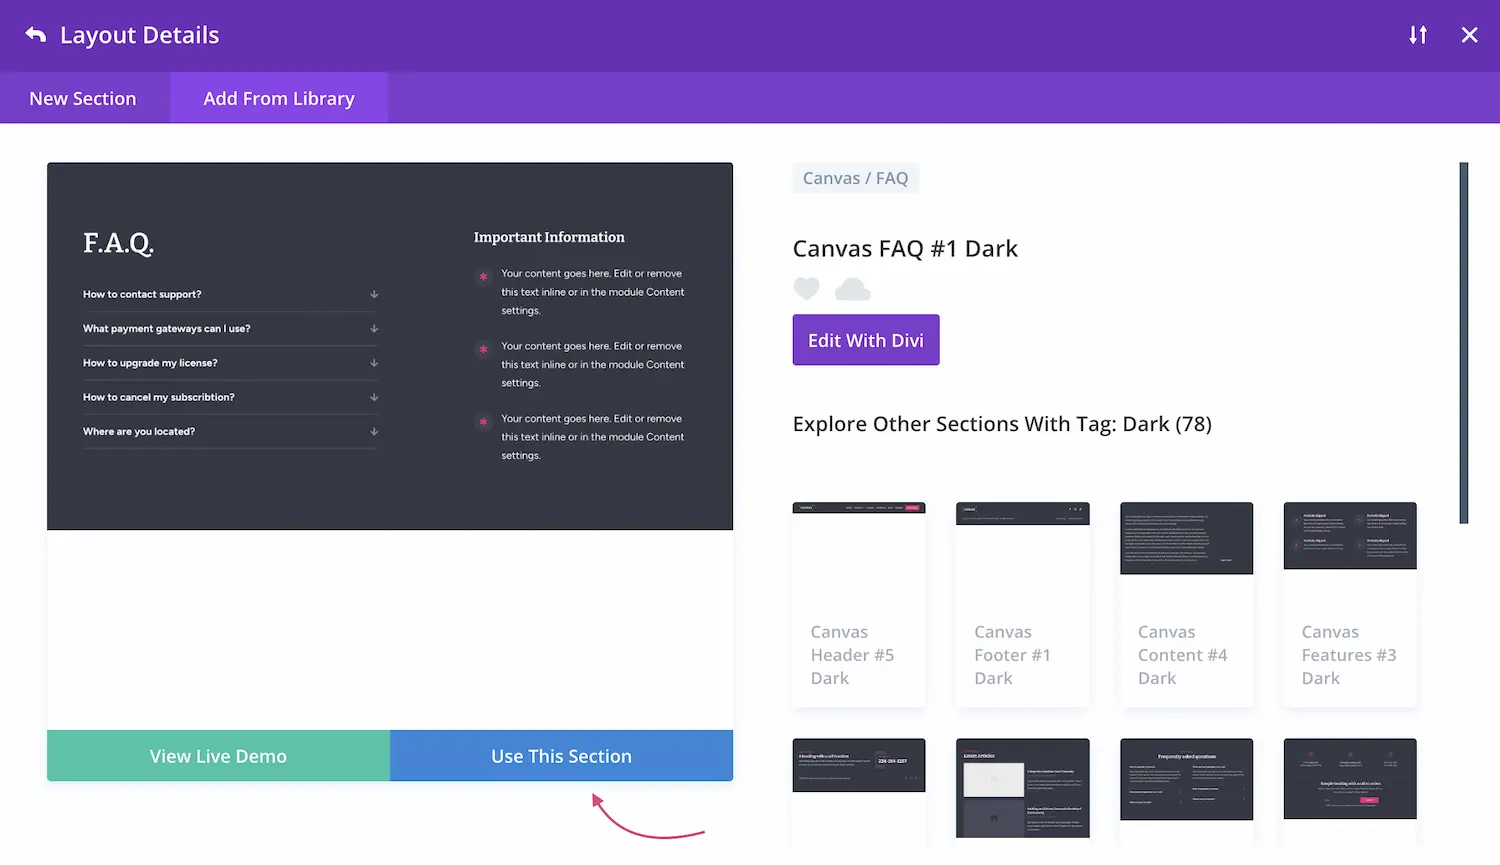
Click a section and choose Use This Section to add it to the page.
Importing sections to the Builder or Divi Cloud
Besides the child theme and the plugin, Canvas comes with JSON files you can import directly in the Divi Builder. Sections imported this way are ready to use: each section includes its own CSS in a Code module in its last row. You can move the code to your Theme Options or child theme later.
Option 1: Import many sections at once
In the download package, open Divi Builder Imports → Divi Library Sections for Divi Cloud. Choose the set of sections to import:
- All sections
- All light sections
- All dark sections
- Sections from one category (blog, call to action, contact, FAQ, features, footer, gallery, header, hero, quote, signup, text content)
Method 1: Import to the Divi Library
Go to Divi → Divi Library and click Import & Export.
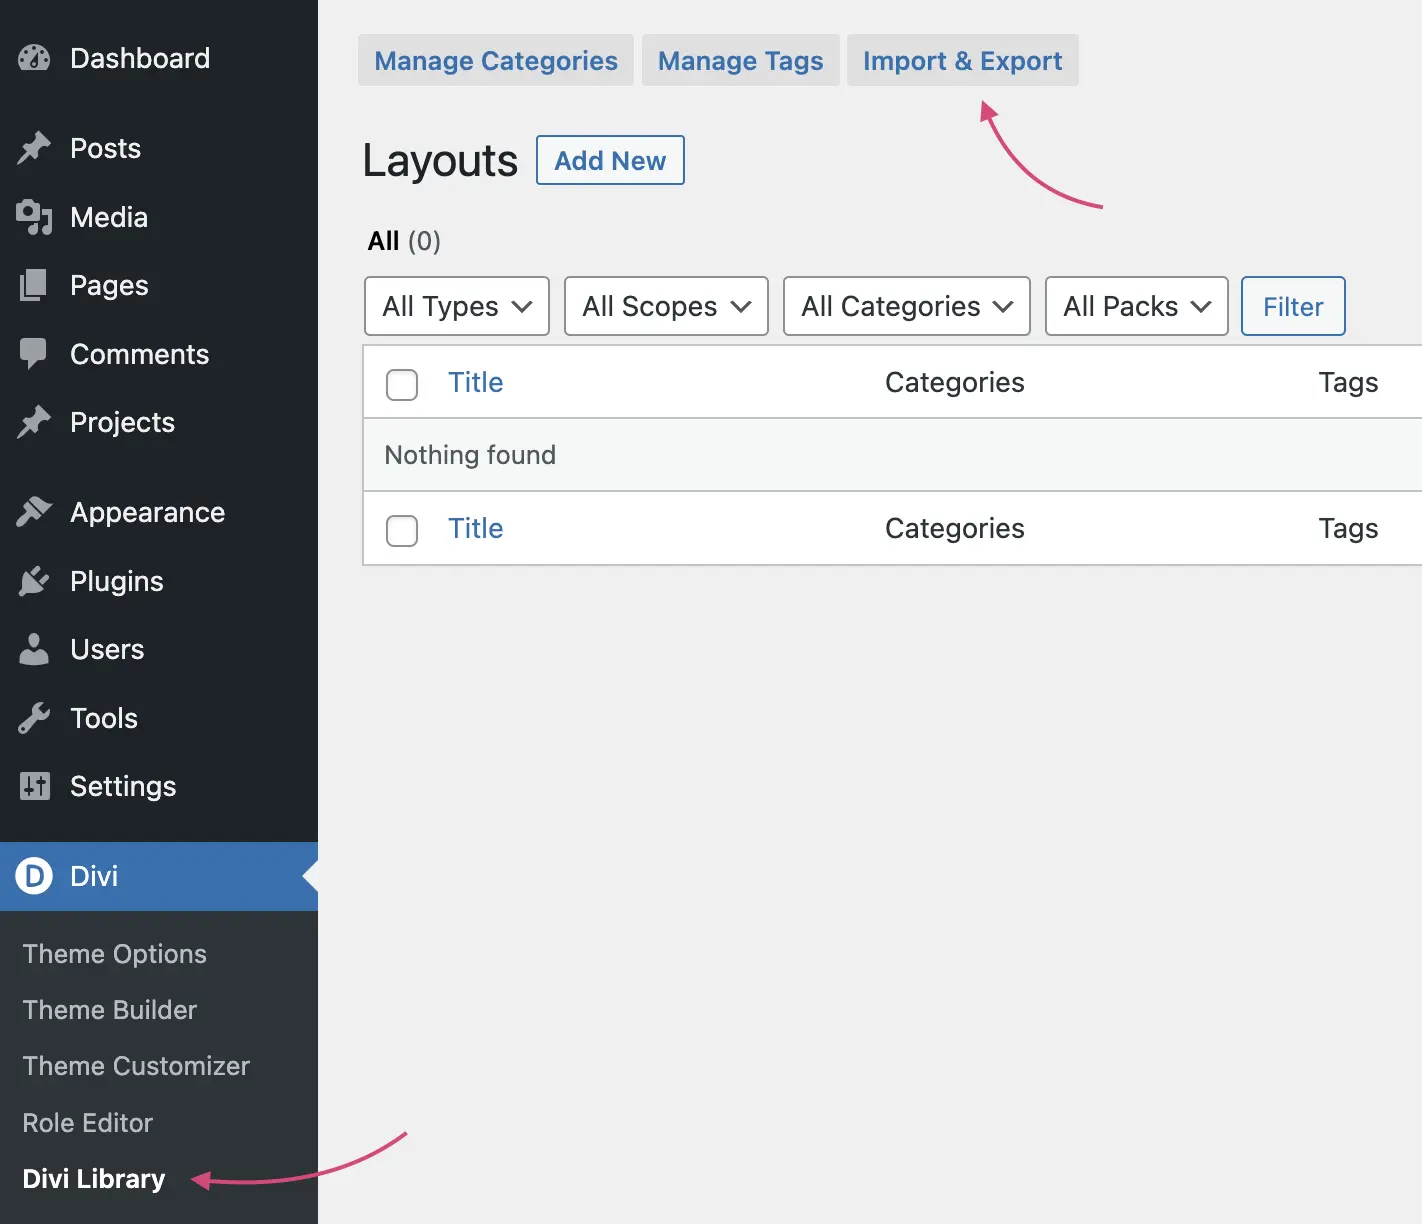
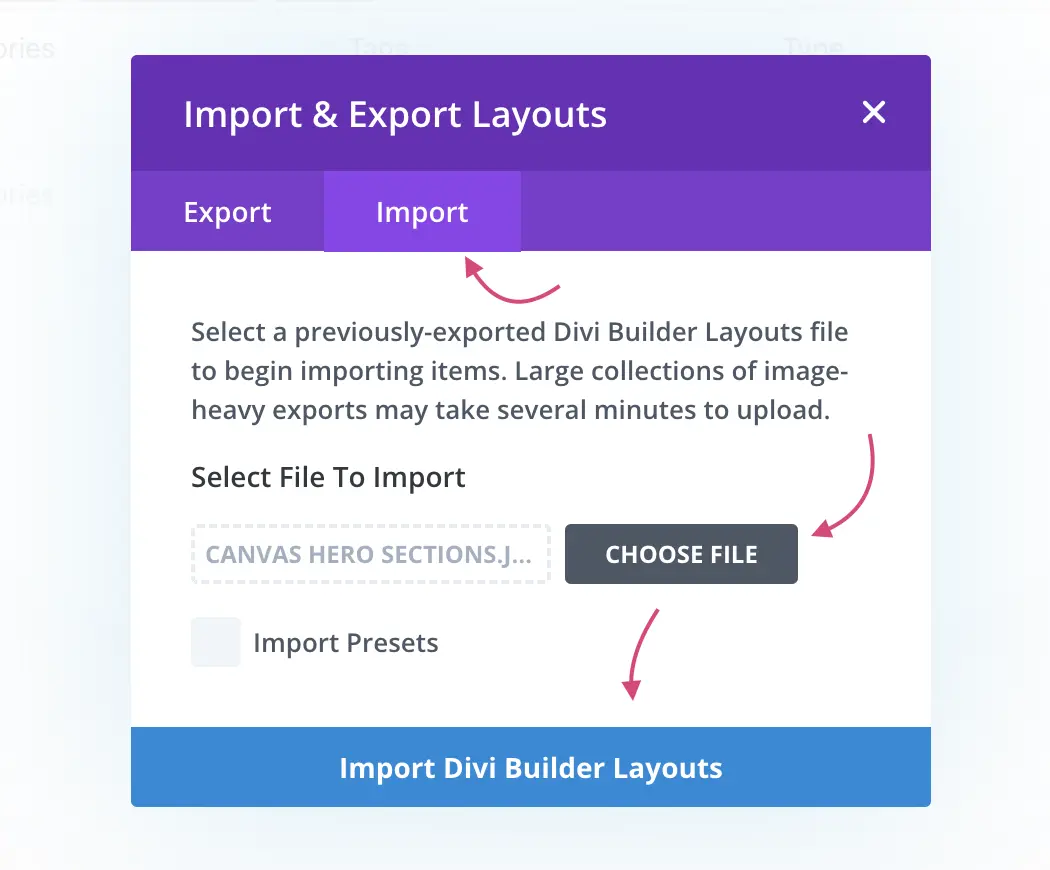
Open the Import tab, select a JSON file from the Divi Library Sections for Divi Cloud folder, click Import Divi Builder Layouts and wait for the import to finish.
The sections are now in your Divi Library. In the Builder, add a new section and open the Add From Library tab to see them. You can search by name or filter by category. To save a section to your Divi Cloud, click its cloud icon.
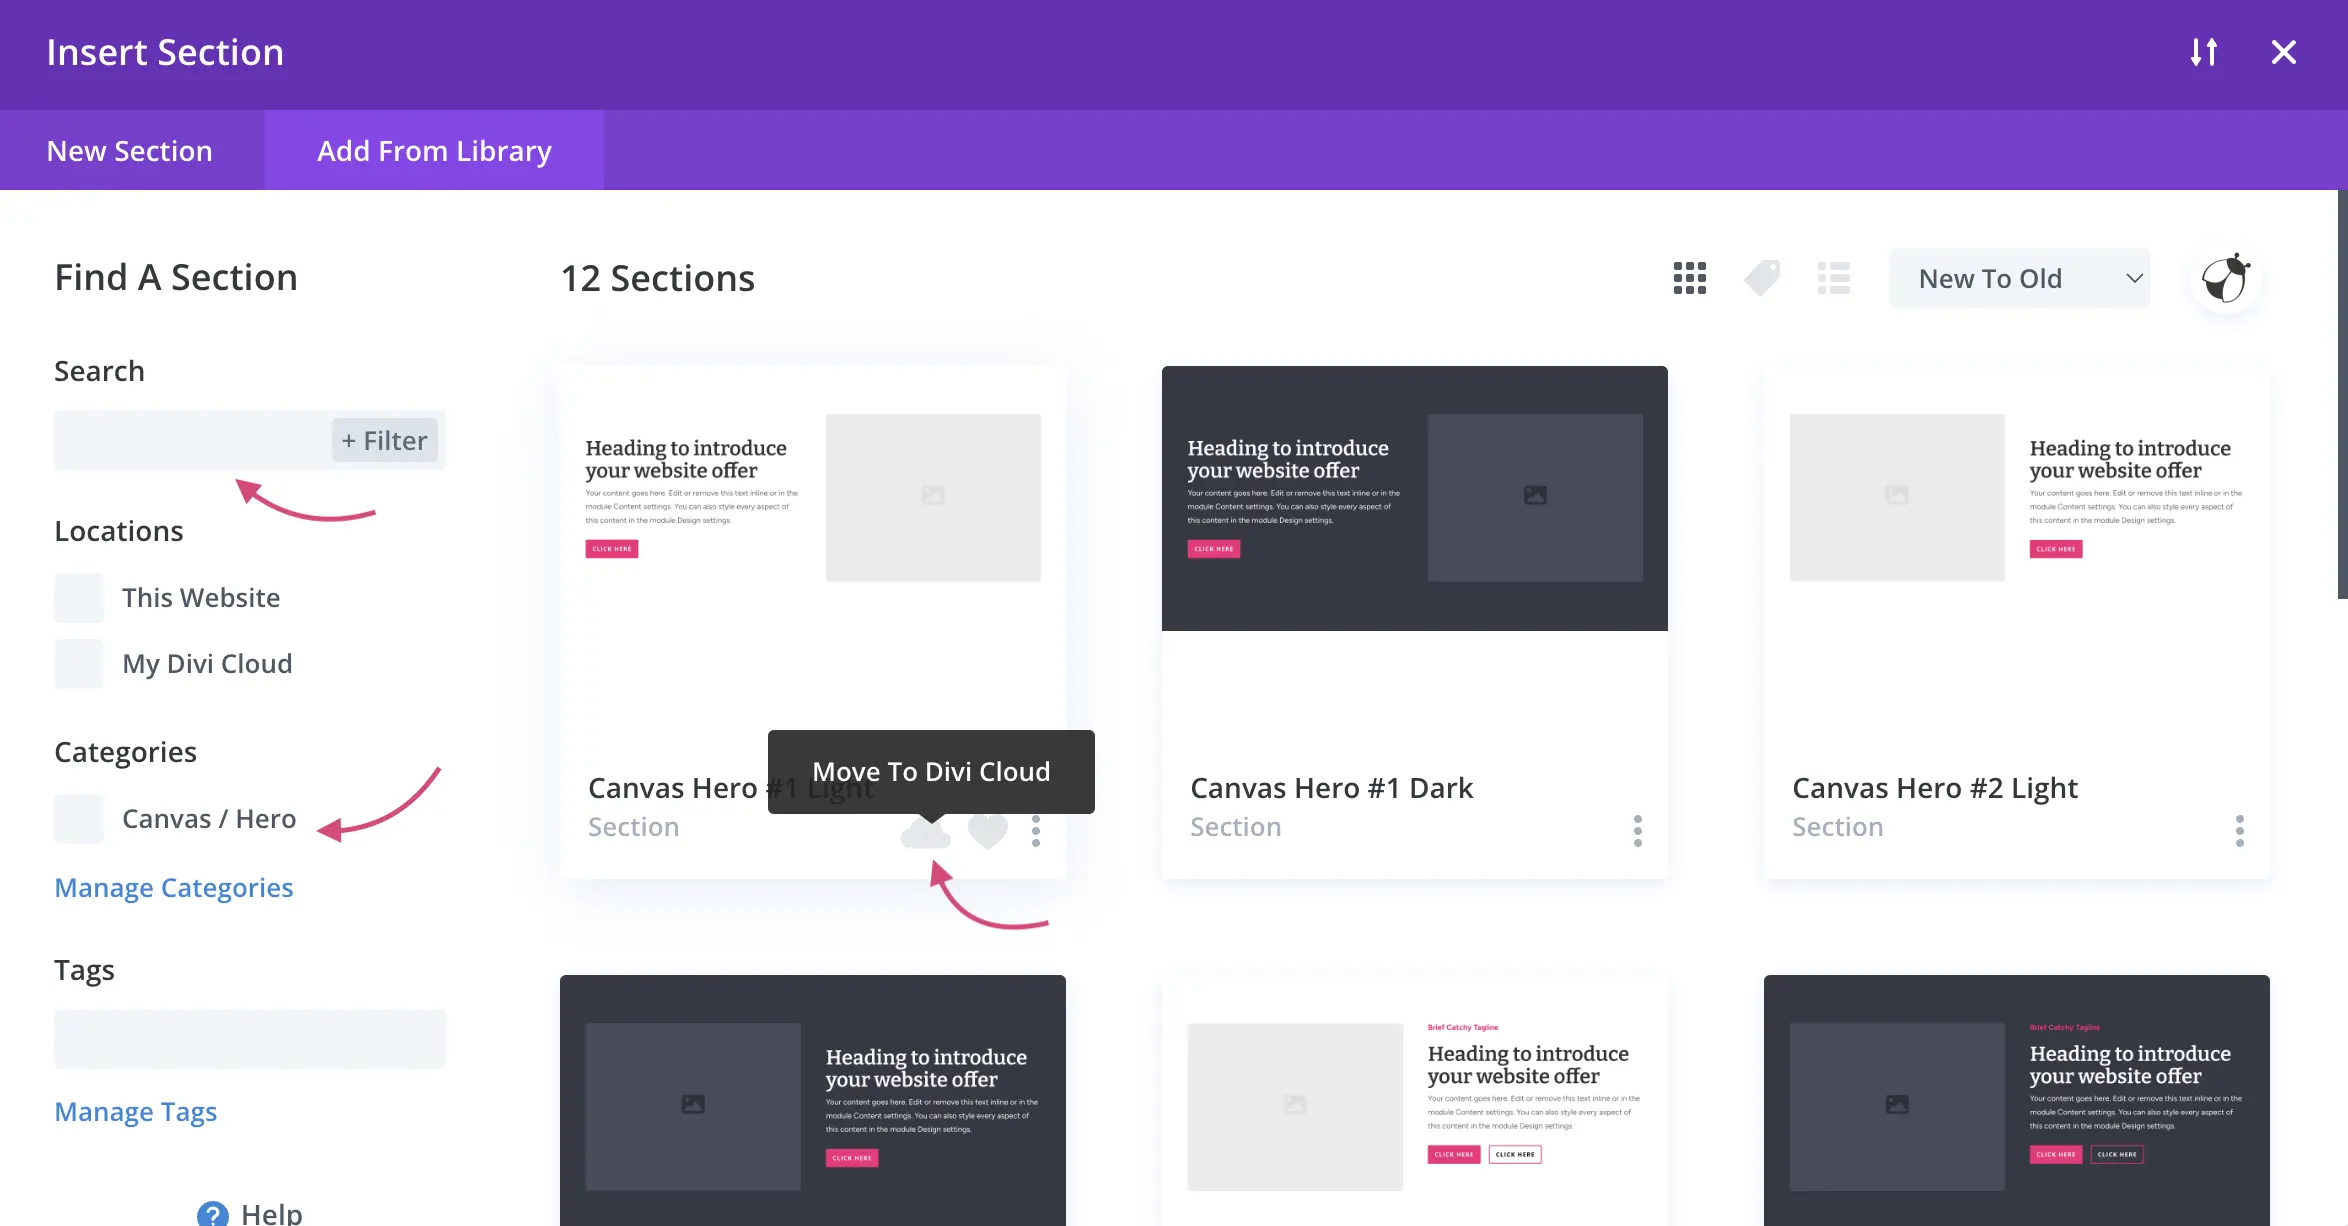
Method 2: Import directly to Divi Cloud
In the Builder, add a new section from the Library and drag and drop the JSON file onto the popup.
Option 2: Import a single section
In the download package, open Divi Builder Imports → Single Drag&Drop Sections. You’ll find every section as a separate JSON file, in folders by category.
Method 1: Use the Portability feature
In the Builder, click the Portability icon, open the Import tab and select a JSON file from the Single Drag&Drop Sections folder. Uncheck Replace Existing Content and click Import Divi Builder Layout.
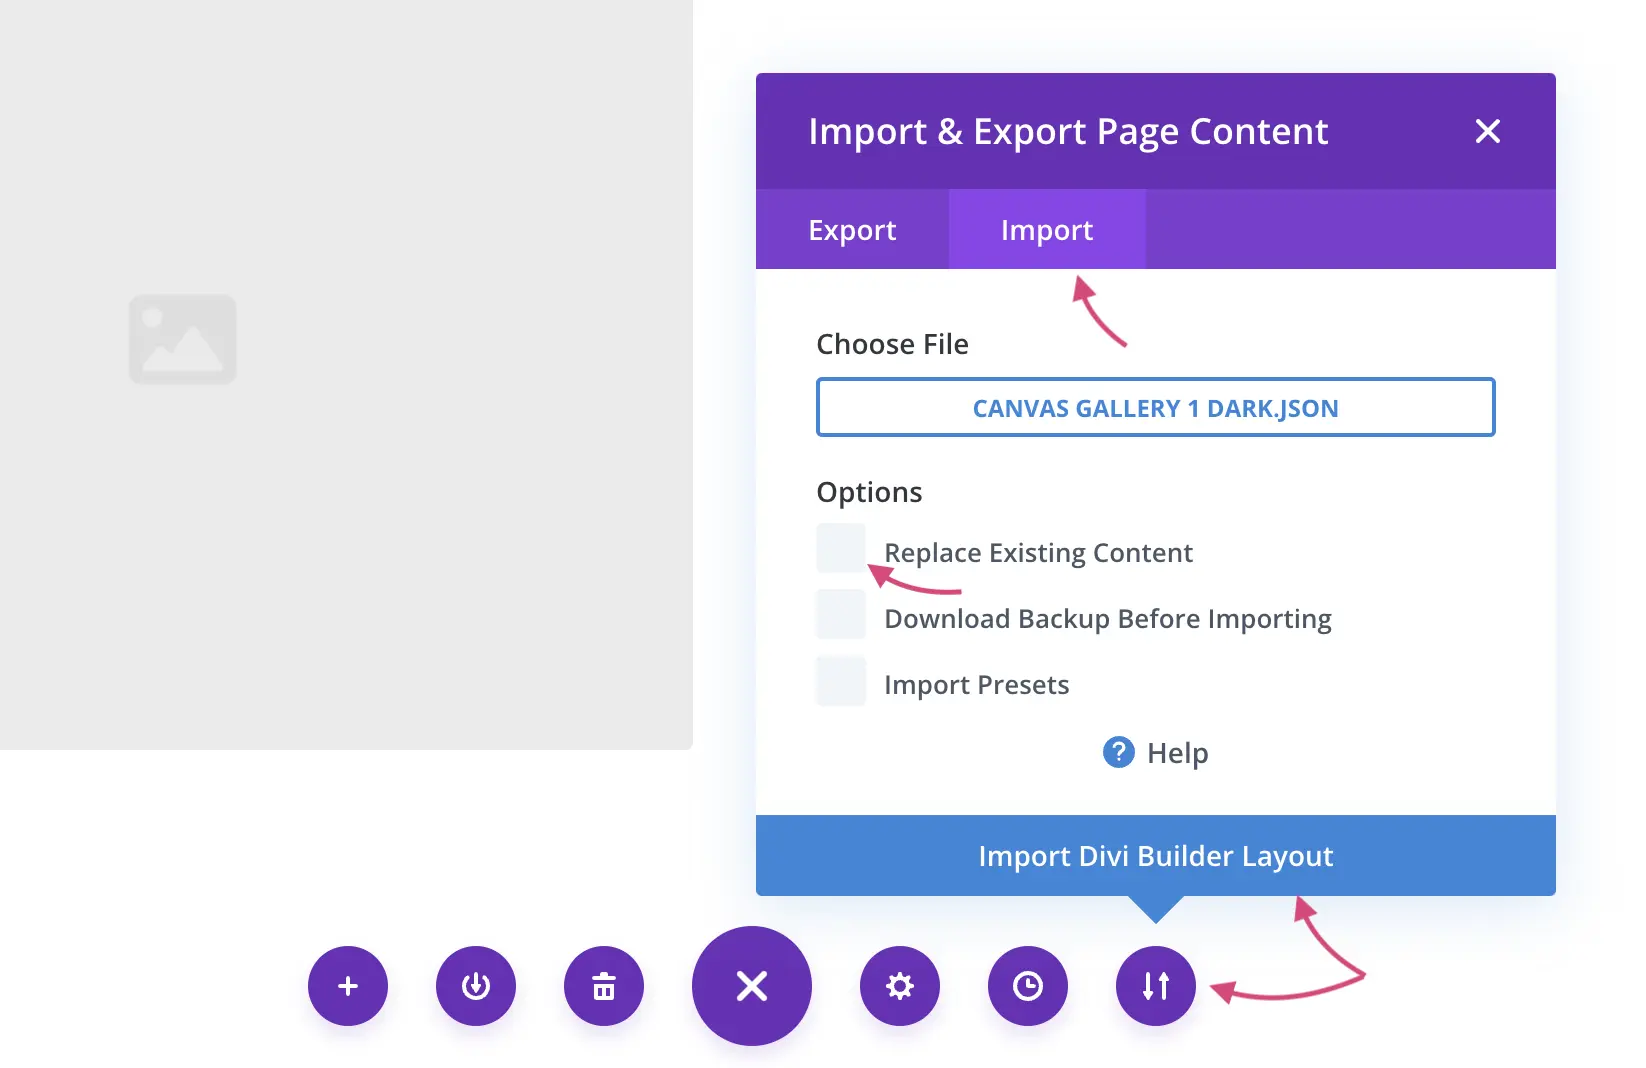
Method 2: Drag and drop
With the Visual Builder open, drag and drop any JSON file from the Single Drag&Drop Sections folder onto the page.
The CSS of each section
Sections imported from the Divi Builder Imports folder include their CSS in a Code module in the last row of each section. It keeps working there, but we recommend moving it to your Theme Options or child theme stylesheet.
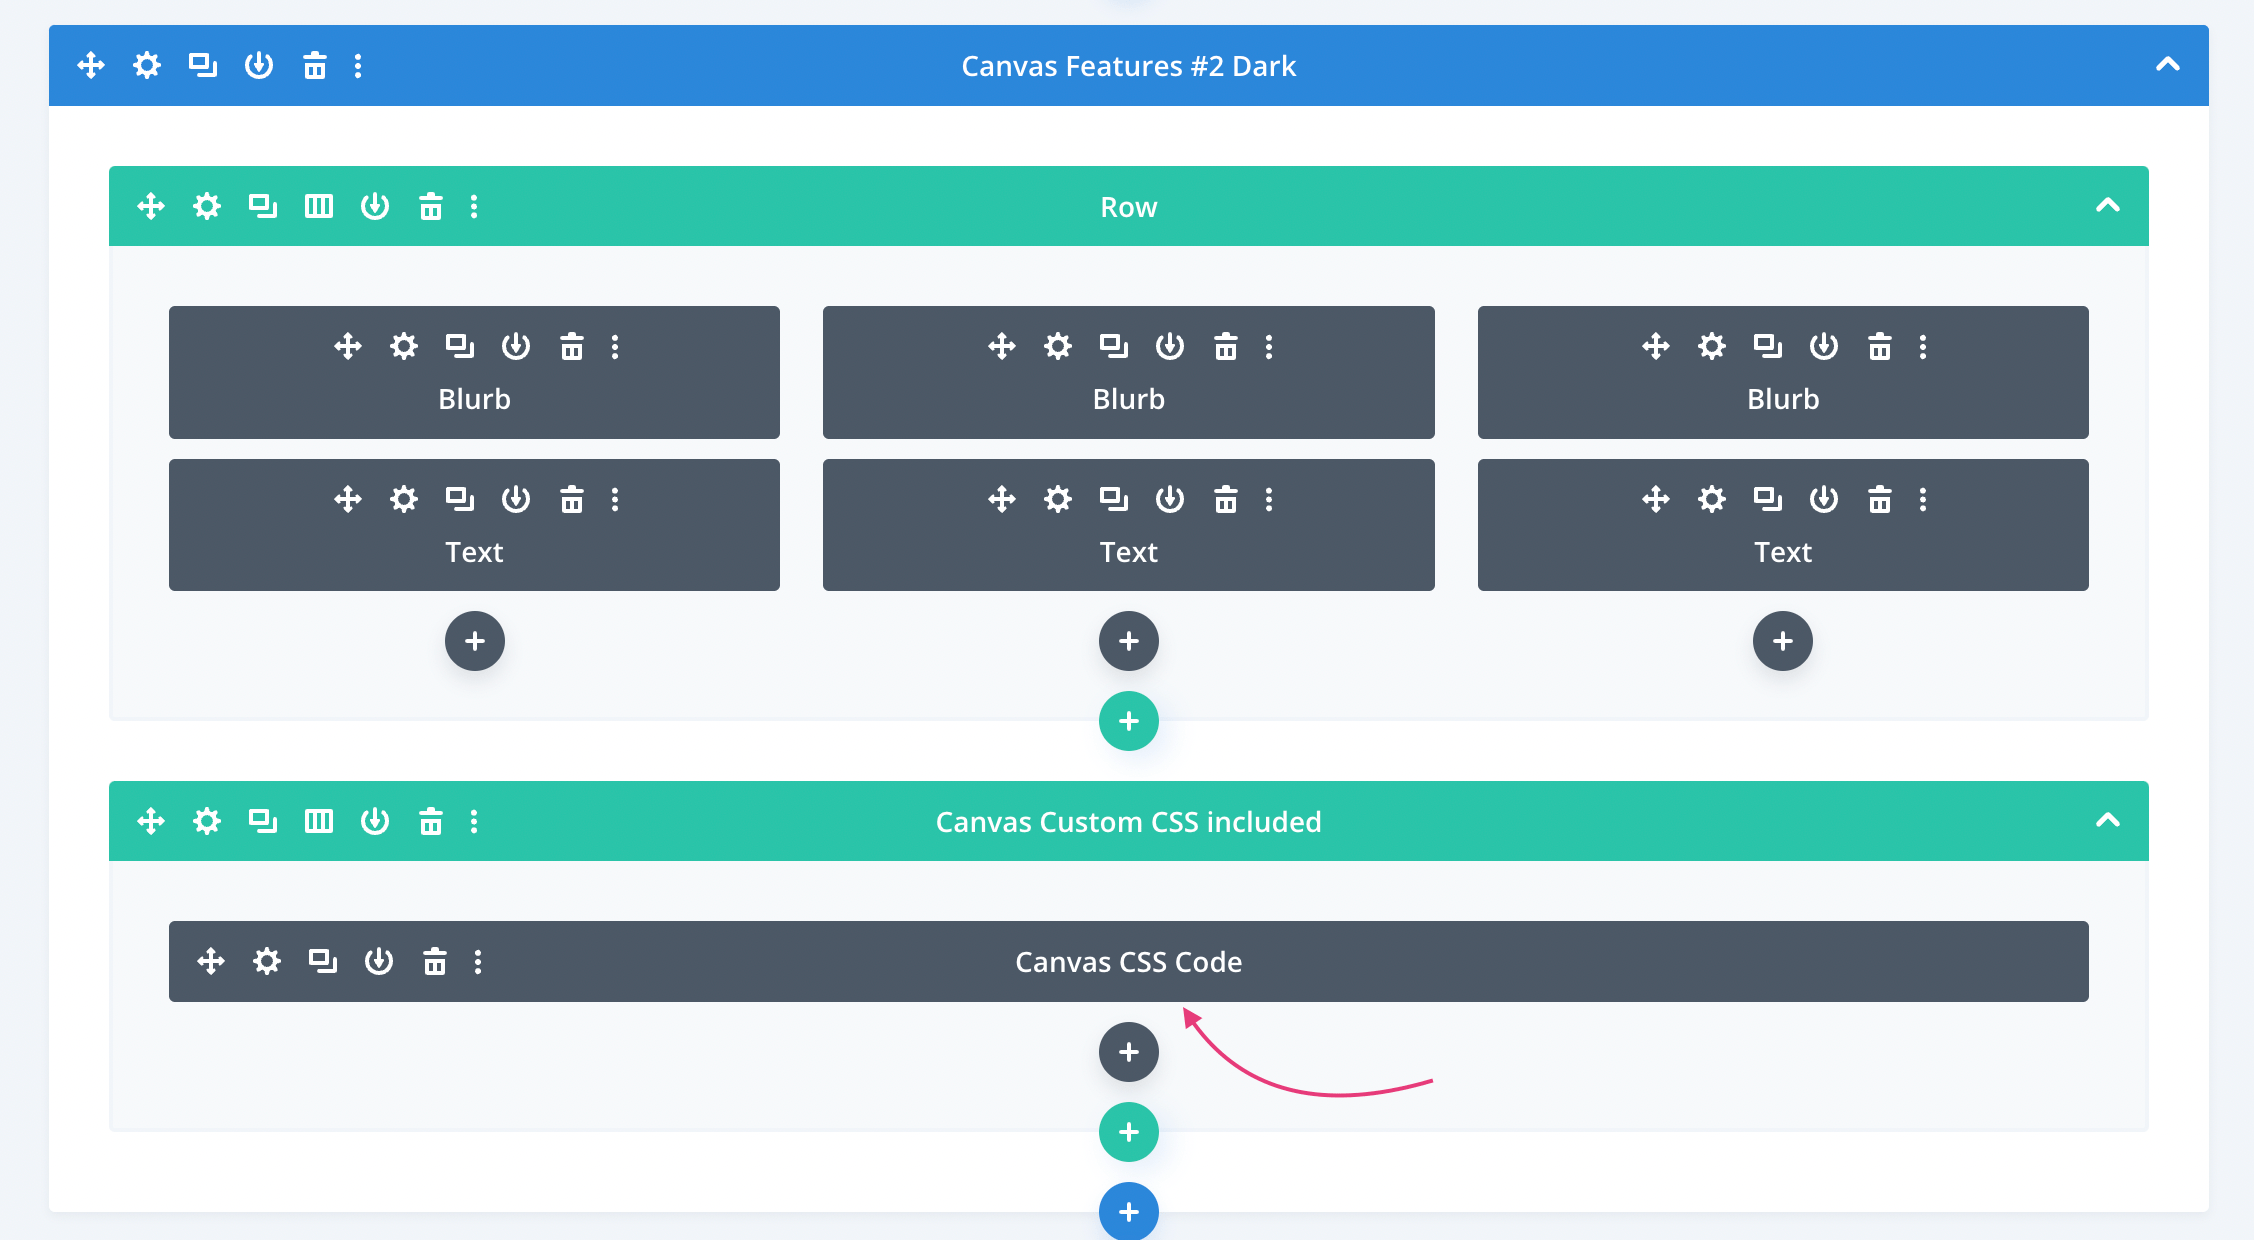
Fullscreen menu overlay section
Canvas headers use two sections
For the header and navigation to work as on the Canvas demo, add two sections to your page:
- Any of the Canvas Header sections
- The Canvas Fullscreen Menu Overlay section
Tip: Move the overlay to the footer template
If you use the Theme Builder, add the overlay section as the last section of your Footer template. This way it doesn’t get in the way while you design the rest of the page in the Builder.
How to update
Download the updated Canvas files from your account. In the Updates folder you’ll find the new sections of each version. Use the option that matches how you imported Canvas:
Option 1: Sections and CSS separately (child theme or plugin)
Use this if you installed Canvas with the child theme or the importer plugin. Open Updates → Canvas x.x → Child Theme and Plugin (CSS separated):
- Canvas x – All sections.json – import it in the Divi Library.
- canvas-x-additional-style.css – copy the code and paste it at the end of your current custom CSS (in your child theme stylesheet or in Divi → Theme Options → Custom CSS).
- Featured Images – PNG images you can set as each section’s featured image, so they’re easier to find in the Builder.
Option 2: Sections with CSS included (Divi Cloud or the Builder)
Use this if you imported Canvas sections in the Builder, or if you want to add the new sections to your Divi Cloud. Open Updates → Canvas x.x → Divi Cloud (CSS included) and choose what to import:
- All new sections
- All new sections from one category
- Single new sections