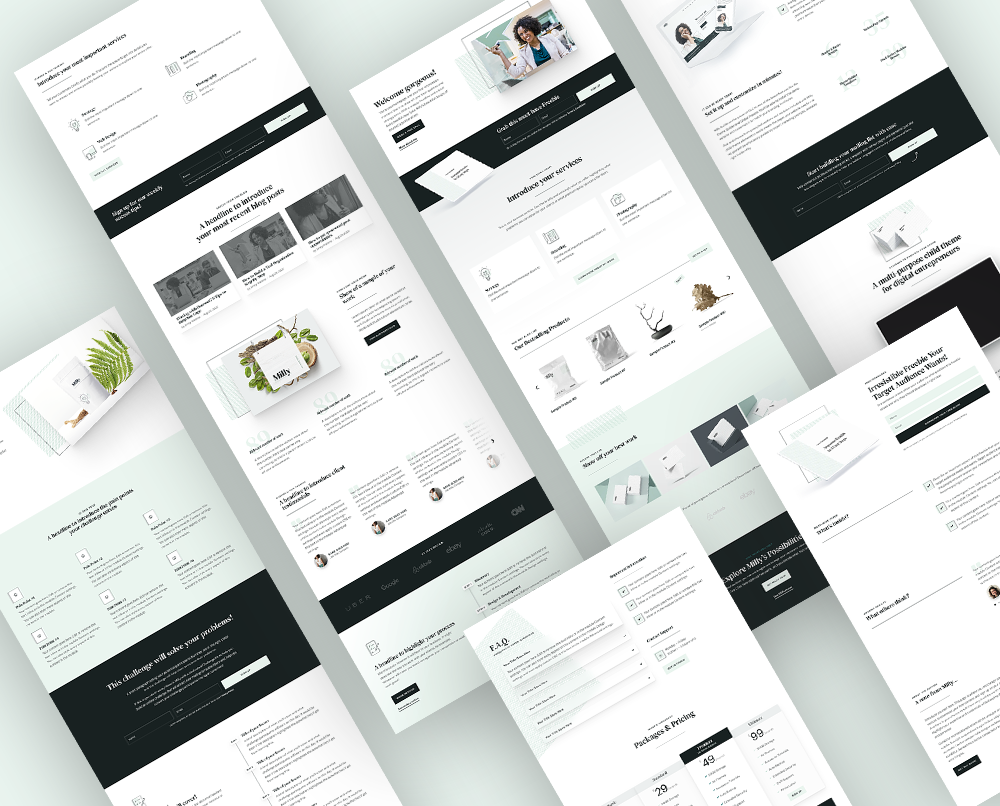
Starting a new website with Milly? This is your guide. Milly 2.0 is built natively for Divi 5: install the child theme, activate your license and import the demo, then make it yours with global colors, fonts and presets.
Not sure which Divi version you have? Go to Appearance → Themes in your WordPress dashboard and check the version number of the Divi theme.
Getting started
Milly 2.0 is built natively for Divi 5, using global variables for colors and fonts, Divi presets, and native Flexbox and Grid layouts. It’s the version we recommend for every new Milly website.
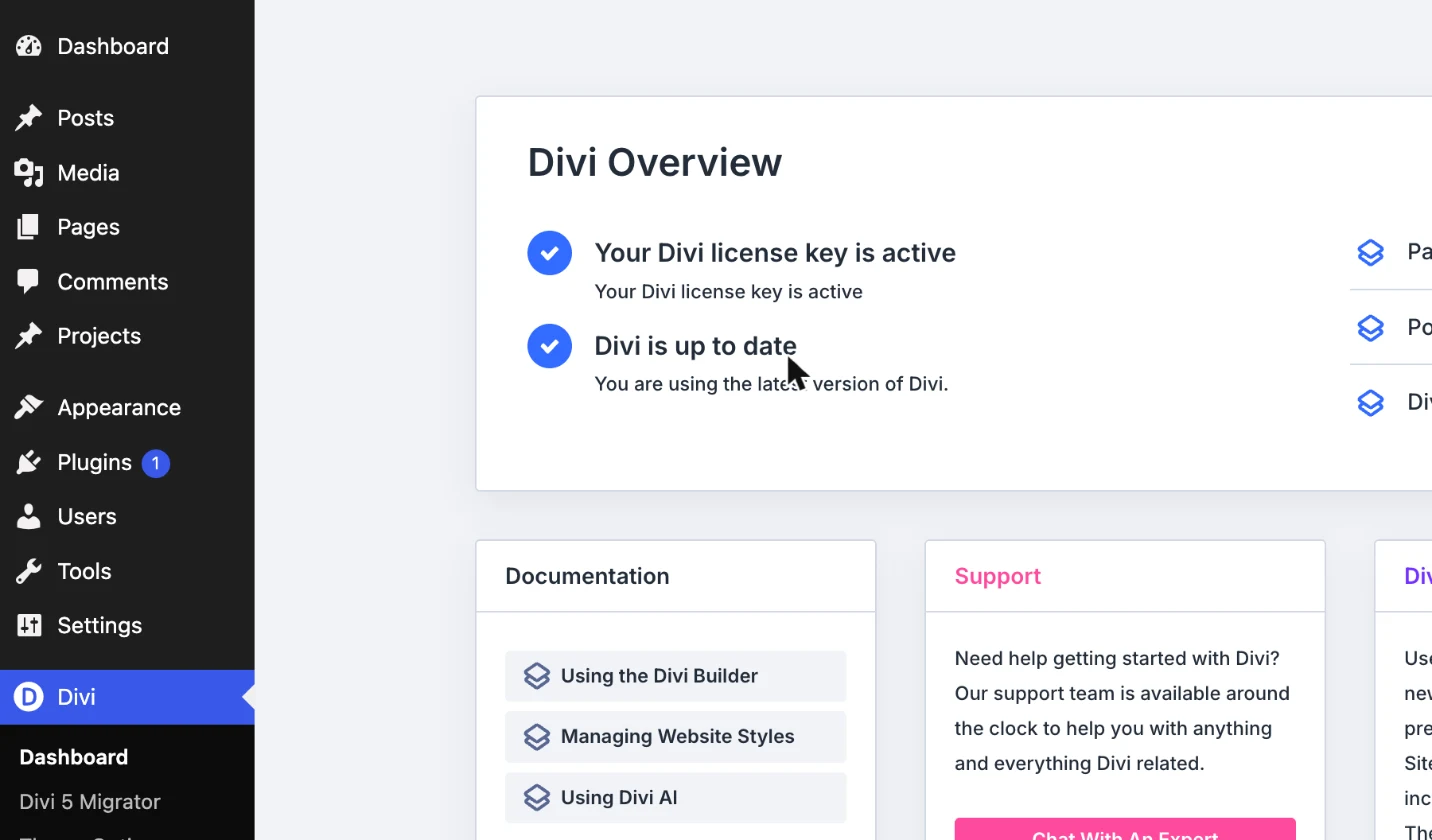
Before you start, you need the Divi theme installed and updated to the Divi 5 update path. Go to Divi ➞ Dashboard and check that Divi is up to date under Divi Overview. If you’re still on Divi 4, click Enable Divi 5 Updates, then update Divi under Dashboard ➞ Updates.
Already have a Milly website on Divi 4? Don’t import the new demo on top of it – see Migrating to Divi 5 instead, which updates your existing site safely.
Downloading and installing Milly
Step 1: Download Milly 2.0
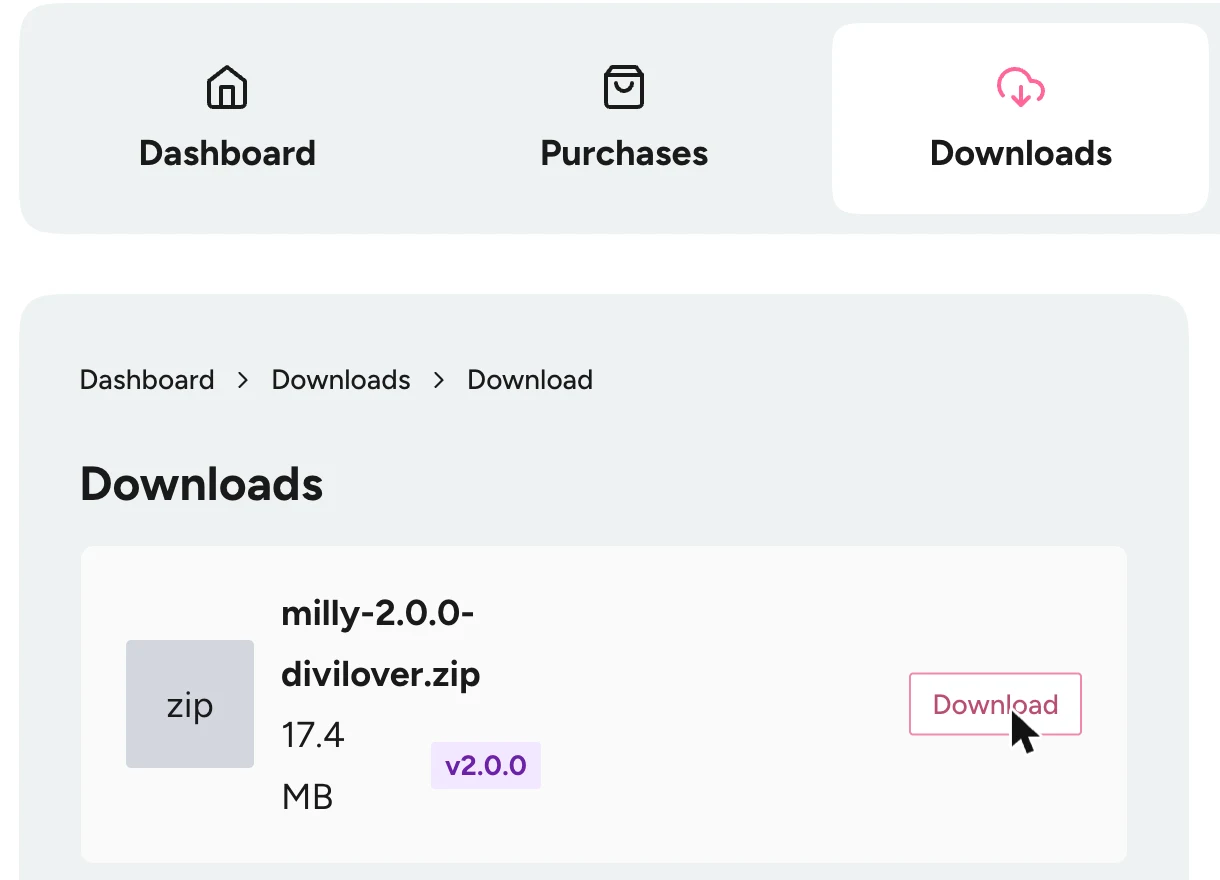
Download the latest milly-2.0.zip file from your account (Downloads ➞ Milly) or from the Elegant Themes Marketplace, depending on where you bought it.
Step 2: Upload and install Milly
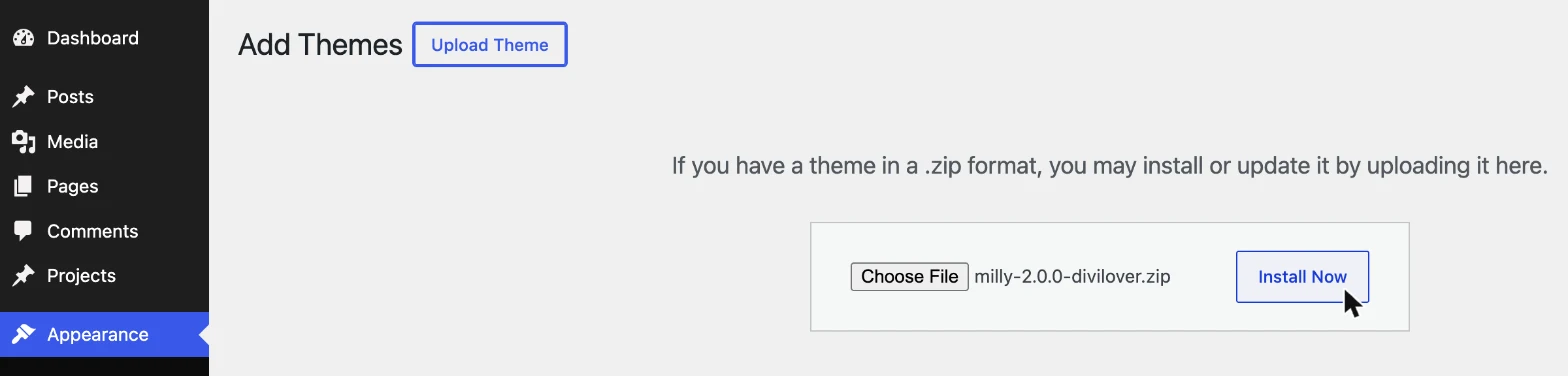
In your WordPress dashboard, go to Appearance ➞ Themes ➞ Add Theme ➞ Upload Theme. Choose the milly-2.0.zip file and click Install Now. WordPress checks that the Divi parent theme is installed.
Step 3: Activate Milly
Click Activate.
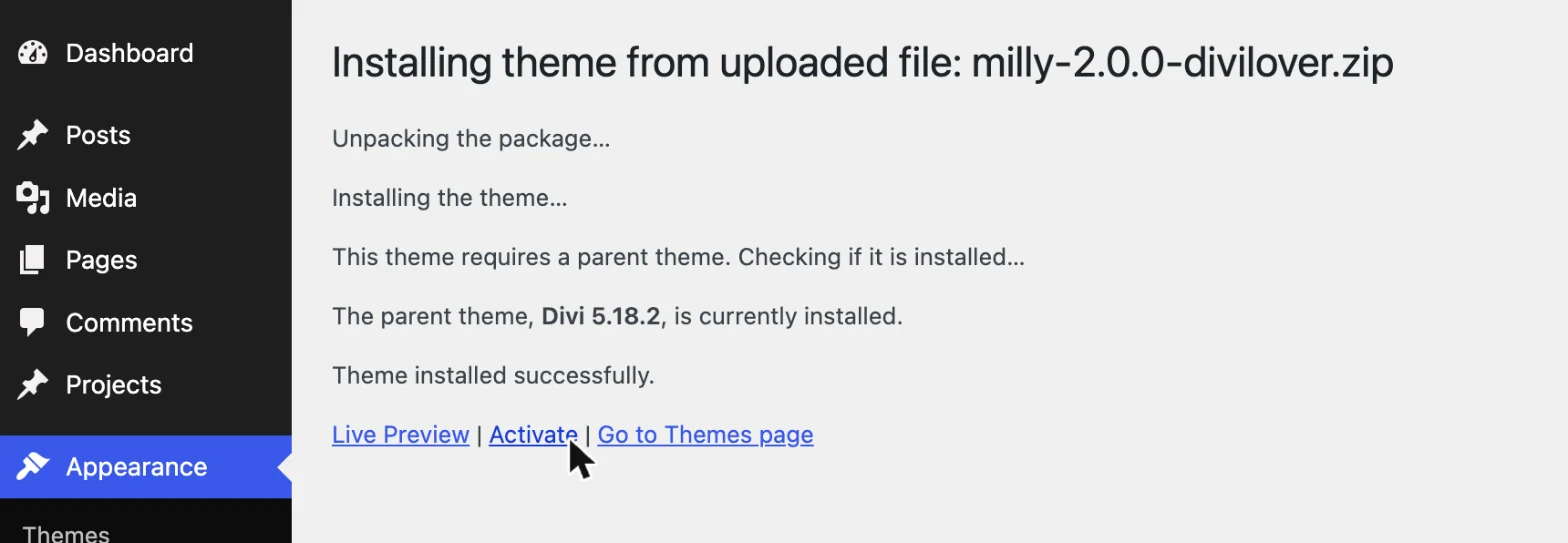
Milly detects your Divi version automatically and loads the Divi 5 version of the theme. You’ll see two notices: one to activate your license, and one letting you know your demo content is ready to import.
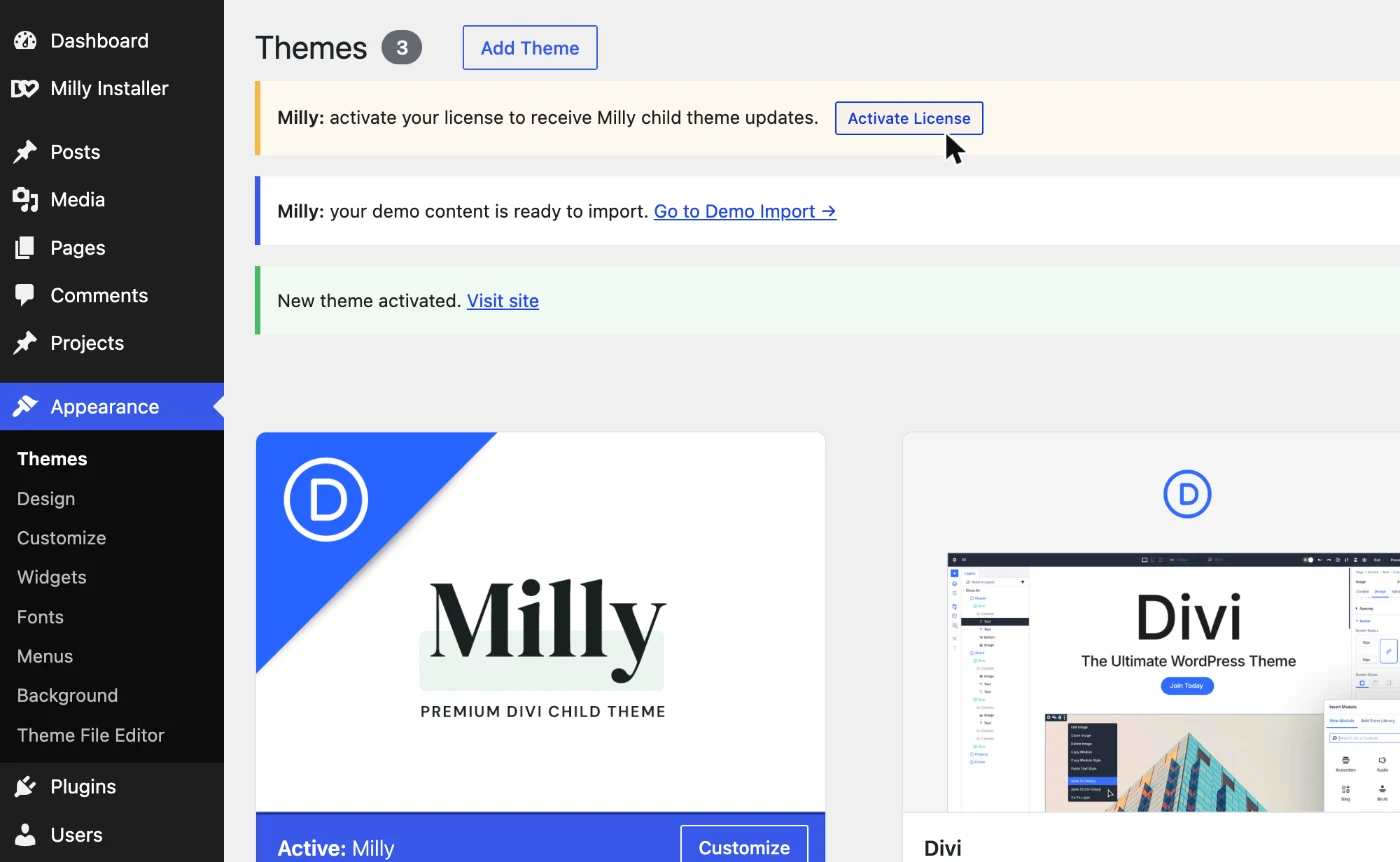
Activating your license
Go to Divi ➞ Milly License, paste your license key and click Activate License. You’ll find your key in your account, in the Licenses tab.
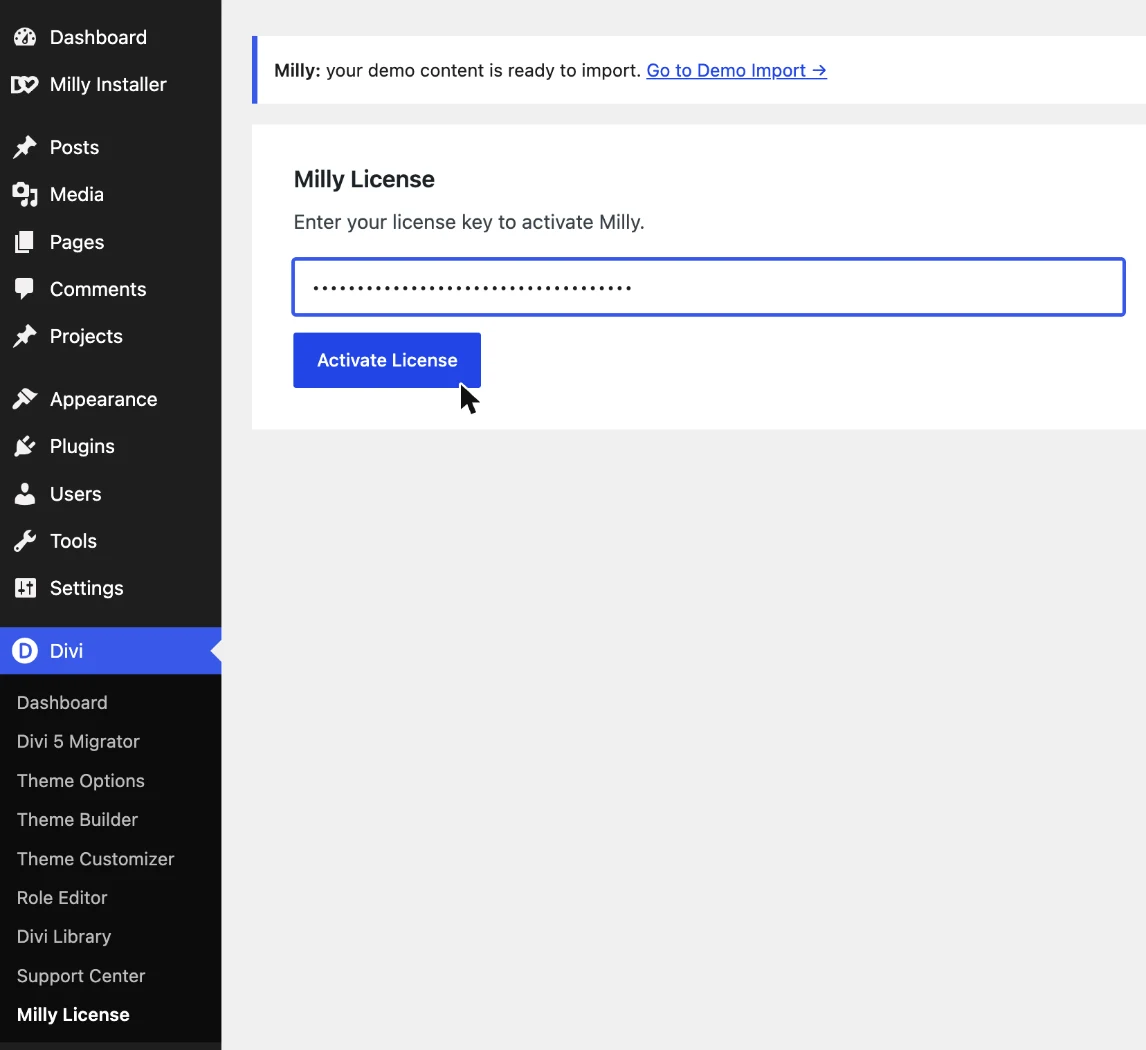
The license also enables automatic Milly updates. A Regular license works on one site at a time – to move it, deactivate it in Divi ➞ Milly License first.
Bought Milly on the Elegant Themes Marketplace? Skip this step – your updates come through your Elegant Themes API key in Divi Theme Options instead.
Importing the demo content
Go to Milly Installer in the sidebar. The demo import needs an active license, so make sure you’ve completed the previous step first.
Click Start Import. The import brings in the complete Milly demo: pages, blog posts, projects, WooCommerce products, Divi Library layouts, Theme Builder templates, Divi presets, global colors and fonts, Divi icons, menus and placeholder images. The demo includes a shop, so the installer also installs and activates WooCommerce if it isn’t on your site yet.
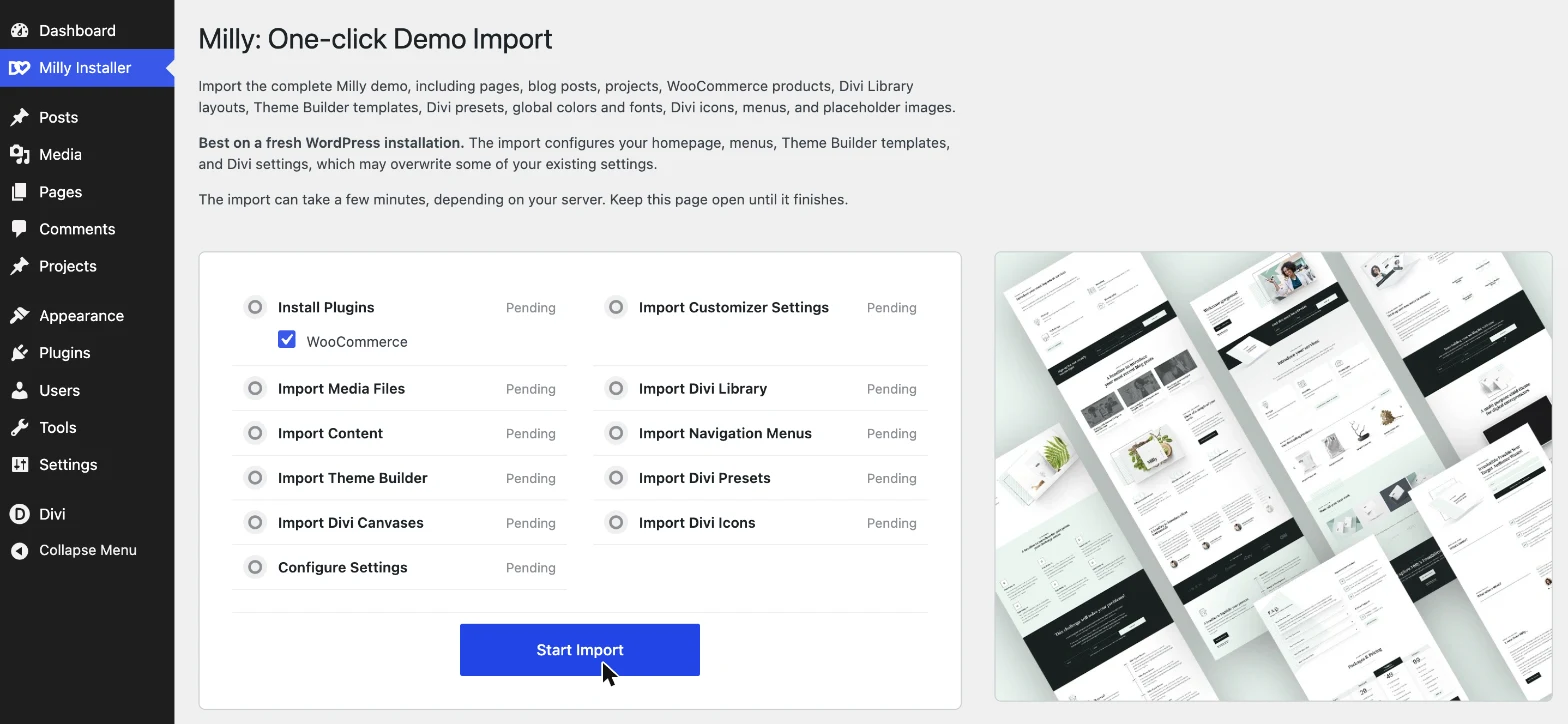
Keep the page open until it finishes – it can take a few minutes, depending on your server. The import is best run on a fresh WordPress installation, since it configures your homepage, menus, Theme Builder templates and Divi settings.
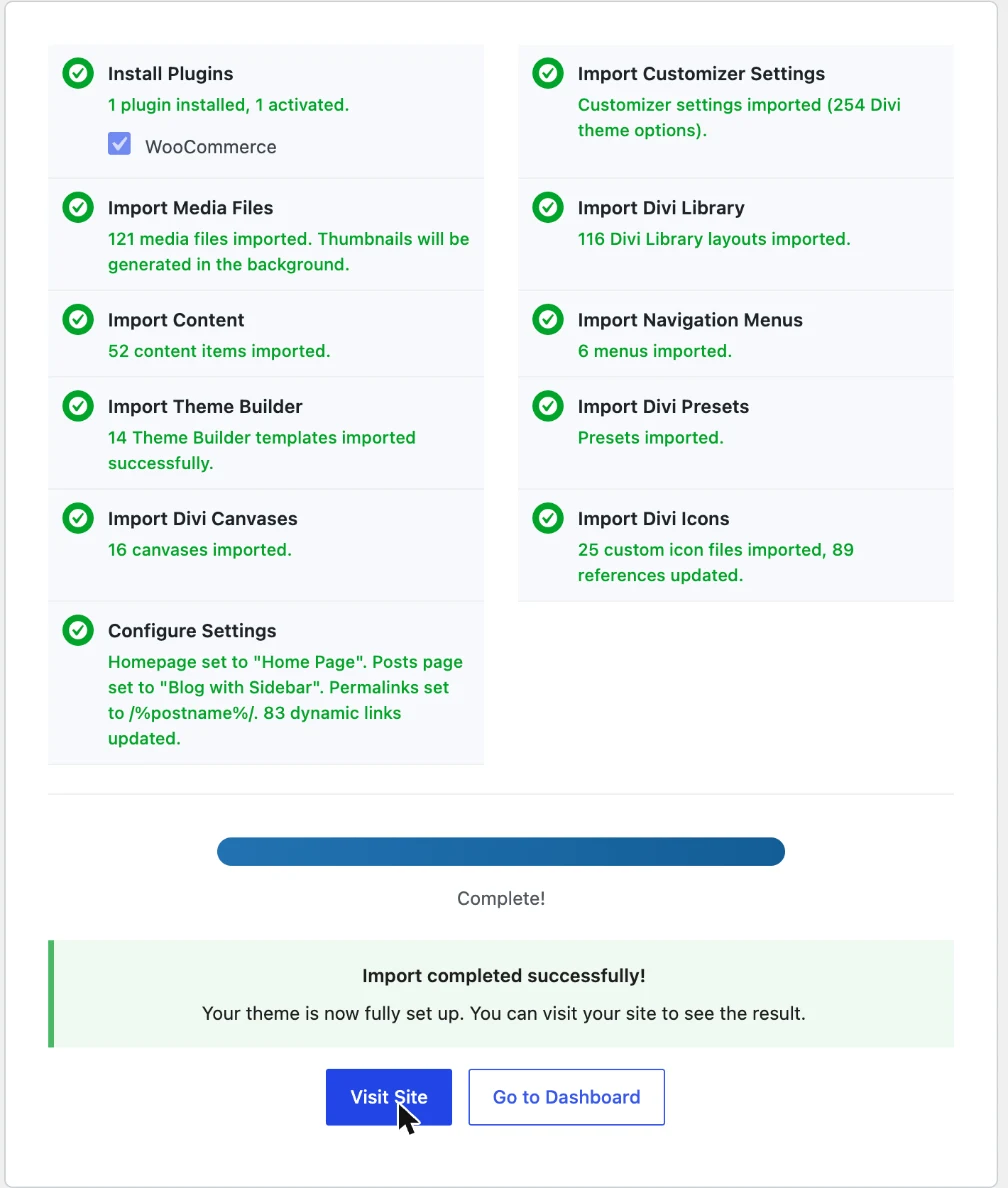
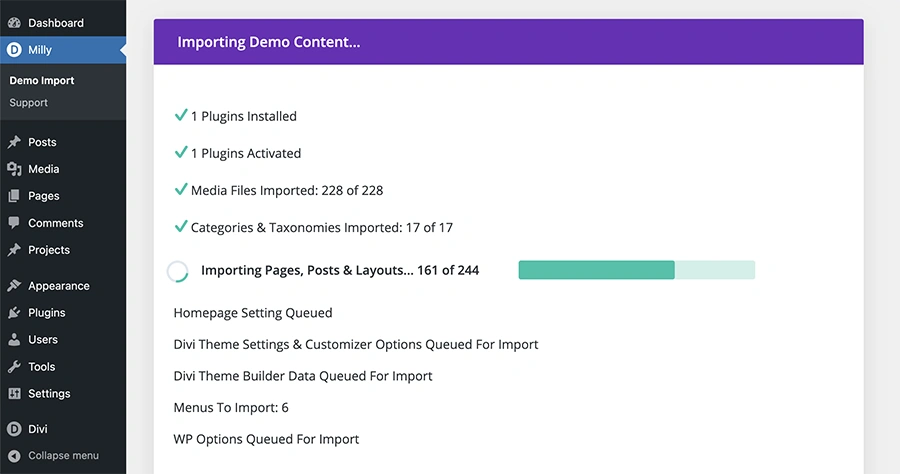
When every item shows a green checkmark, the import is complete and your site matches the Milly demo.
Theme Builder templates
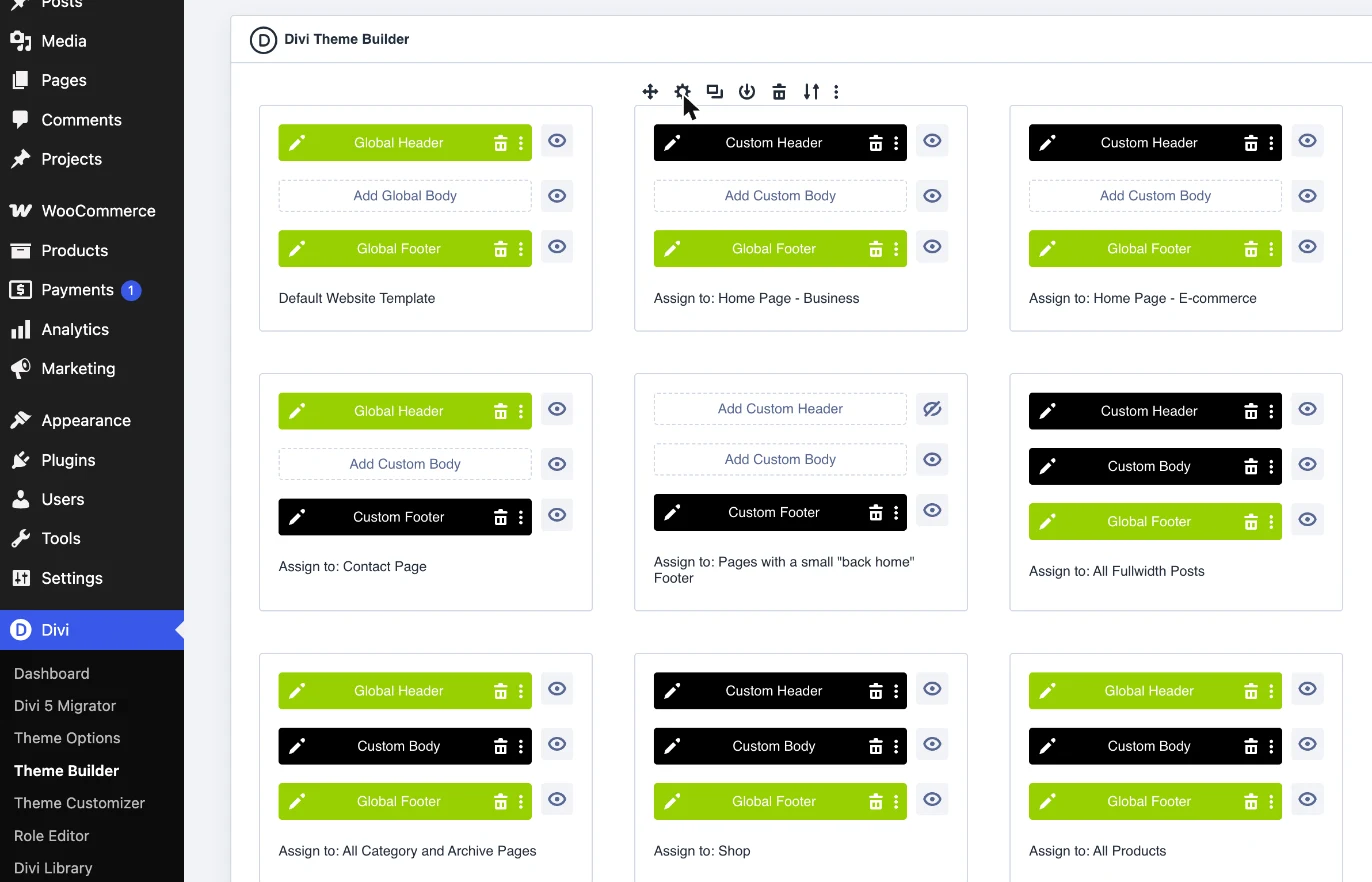
The import sets up 14 Theme Builder templates. Go to Divi ➞ Theme Builder to see them and check which template is assigned where.
- Default Website Template – the global header and footer used across the site.
- Pages with their own header or footer – Home Page – Business, Home Page – E-commerce, Resources and Contact, plus the cart and checkout pages with a small “back home” footer.
- Blog – fullwidth posts, posts with a sidebar, category and archive pages, and search results.
- Shop – the shop page, single products and product category pages.
- 404 page.
Hover over a template and click its gear icon (Template Settings) to change what it applies to. Every Milly header and footer is also saved in your Divi Library, so you can swap them in any template.
Colors, fonts and Global Variables
Milly 2.0 uses Divi 5’s global Variables instead of theme options, so every color lives in one place and updates everywhere it’s used. Open any page in the Divi Builder, then open the Variables panel in the left toolbar and expand Colors.
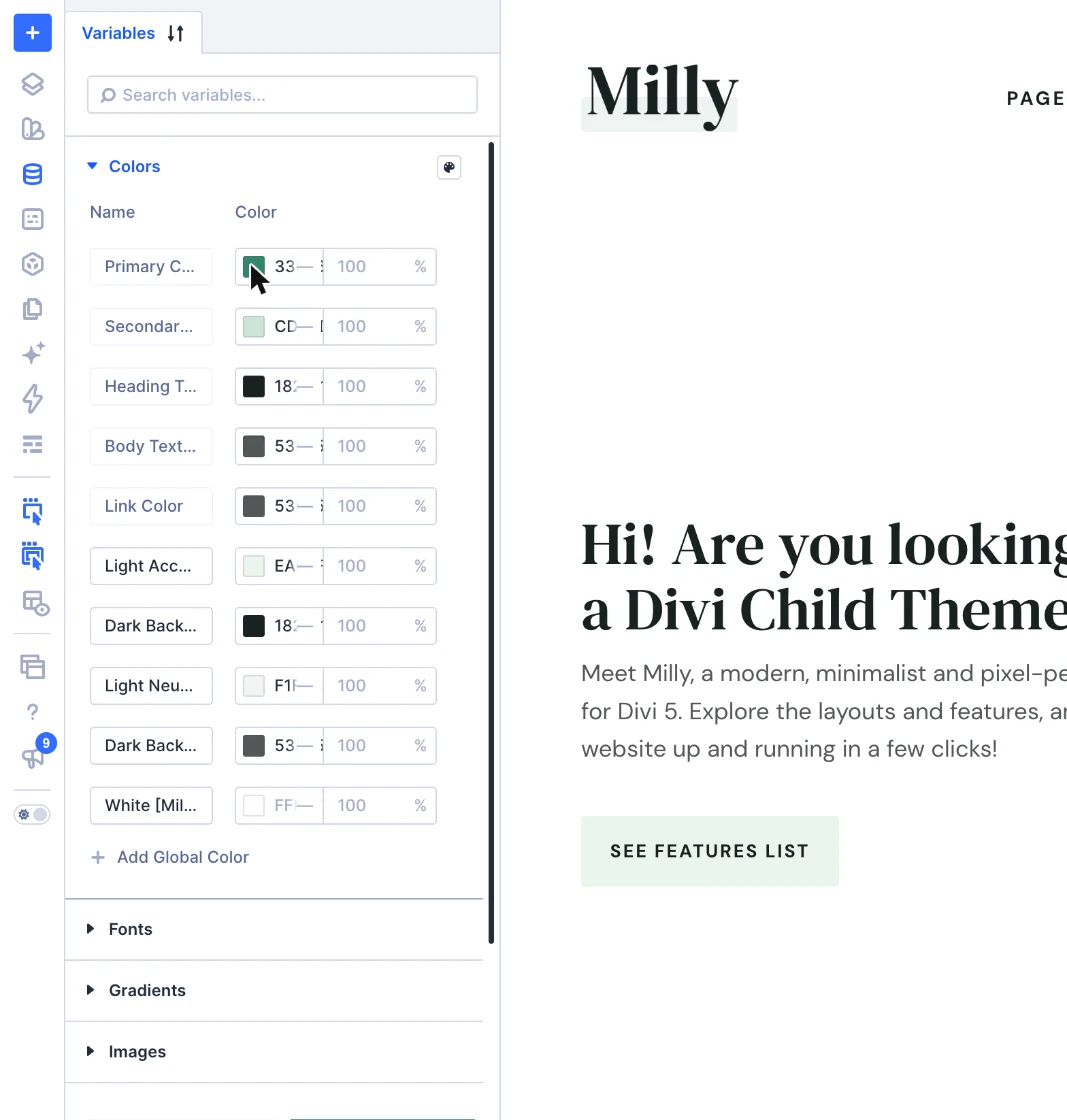
Changing a color here – Primary and Secondary, the Heading, Body and Link text colors, and Milly’s Light Accent, Light Neutral, Dark Backgrounds and White – updates it across the whole website immediately. You can add your own global colors with Add Global Color.
Fonts are global variables too: expand Fonts in the same panel to change the Heading and Body fonts used across the demo. Text sizes use fluid values, so headings and body text scale smoothly between phone and desktop instead of jumping at breakpoints.
Divi Library and Presets
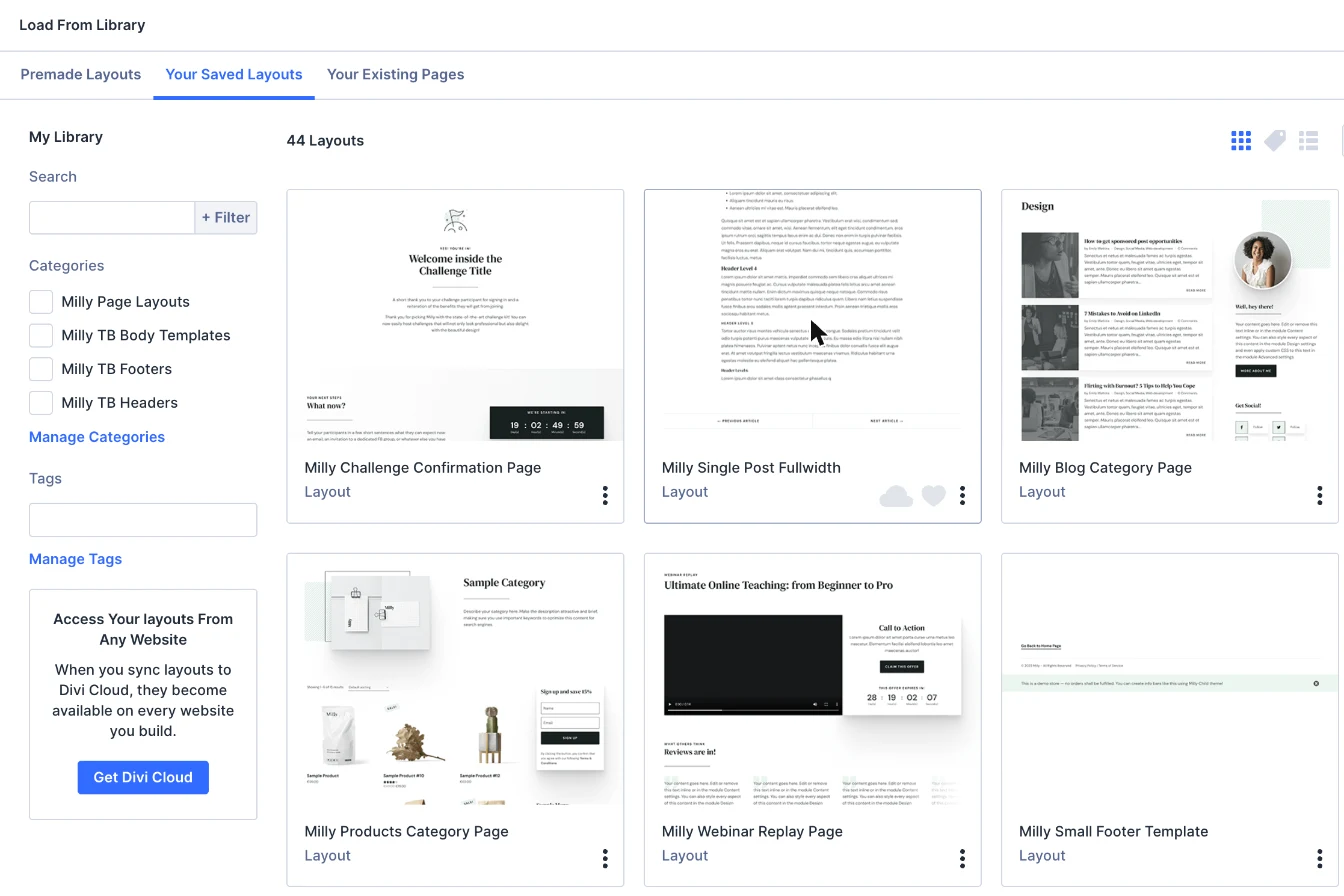
Every Milly page, template and section is saved in your Divi Library, with a preview image for each layout:
- Page layouts – all 31 demo pages, so you can delete pages you don’t need and load a layout again later.
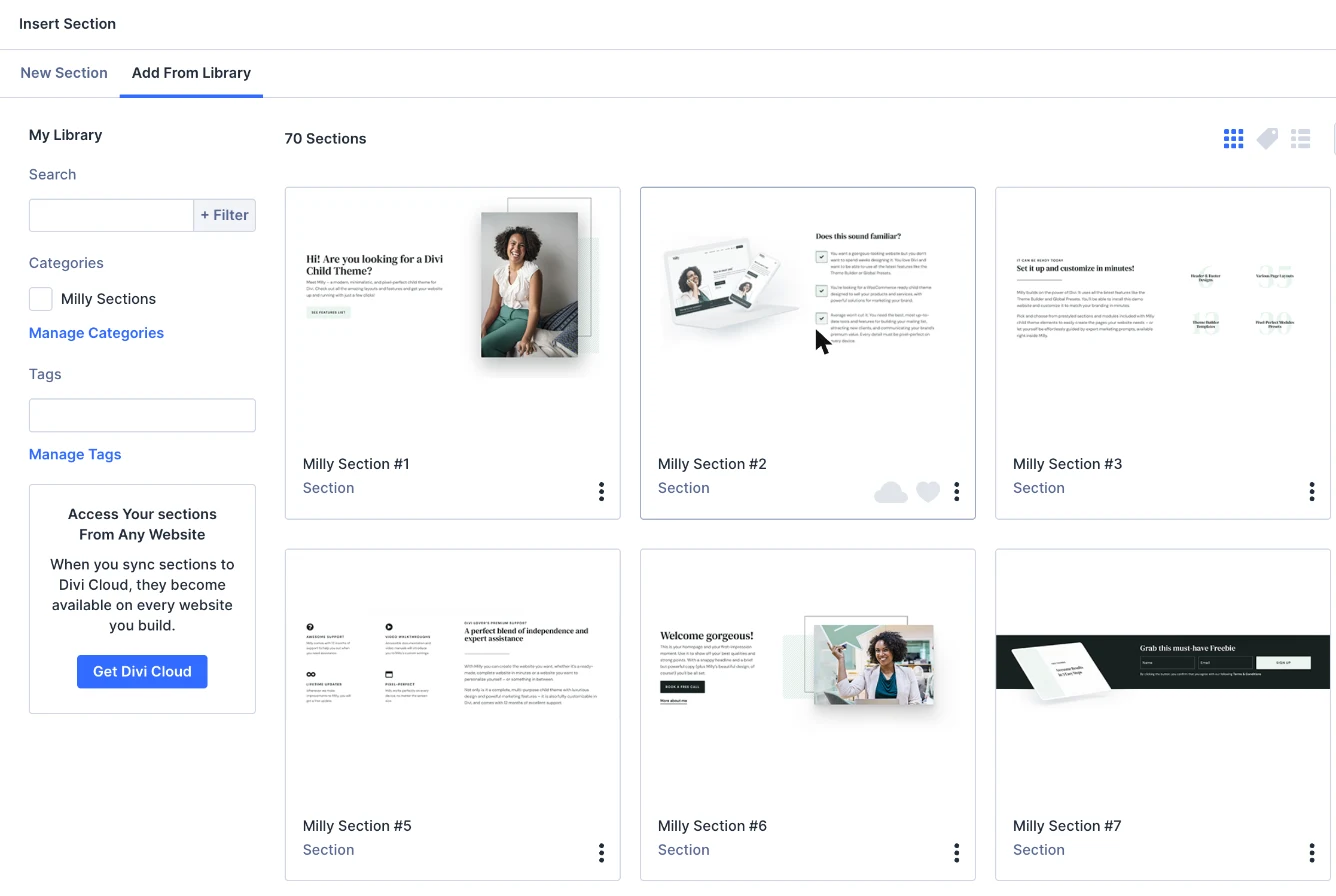
- Sections – 70 sections, including sliders, popups and a promo bar, to mix and match on your own pages.
- Theme Builder headers, footers and body templates – for building new templates.
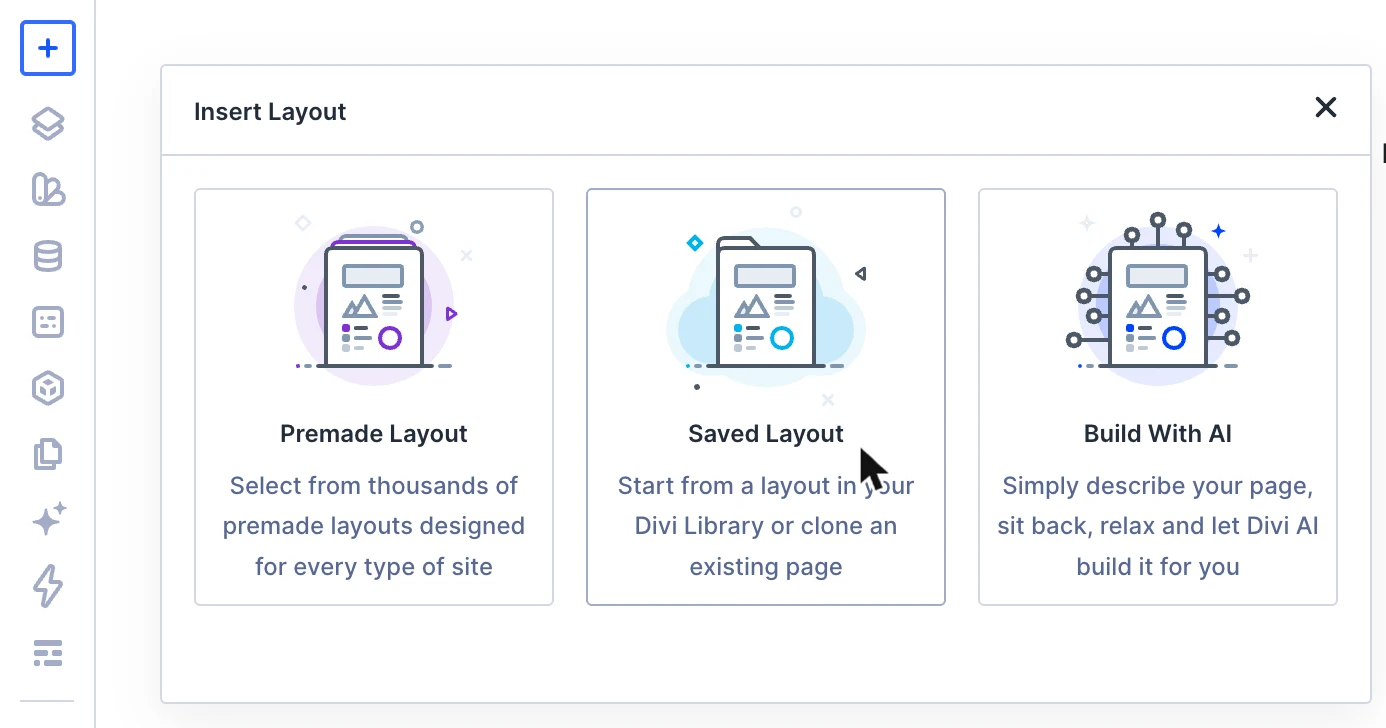
To add a full page, click the + icon at the top of the Builder’s left toolbar, choose Saved Layout and pick a layout in the Your Saved Layouts tab. To add a single section, click the blue + button below any section and open the Add From Library tab.
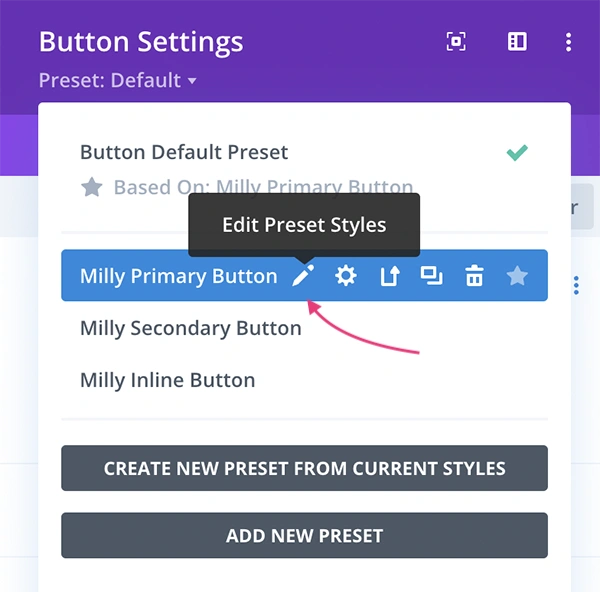
Every module in the demo uses Divi’s global Presets, so new modules you add pick up the same styling automatically. Some modules, such as buttons and blurbs, have several presets – pick the one you need when you add the module. Editing a preset changes every module that uses it, across the whole website.
Popups and Canvases
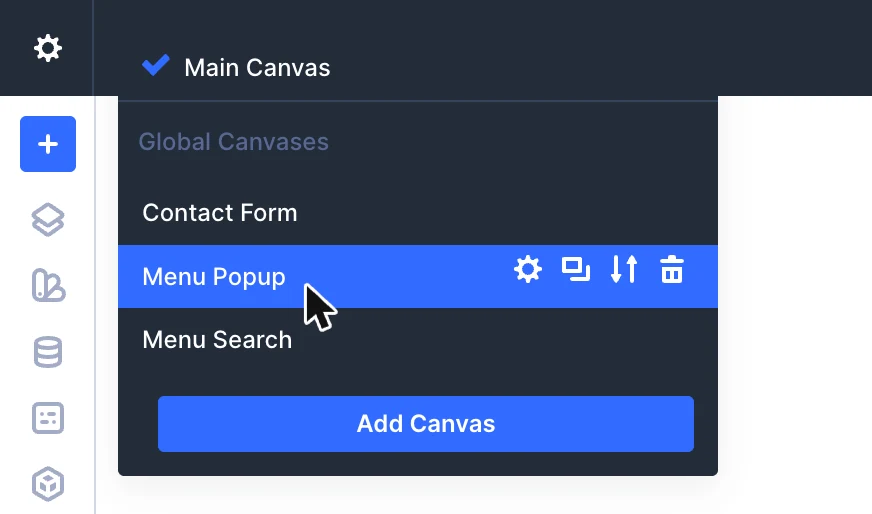
Milly’s popups – the menu search and menu popup, newsletter sign-up, contact form, video overlays and the service details on the Services page – are built with Divi 5’s Canvases and Interactions. Each popup is a section on its own canvas, and the button or icon that opens it has an Interaction that shows that section.
To edit a popup, open the page in the Divi Builder and switch to its canvas in the canvas menu at the top left of the Builder (it shows Main Canvas by default). The menu popups are Global Canvases, shared by every page.
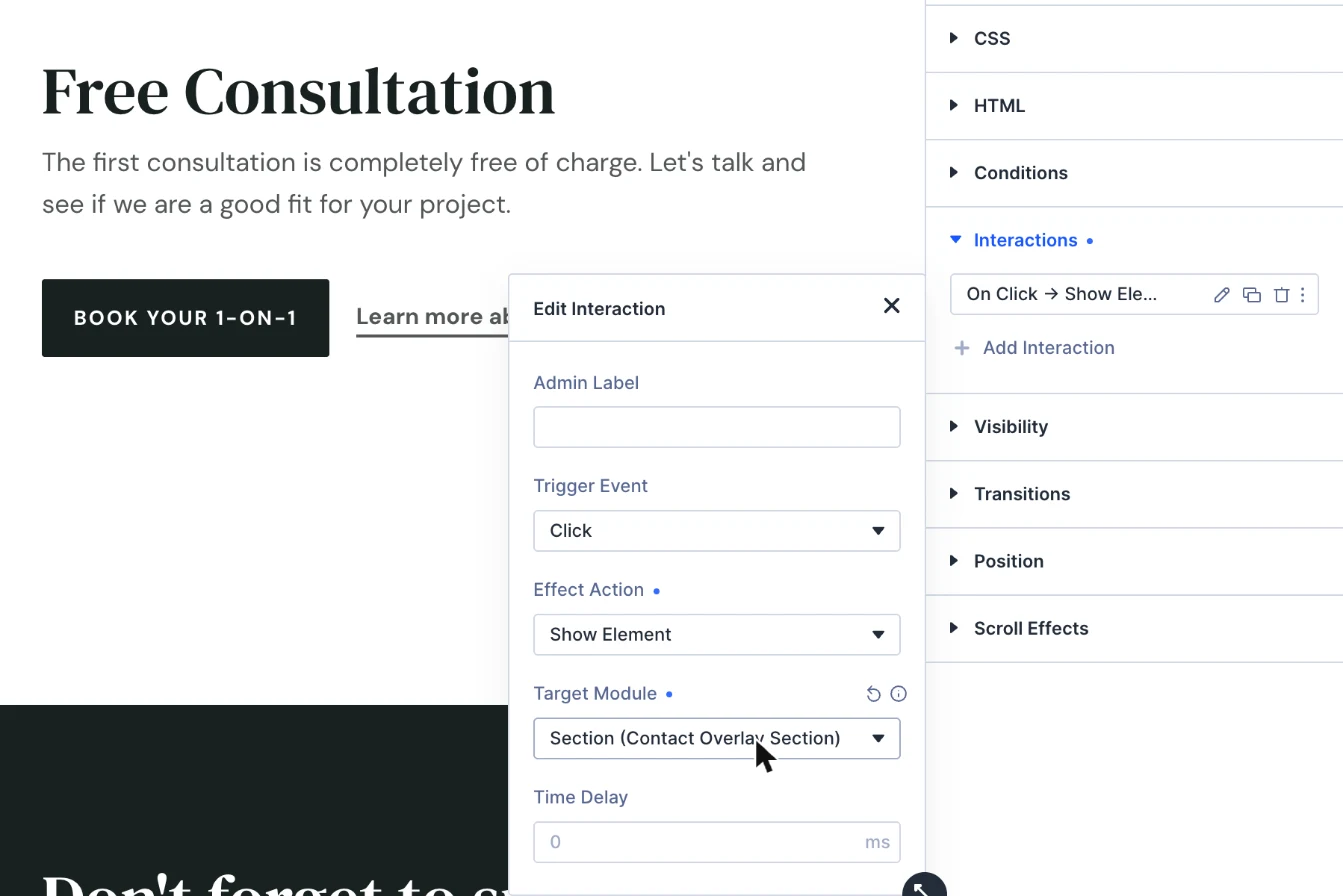
To open a popup from another element, select that element and go to Advanced ➞ Interactions ➞ Add Interaction. Set Trigger Event to Click, Effect Action to Show Element and Target Module to the popup’s section. For all trigger and effect options, see Interactions in Divi 5 in the Elegant Themes docs.
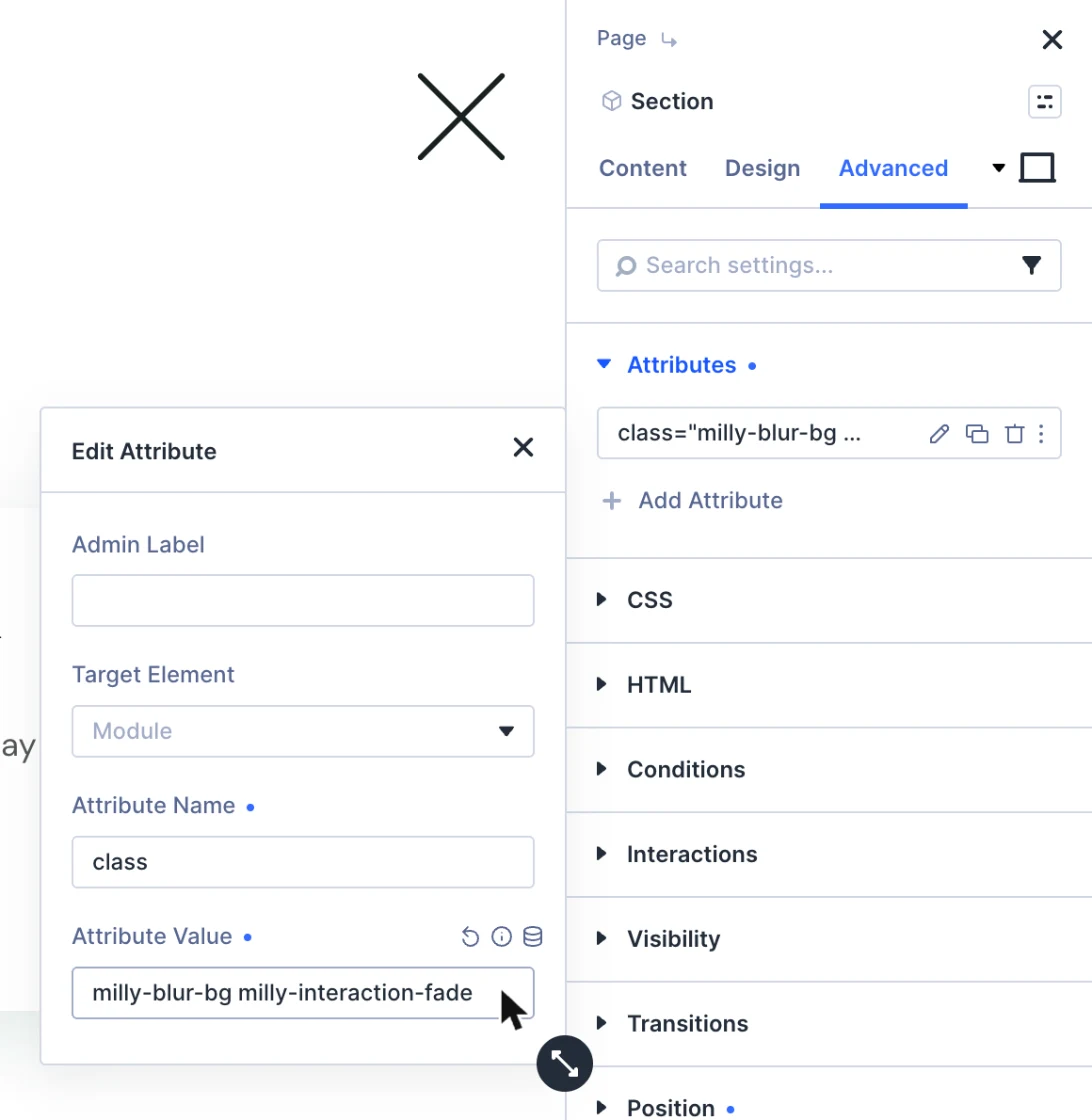
The CSS class milly-interaction-fade on the popup section makes the popup fade out when it closes (in Divi 5, classes are set in Advanced ➞ Attributes as the class attribute). How the popup appears is set in the section’s Design ➞ Animation settings. Add the same class to your own popups to get the same fade-out.
Sliders and carousels
Milly’s sliders work with one CSS class: add milly-carousel to a Section, Row, Column or Group. The elements directly inside become the slides – Rows in a Section, Columns in a Row, modules in a Column or Group. The slide widths you set in the Builder decide how many slides are visible on each device.
To change how a slider behaves, open its Advanced ➞ Attributes settings, add an attribute named data-milly-slider and list the options you need, separated by semicolons, for example wrapAround: true; autoPlay: 4000:
- autoPlay: 4000 – plays the slides automatically; the number is the time per slide in milliseconds.
- wrapAround: true – loops endlessly, so the first slide follows the last one.
- pageDots: true – shows page dots below the slider.
- dotsLeft: true – page dots aligned left instead of centered.
- prevNextButtons: false – hides the arrows.
- fadeEdges: true – a soft fade next to the arrows.
- adaptiveHeight: true – the slider height follows the current slide.
- freeScroll: false – the slider snaps to each slide instead of scrolling freely.
- hoverDim: true – the other slides fade back while one is hovered.
- ticker: 0.5 – a continuous scroll; the number sets the speed.
Milly’s sliders are built on Flickity, so its other options work too.
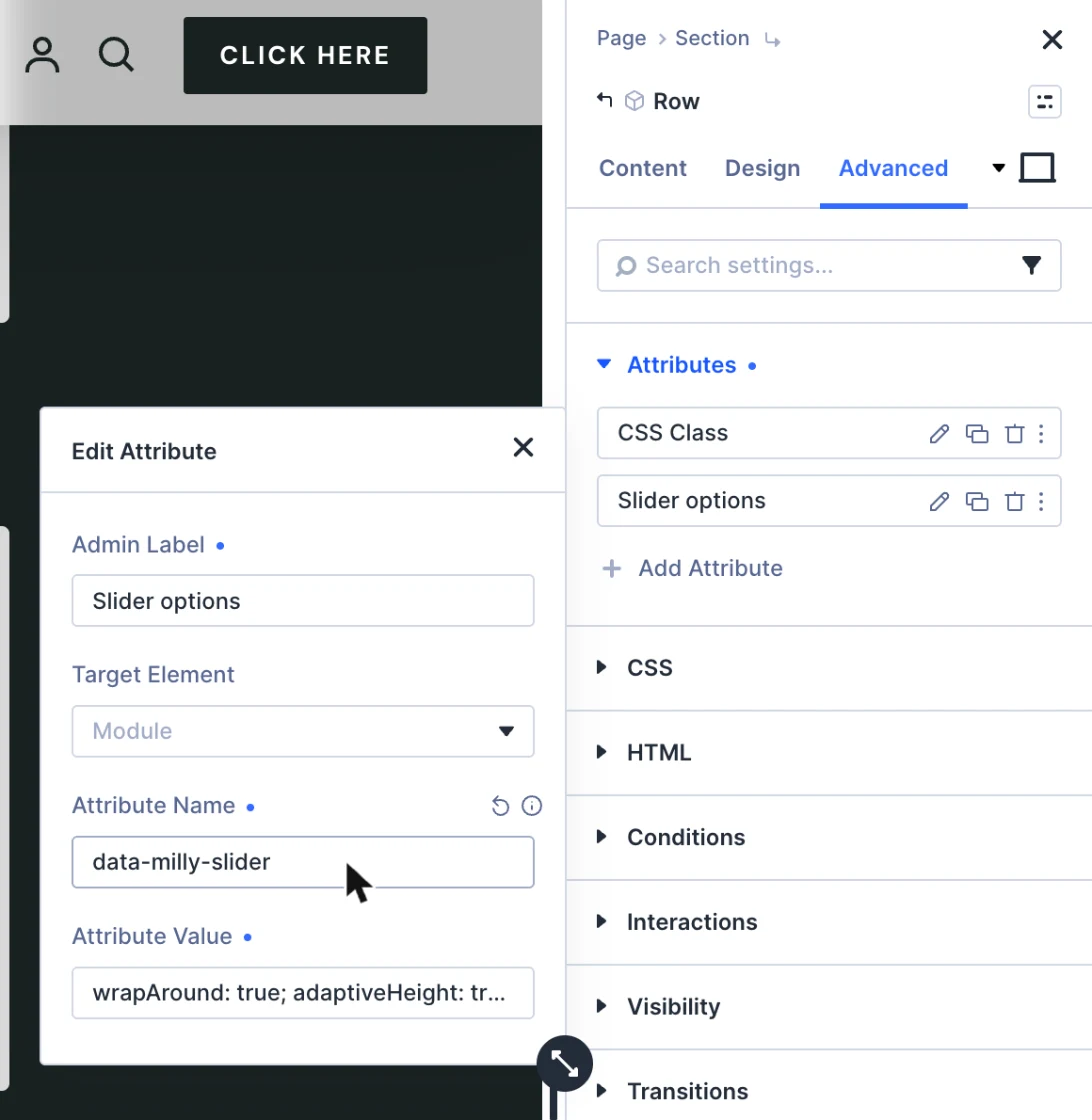
Two ready-made sliders have their own classes: milly-testimonial-slider on a single-column Row of Testimonial modules, and milly-shop-slider on a Woo Products module. The sliders need the Enable Carousels and Sliders option, which is on by default (see below).
Preloader and Theme Options
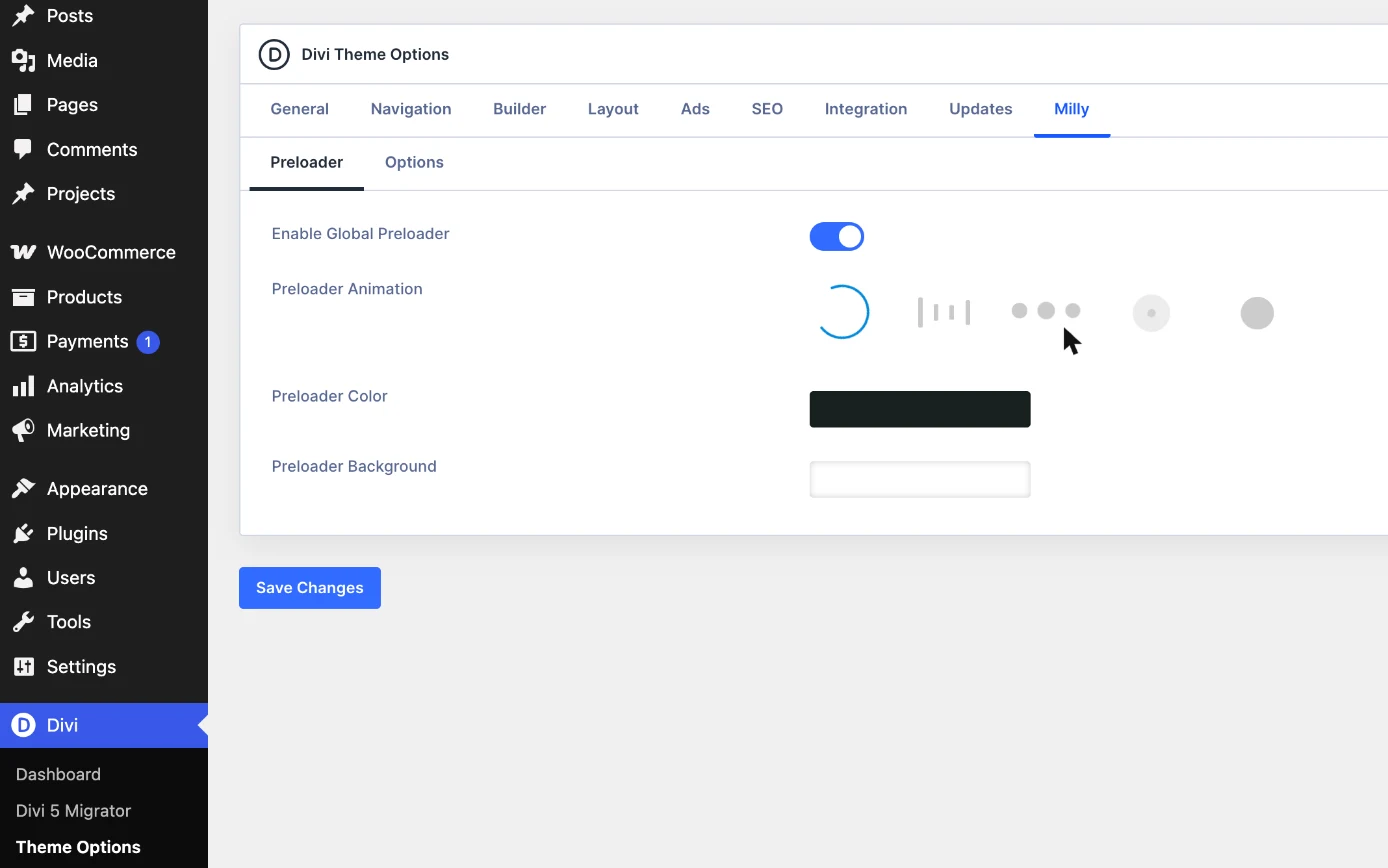
Milly’s settings are under Divi ➞ Theme Options ➞ Milly, in two sub-tabs.
Preloader
- Enable Global Preloader – shows a preloader while the page content is loading.
- Preloader Animation – choose the animated element.
- Preloader Color – choose the color of the animated element.
- Preloader Background – choose the color of the preloader background.
Options
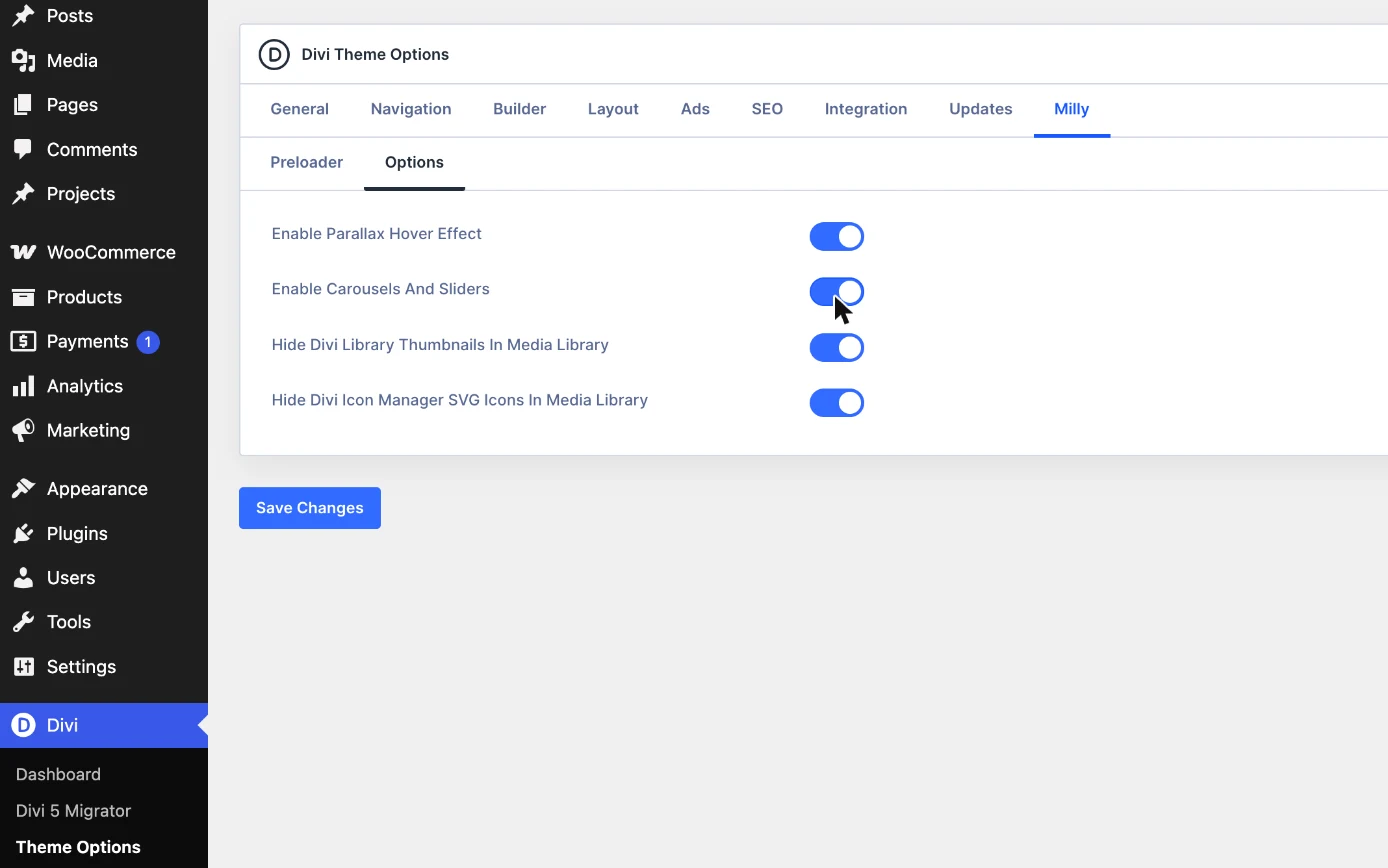
- Enable Parallax Hover Effect – a mouse-aware parallax effect on modules inside an element with the CSS class milly-parallax.
- Enable Carousels and Sliders – loads the slider scripts. Turn it off if you don’t use Milly sliders.
- Hide Divi Library Thumbnails in Media Library – every saved layout has a preview image; this keeps them out of your Media Library so your own uploads are easy to find.
- Hide Divi Icon Manager SVG Icons in Media Library – hides the SVG icons uploaded in the Icon Manager. Don’t delete these files: the icons are loaded from them.
Useful CSS classes
A few CSS classes you can use in your own layouts:
- milly-shadow – adds a soft, multi-layered shadow to any element.
- milly-scroll-icon – a looping up-and-down animation, used on the scroll-down icon.
- milly-shake – a looping shake animation, used on the “hot” label in the promo bar.
- milly-menu-icons and milly-cta-menu – used in the headers: the group of menu icons (cart, account, search) and the menu button are copied into the mobile menu automatically.
Already have a Milly website on Divi 4? This guide shows you how to update Milly to version 2.0 and move your website to Divi 5 safely, step by step. Your existing design stays the same after the update.
Before you start
If your Milly website still runs on Divi 4, you don’t have to migrate right away. Divi 4 keeps receiving security and bug-fix updates for at least 12 months after the official Divi 5 release (February 26, 2026), so staying on Divi 4 a little longer is a safe, valid choice – especially if your site relies on third-party Divi modules or plugins that aren’t Divi 5 compatible yet.
When you’re ready to switch, the move is handled automatically by Divi’s built-in Divi 5 Migrator: it converts your Divi 4 content to the new Divi 5 format and keeps anything that isn’t supported yet running exactly as before, through a backward-compatibility mode. You don’t need to rebuild any pages by hand.
Prefer to stay on Divi 4 for now? There’s nothing you need to do – see Using Divi 4 for how your current setup keeps working.
Back up your website and use a staging site
Before migrating, back up your entire website – the database, the uploads folder, and your theme and plugin files. Most hosting providers offer one-click backups; if yours doesn’t, a backup plugin works just as well.
We also recommend running the migration on a staging copy of your site first, rather than directly on your live website. If your host offers one-click staging, use that. Once everything looks right on staging, repeat the same steps on your live site.
Updating Milly to version 2.0
Milly 2.0 is the Divi 5-ready version of the child theme. It includes the Divi 4 version too, so your current site keeps working exactly as before after the update. Update it the same way you update any WordPress theme:
Automatic update (if your license is active)
Go to Dashboard ➞ Updates. If Milly 2.0 is available, you’ll see it listed under Themes – check it and click Update Themes.
Manual update
You can also download the latest milly-2.0.zip from your account and upload it from Appearance ➞ Themes ➞ Add Theme ➞ Upload Theme, the same way you installed Milly the first time.
Updating the child theme only replaces its files – your pages, content, Theme Builder templates and Milly Theme Options stay exactly as they are.
Activating your license
Milly 2.0 uses license keys instead of the old API keys. Go to Divi ➞ Milly License, paste your license key and activate it. You’ll find your key in your account, in the Licenses tab. Once it’s active, future Milly updates appear in your WordPress dashboard.
Bought Milly on the Elegant Themes Marketplace? Skip this step – your updates come through your Elegant Themes API key in Divi Theme Options instead.
Migrating your website to Divi 5
Once Milly is updated and your backup is in place, you’re ready to move the website itself to Divi 5. This part is handled by Divi’s built-in Migrator and takes just a few clicks.
Step 1: Switch to the Divi 5 update path
Go to Divi ➞ Dashboard and click Enable Divi 5 Updates in the Upgrade to Divi 5 card.
Step 2: Update Divi
Go to Dashboard ➞ Updates, select Divi, and click Update Themes. This installs Divi 5 itself – your site still looks and works exactly as before at this point.
Step 3: Run the compatibility check
Go to Divi ➞ Divi 5 Migrator. It scans your pages, posts, Theme Builder templates, Divi Library items and widgets, and shows which ones are fully compatible with Divi 5 and which contain modules that will run in backward-compatibility mode. Note any items flagged with a warning, so you know what to check afterwards.
Step 4: Migrate
Click Migrate This Site to Divi 5, then Confirm. This usually takes a few seconds, up to a couple of minutes on larger sites. When it’s done, you’ll see a confirmation card – your site is now running on Divi 5.
What changes and what stays the same
Your design doesn’t change. The migration converts how Divi stores your content behind the scenes, not how your website looks. Milly 2.0 includes fixes for migrated Milly sites – module alignment, borders, blurbs, testimonials, the blog grid, social icons, popups and parallax – so your pages keep looking the way they did on Divi 4.
- Your Milly Theme Options, popup overlays, sliders and CSS classes keep working as before.
- Any page that still uses a module Divi 5 doesn’t support yet keeps working through a backward-compatibility layer, so you may see a small Backward Compatibility Mode Enabled notice on the front end. This is expected and not an error.
- You can keep editing your pages normally in the Divi Builder.
Migrating keeps your Divi 4 design – it doesn’t replace it with the new Milly 2.0 demo. The new demo, built natively for Divi 5, is meant for new websites: see Using Divi 5.
Checking your website after migration
Once the migration finishes, take a few minutes to check that everything looks right:
- Visit your most important pages on the front end and check the layout, popups and sliders.
- Open a few pages in the Divi Builder and confirm you can still edit sections, rows and modules as expected.
- Check your Theme Builder templates (header, footer, any custom templates) under Divi ➞ Theme Builder.
- If you use WooCommerce, spot-check your shop, product, cart and checkout pages.
- Test any third-party plugins you rely on.
If something looks off, it’s almost always caused by a plugin that isn’t Divi 5 compatible yet. Clearing your browser cache, the Divi cache, and any caching-plugin cache also resolves most builder glitches.
Not happy with the result? Right after migrating, you can click Restore Divi 4 Content on the Divi 5 Migrator page, then reinstall Divi 4. The longer you keep editing on Divi 5, the harder a clean rollback becomes, so it’s best to check everything soon after migrating.
This guide is for Milly websites that already run on Divi 4. If you’re starting a new website, we strongly recommend building it on Divi 5 instead. The latest Milly demo is designed specifically for Divi 5, with global variables for colors and fonts, plus native Flexbox and Grid layouts.
The Divi 4 version of Milly is a legacy version. It still works and you can upgrade to Divi 5 later, but layouts imported on Divi 4 keep their Divi 4 structure and won’t automatically gain the new Divi 5 features.
Starting a new website? Upgrade first: go to Divi → Dashboard, click Enable Divi 5 Updates, update Divi under Dashboard → Updates, then follow Using Divi 5. Already have a Milly website on Divi 4? See Migrating to Divi 5.
Getting started
In order to install this child theme, you must first purchase a membership to Elegant Themes and download the Divi Theme package. The Divi Theme is NOT included with this child theme.
Please note: Ensure you have the Divi Theme installed and activated prior to installing the Milly Child Theme. To avoid any issues during installation, it is highly recommended that you use this child theme on a fresh installation of WordPress.
Downloading and installing Milly
Step 1: Download the child theme
After purchase, download the Milly.zip file from your account or from the Elegant Themes Marketplace, depending on where you made the purchase.
Step 2: Install the Divi Theme (if not installed yet)
Log in to your WordPress website and go to Appearance ➞ Themes. Upload and activate the Divi parent theme, then click Add New Theme.
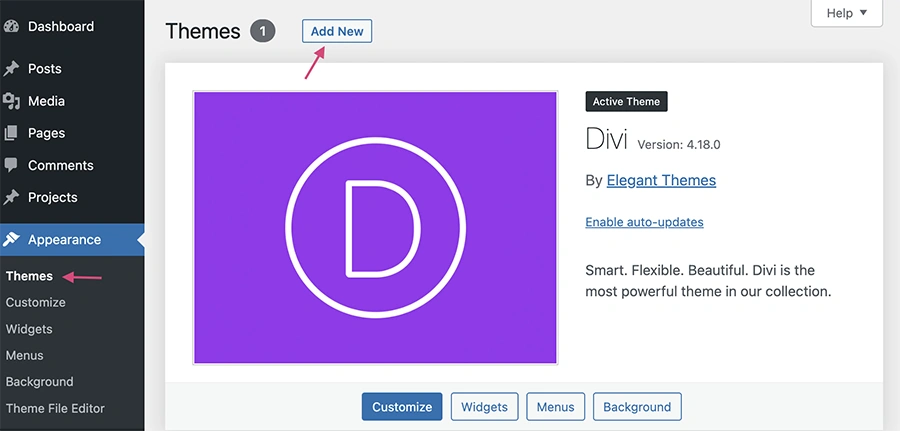
Step 3: Upload and install Milly
Click Upload Theme and then Choose file. Locate the Milly.zip file on your computer, then click the Install Now button.
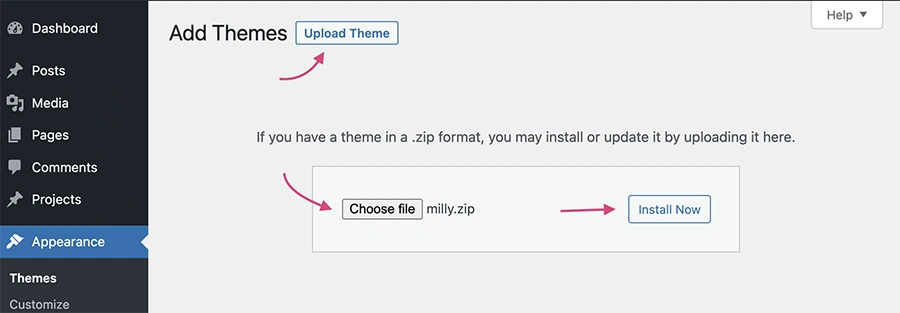
Step 4: Activate the child theme
After completing the upload, activate the theme by clicking the Activate button.
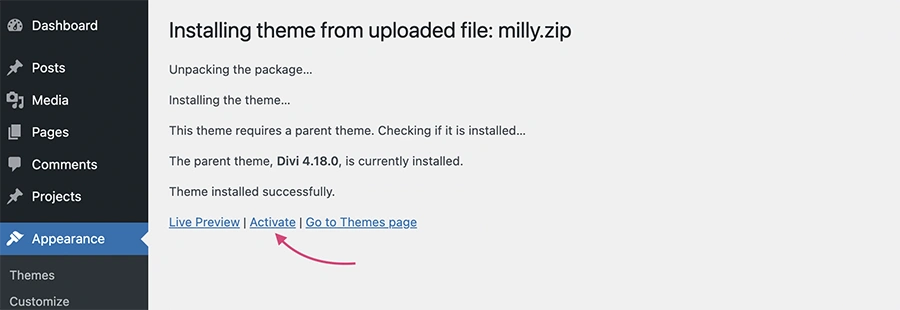
License activation
Bought Milly on the Elegant Themes Marketplace? Skip this step. Your child theme updates come through your Elegant Themes account, as long as your Elegant Themes API key is active in Divi Theme Options.
If you bought Milly on divilover.com, activate your license to receive automatic child theme updates and to import the demo. Go to Divi ➞ Milly License, paste your license key and activate it.
You’ll find your license key in your account, in the Licenses tab. Once the license is active, Milly updates will appear in your WordPress dashboard.
Importing demo content
Step 1: Back up your site
Imports work best on a fresh installation of WordPress with the Divi Theme installed. It is always recommended that you verify that you have a good backup prior to importing new content.
Step 2: Choose demo import options
Go to the Milly ➞ Demo Import dashboard panel. You’ll see the list of all elements ready to import, including: Posts (blog posts, pages, projects, products, Divi Theme Builder templates and Divi Library layouts), Media files, Menus, Home and Posts Page settings, Divi Theme Options and WP Options (which include the custom permalink structure). You can also choose whether to install and activate the WooCommerce plugin.
For non-experienced users, we recommend keeping all elements selected.
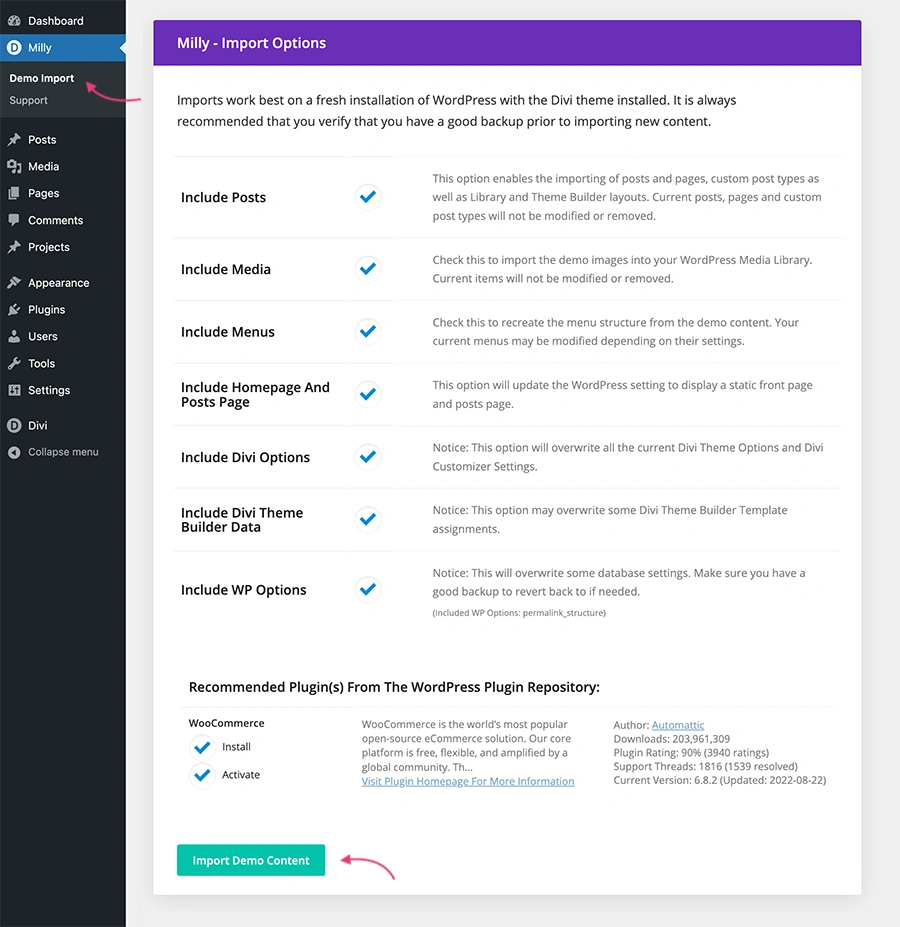
Step 3: Import the Milly demo
Click the Import Demo Content button. The import may take several minutes, depending on your internet connection speed. You’ll see a progress bar with detailed information about the current import status – please wait for the import to finish.
Optional: Remove importer files
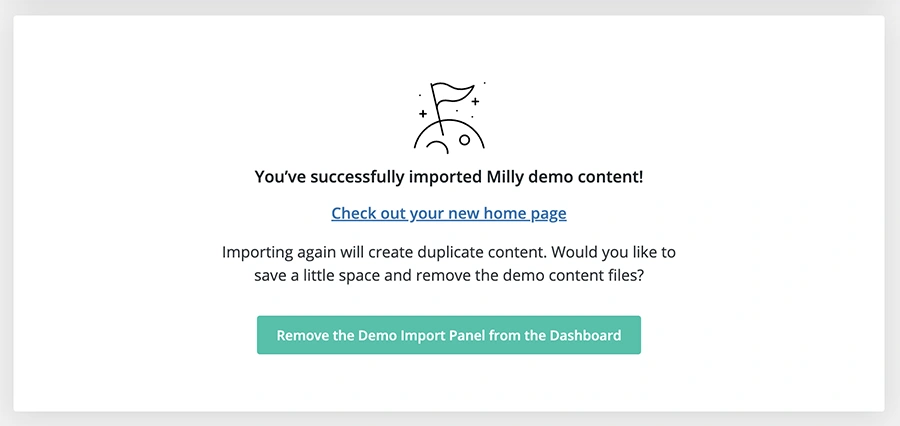
Once the import is completed, you can delete the importer files and remove the import functionality from the Dashboard by clicking the Remove the Demo Import Panel from the Dashboard button.
Theme Builder templates
Step 1: Check Theme Builder templates
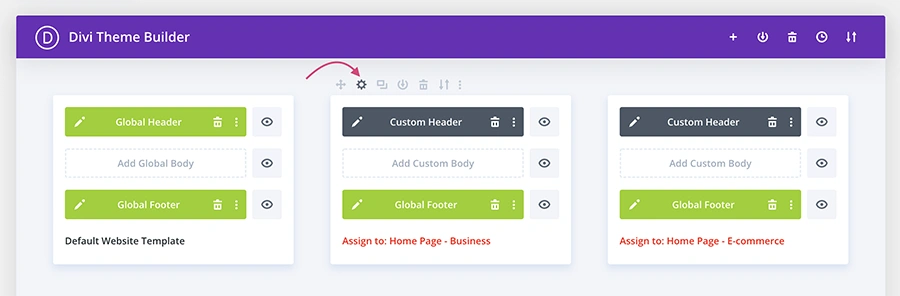
The Milly Child Theme includes 13 Theme Builder templates. Depending on your setup, some of the template assignments used on the Demo page may not transfer automatically. Go to Divi ➞ Theme Builder to check the template structure. You can choose which header and footer template you want to use as global (Default Website Template), and what pages should use different header and footer templates.
Step 2: Manage template assignments
Templates marked with the red font are Unassigned, which means they are not used on any page. You can manage template assignments using the Template Settings panel.
Milly Theme Options
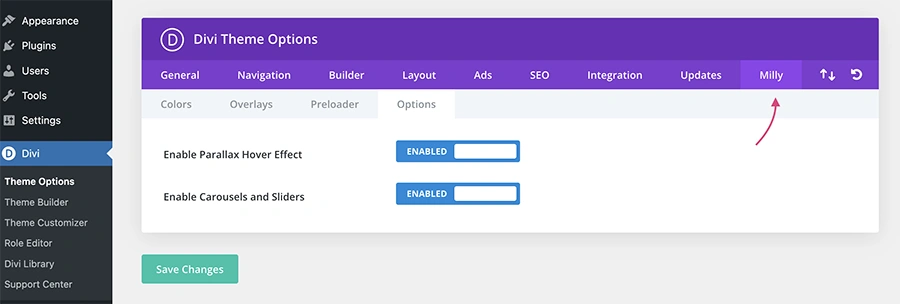
The Milly Child Theme features extensive customization options, which you can access in the Divi ➞ Theme Options ➞ Milly tab. Its settings are split into four sub-tabs:
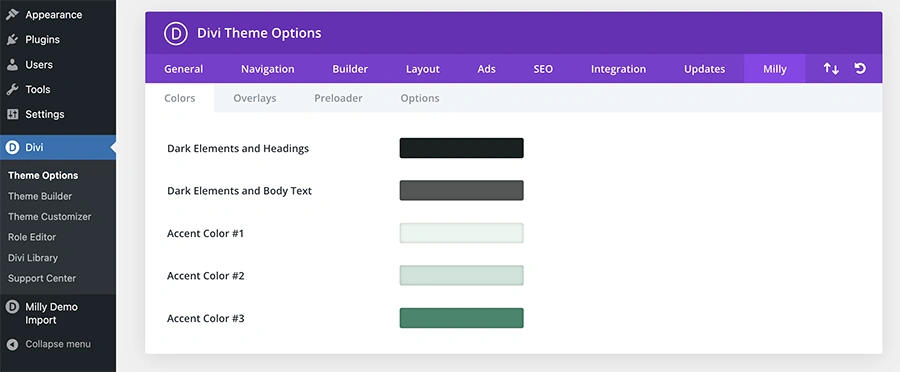
Tab 1: Colors
Change the color palette of all elements across every page on the website. You can set five different colors:
- Dark Elements and Headings – used mainly for heading text, CTA backgrounds and dark decorative elements.
- Dark Elements and Body Text – used mainly for body text and dark overlays.
- Accent Color #1 – the main accent color used across the site. We recommend using a light color value.
- Accent Color #2 – a secondary, complementary accent color. We recommend using a color slightly darker than Accent #1.
- Accent Color #3 – used for accents and CTA elements.
After updating the global colors, you can further edit the color of any individual element using the Divi Builder.
Tab 2: Overlays
Choose the appearance and manage the behavior of Milly’s popup overlays – see Popup overlays below.
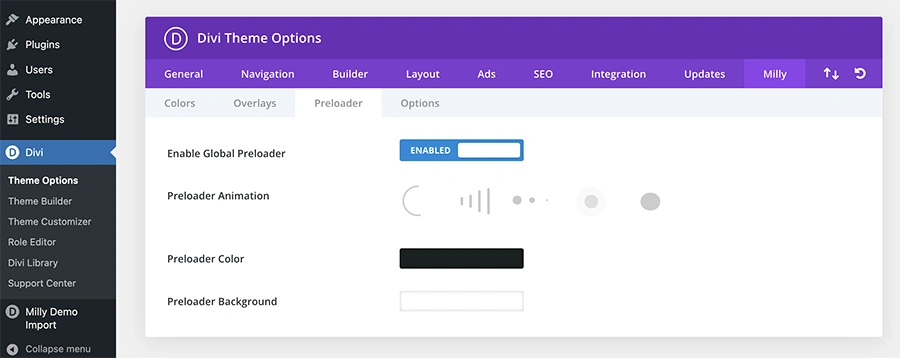
Tab 3: Preloader
Manage the global preloader:
- Enable Global Preloader – check this setting to show a preloader while the page content is loading.
- Preloader Animation – choose the animated element.
- Preloader Color – choose the color of the preloader icon.
- Preloader Background – choose the color of the preloader background.
Tab 4: Options
Turn off the scripts for the Parallax hover effect and for Milly’s sliders and carousels, if you don’t use them.
Popup overlays
Step 1: Manage overlay options
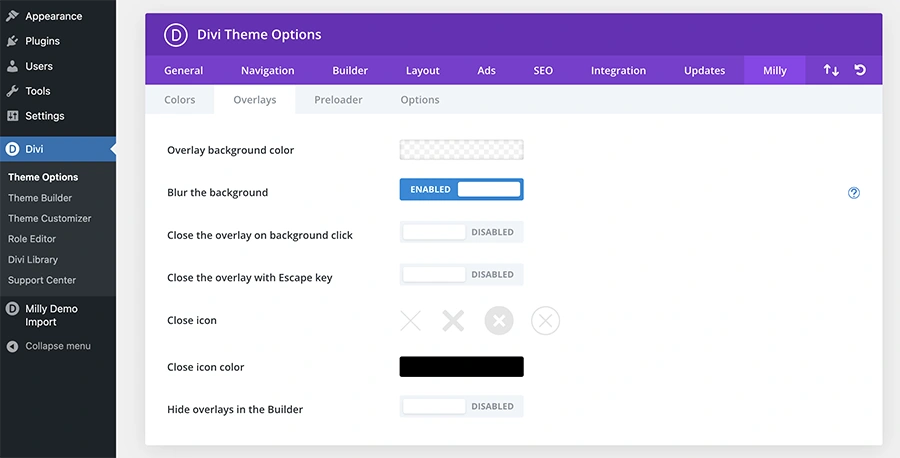
To customize the appearance and behavior of popup overlays, go to Divi ➞ Theme Options ➞ Milly ➞ Overlays. Available settings:
- Overlay background color – the color behind the popup section. You can change the background of each individual popup in its Section settings in the Divi Builder.
- Blur the background – blurs the background behind the overlay (limited browser support).
- Close the overlay on background click and Close the overlay with the Escape key.
- Close Icon and Close icon color – the default close icon. To use your own close button inside a popup, give an element (e.g. an Icon or a Button module) the CSS class milly-close.
- Hide overlays in the Builder – hides all overlays while you edit the page in the Visual Builder. To hide a single overlay, give it the CSS class builder-hidden. Hidden overlays are still accessible from the Wireframe view.
Step 2: Add a new overlay
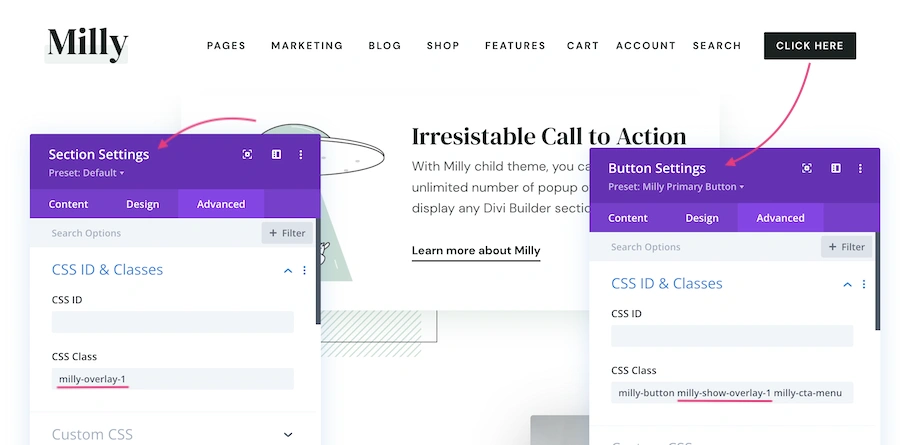
A popup needs two elements with matching CSS classes: a trigger and a popup section. Give the trigger element (e.g. a Button module) the CSS class milly-show-overlay-123, and the section that should appear in the popup the CSS class milly-overlay-123. Replace 123 with any number – it just has to be the same in both classes.
Typography
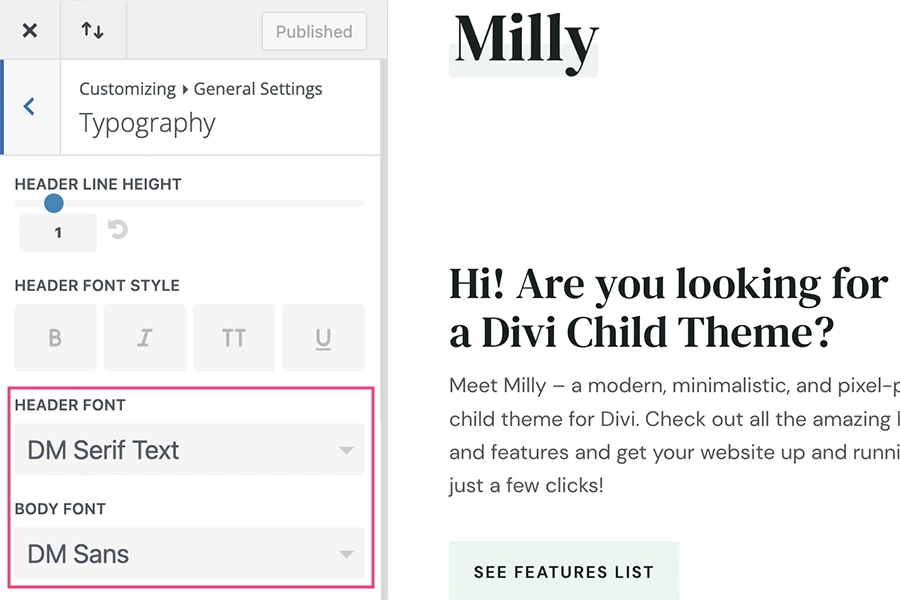
You can edit the default font used in the demo by going to Divi ➞ Theme Customizer ➞ General Settings ➞ Typography.
Sliders and carousels
Milly includes draggable sliders in six pre-styled types. Each one is turned on with a CSS class:
Logo slider

Slides automatically, with no arrows or dots. Add the CSS class milly-logo-slider to the Column or Row settings, and place all Image modules in the same Column.
Testimonial slider
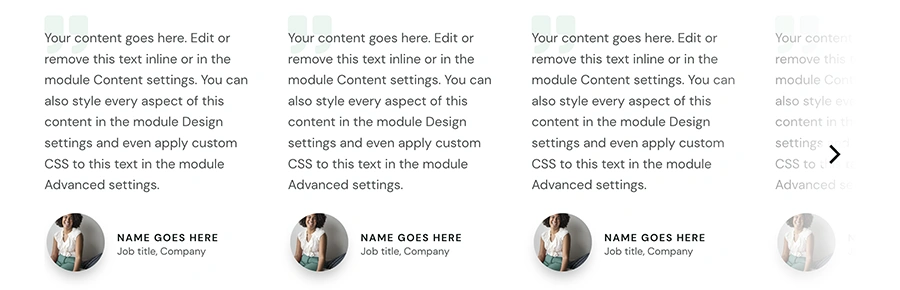
Arrow navigation with a gradient background. Use a single-column Row and add the CSS class milly-testimonial-slider to the Row settings.
Mini slider
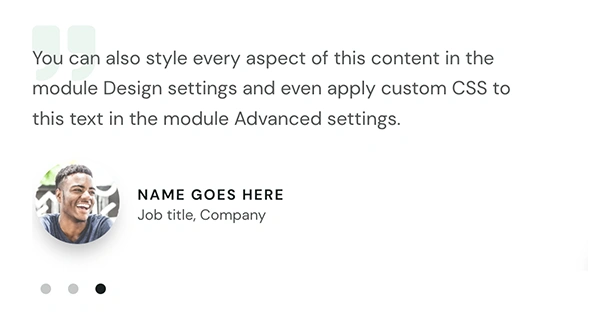
Dot navigation, and you can use any module inside. Add the CSS class milly-mini-slider to the Column settings and set each module’s width to 100%.
Shop slider
Add the CSS class milly-shop-slider to a Woo Products module to turn the product list into a carousel with arrow navigation.
Row slider and row inline slider
Add milly-row-slider to a Section to turn each Row inside it into a slide, shown one at a time with arrow navigation. With milly-row-inline-slider, the Row widths you set in the Builder decide how many slides are visible, for a carousel of cards.
Divi Library and Global Presets
Page layouts and Theme Builder templates
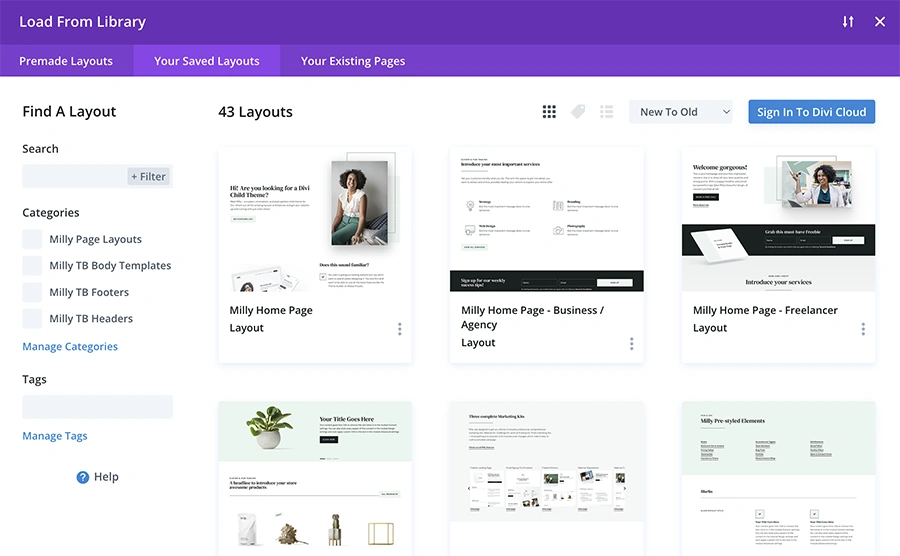
Every Milly demo page is saved in the Divi Library, with a featured image so you can preview each layout when loading it in the Builder. You’ll find these categories:
- Page Layouts – every Milly demo page, so you can safely delete unwanted pages and load a layout again when creating a new page.
- TB Body Templates – Theme Builder body templates used on archives and pages with dynamic content, such as single posts and products.
- TB Headers and TB Footers – every Milly header and footer design, for building new Theme Builder templates.
Section layouts
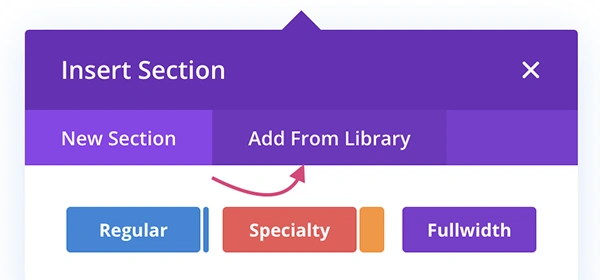
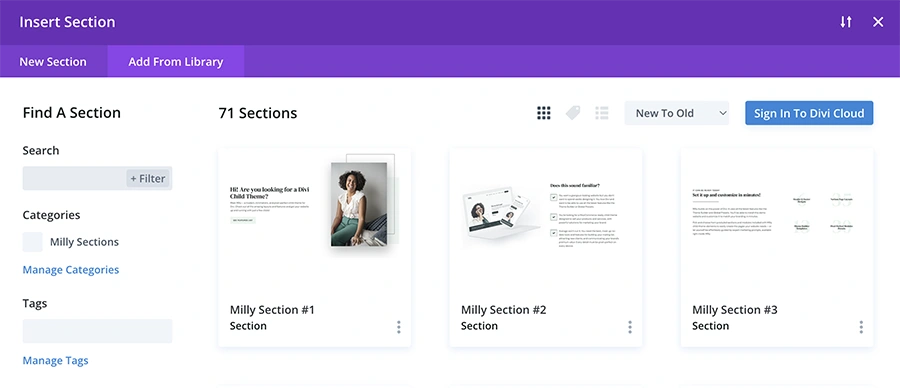
Milly comes with 70 section layouts. When adding a new section in the Builder, choose the Add From Library tab and select a pre-styled demo section.
Icons
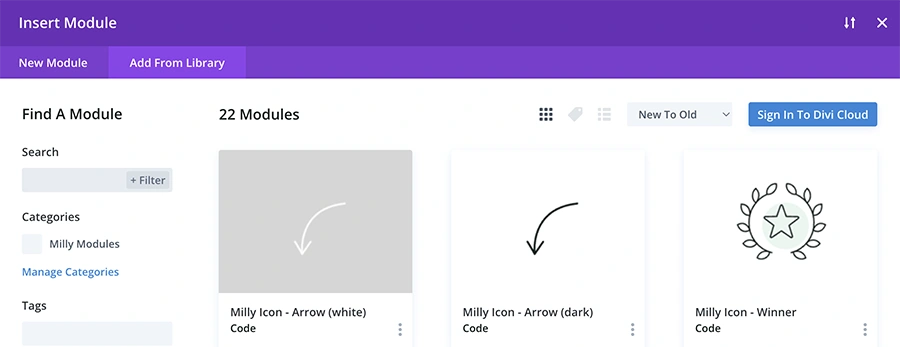
Milly’s custom SVG icons are saved in the Divi Library as Code modules. Choose Add From Library when adding a new module to insert one. To add a hover effect, give one of the parent elements (the Code module itself, Column, Row or Section) the CSS class milly-ico-hover – yes, ico, not icon.
Global Presets
Every other module uses Global Presets, so it’s already styled as on the Milly demo and there’s no need to load it from the Library. Some modules, e.g. Buttons and Blurbs, have several design variations, each saved as a separate Preset – choose one when adding the module.
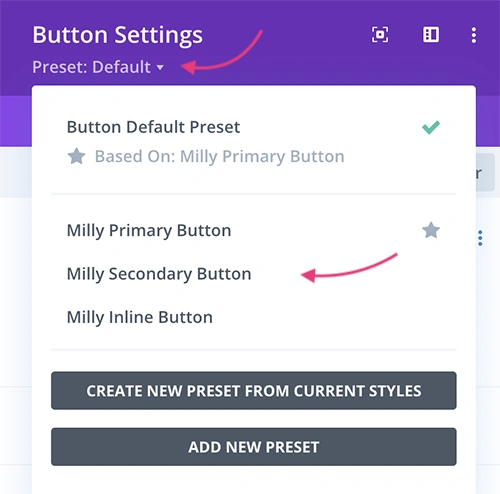
You can edit the Design settings inside every Preset, but keep in mind that updating a preset changes all modules that use it, across the entire website.
Menu icons and CSS classes
Menu icons
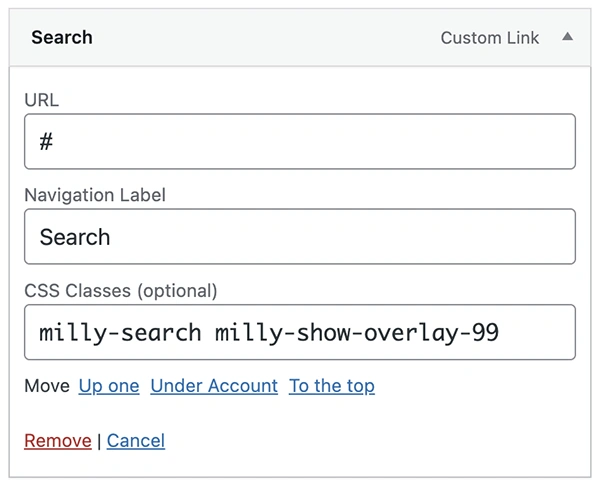
Milly’s default menu includes three icons. To turn a menu link into an icon, go to Appearance ➞ Menus and add one of these CSS classes to the menu item: milly-cart, milly-account or milly-search.
The search icon on the demo also opens a popup overlay, so it uses two CSS classes: one for the icon and one for the overlay. The search overlay section is in the Global Footer template in the Theme Builder.
Useful CSS classes
- milly-shadow – adds a multi-layered shadow to any element.
- milly-scroll-icon – a looping animation, used on the scroll-down icon.
- milly-shake – a looping shake animation, used on the “hot” label in the promo bar.
- milly-close-this-section – clicking an element with this class hides its parent Section, like the close icon in the promo bar.
- milly-content-center and milly-content-bottom – add to a Column to align its modules vertically in the center or at the bottom. Enable Equalize Column Heights in the Row’s Design tab.
- milly-reverse-columns-mobile and milly-reverse-columns-phone – add to a Row to reverse the order of its columns on tablets and phones, or on phones only.
- milly-keep-tablet-col and milly-keep-phone-col – add to a 2-column Row to keep both columns side by side on tablets or phones.
- milly-inline-module – add to modules to display them inline, next to each other, when there’s enough space.